

Well, the excitement is escalating, let me tell you. I'm happy to say that both my Inamorata Prognostication Engine and my Ultra-Macho Prognostication Engine projects are currently racing "full steam ahead."
Having made the final selections on exactly which antique analog meters I intend to use for the Inamorata Prognostication Engine, I assembled all of the meters, buttons, switches, and knobs onto the brass panels and brass bezels as seen below. You may recall that the main enclosure for this engine is to be an antique wooden radio cabinet circa 1929. What we see here is a test jig that will hold everything in place while I create the wiring harness and make sure everything works as planned.
Note that the interestingly-shaped piece of wood in front of the lower brass panel is just hardboard that I cut out for this jig -- the equivalent piece on the real cabinet is dark cherry that looks much nicer and really complements the brass.
The two holes on either side of every momentary push button and toggle switch will each have a tri-colored LED behind it (I'm using the Flora NeoPixels from Adafruit for this purpose). Similarly, the sixteen holes surrounding each of the potentiometers will each have its own tri-colored LED (in this case I'm using NeoPixel Rings).
In front of each of these LEDs will be a mother-of-pearl "dot." Actually, these are plastic facsimiles that were originally intended to be used in the frets for guitars, but they look like the real thing. When this all comes together, the combination of the dark wood, the brass, and the mother-of-pearl dots will look incredible, even when the beast is powered down.
I will be attaching the LEDs this coming weekend so that I can begin to wire everything up, but I will wait to insert the mother-of-pearl dots until after I've aged the brass panels.
One of the things that have been delaying this project is the problems I've been having with my antique analog meters. This started with the main meter for the Ultra-Macho Prognostication Engine (see this blog), but then I discovered that some of my other meters were also sticking (sad face).
This left me in something of a quandary. Fortunately, a feedback on the aforementioned article led me to Instrument Meter Specialties (IMS) -- a company that specializes in anything and everything to do with both antique and modern meters, including repairing and restoring the little beauties (see this blog and this one too).
Quite apart from anything else, these folks often create new faceplates for bold old and new meters. For the last week I've been bouncing ideas back and forth with Jason Dueck at IMS. This past weekend he emailed me a copy of the proposed graphics for a new front plate for my "Full Moon" meter as shown below.
You wouldn’t believe how much cogitation goes into this sort of thing -- it's not just a case of creating each meter in isolation -- you have to think about how all of them are going to look in relation to each other. I could write an entire column about the thought that went into creating the above layout, but we'll leave that for another day.
In the meantime, I do have a question for you with regard to the above image. Note the negative numbers on the left are (not surprisingly) prefixed by '-' signs. By comparison, the positive number on the right doesn't have a '+' sign. Jason informs me that, in this sort of situation -- mixing negative and positive quantities -- omitting '+’ signs was the old pre-WWII way of doing things. These days I think people do tend to use them (only if there’s a mix of negative and positive quantities; if everything is positive then we wouldn’t bother with '+' signs). So, in the case of the faceplate shown above, which do you prefer; should we add the '+' sign or should we leave everything as is?
As I mentioned in a previous blog, I was dreading having to open my meters up once again to replace the faceplates (every time you open one of these sealed units, you run the risk of messing something up). So I can’t tell you how happy I am that Jason and team have offered to take this task over. This evening I'm going to take the meters off the test jig and ship them to IMS where they will be cleaned and fine-tuned, have their faceplates swapped out, and be fully checked before being returned to your truly (happy face).
But wait, there's more, because I've been performing further experiments with regard to giving my brass panels an aged look...
Yet more brass-aging experiments
Do you remember my earlier trials using Cow Pool & Horse Doo-Doo? Well, suffice it to say that working with these substances is not as much fun as it sounds, so I decided to investigate more conventional techniques.
When you perform a Google search for "Aging Brass" on the Internet, the responses can be wide and varied, but several people mention using salt and/or vinegar. In the case of the vinegar, I decided to use the English malt variety. Why? Well, for one thing I like the taste of malt vinegar. With regard to salt, I opted for using large Himalayan pink rock salt because I happened to have a jar to hand and I thought the minerals in it might enhance the effect.
I obtained a load of cheap plastic containers and put a piece of brass in each. In one, I covered the brass with malt vinegar on its own. In another, I covered the brass with tap water and then I added some coarsely crushed rock salt on top. And in a third, I covered the brass with vinegar and then added crushed rock salt on top.
I did all of this about ten days ago. After seven days I took a look to see what was happening. The answer was "Not much" (I'll check again at the 14-day mark). Fortunately, a few weeks ago I laid my hands on a copy of Patina: 300+ coloration effects for Jewelers and Metalsmiths by Matthew Runfola, and I remembered him mentioning that some interesting effects could be obtained using sawdust.
The last time I visited my master carpenter chum, Bob, I asked him to give me some sawdust, and I returned home clutching two bags -- one containing fine sawdust of one type of wood and the other containing medium-coarse shavings of another type of wood.
Thus it was that, at the same time as I set up the experiments using the salt and vinegar solutions directly, I also set up a second batch of experiments using identical solutions (except I ground the salt up finer and made sure it was fully dissolved) poured into containers of sawdust.
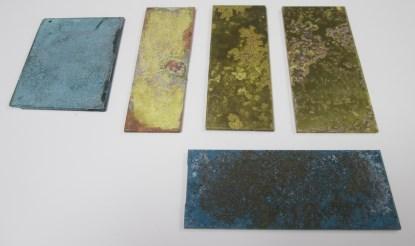
Oh, I forgot to mention that I also added an experiment using ammonia and another experiment using a different substance. Take a look at the image below. The blue/green brass test piece in the upper left-hand corner was exposed to the gas emitted from household ammonia for three days. I actually used a small sheet of old fired clay to keep the brass out of direct contact with the ammonia liquid. What we see below is the upper face that was exposed to the vapor only.

To the right to the ammonia test we see the results of the brass that was left in a salt and vinegar mixture in fine sawdust for a week. To the right of this we see the results of salt water in coarse sawdust for a week. Finally, the right-most piece was exposed to malt vinegar in coarse sawdust for a week.
What? You desperately want to know about the substance that resulted in the blue piece of brass in the foreground. Well, let's just say that this predominantly consists of a heterocyclic compound of carbon, nitrogen, oxygen, and hydrogen with the formula C5H4N4O3. In turn, this largely started out as a fermentation of malted barley, malted wheat, and hops (in the form of Boddingtons finest beer), which -- by a miracle of evolutionary biology -- underwent a process of transmogrification, followed by an exchange of electrolytic fluids, ending up in a container of fine sawdust.
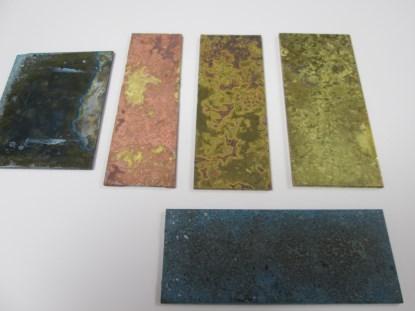
But let's not wonder off into the weeds. Another interesting aspect to all of this is that the effects vary depending on which side of the test pieces we're talking about. The image below shows the bottom sides of the test pieces.

I'm assuming that the more pronounced effects are caused by the weight of the brass pressing down on the moist sawdust (the sawdust should be heavily moistened, but not soaking). The two pieces I find most interesting in the context of the brass panels for my Inamorata and Ultra-Macho Prognostication Engines are the ones exposed only to salt or to vinegar as shown in the close-up images below.
I think it's safe to say that I'll be concentrating on the use of coarse sawdust/shavings. Unfortunately, I neglected to question Bob as to the types of wood these were. But that doesn’t matter, because now I intend to embark on a new round of salt and vinegar experiments using a variety of different wood types and exposure times.
In the meantime, what do you think about the effects I've achieved thus far? Do you think one (or both) of these could be of interest for my Prognostication Engines? Or do you thing they are a bit much and that I should continue on my quest?
 /4
/4 
文章评论(0条评论)
登录后参与讨论