

No happy face for me a few days ago. I was faced with a conundrum that made my poor old noggin ache. The solution turned out to be simple, but the underlying problem has certainly given me pause for thought
It all started when I decided it was time to organize the morass of breadboard-based circuitry driving my Cunning Chronograph.

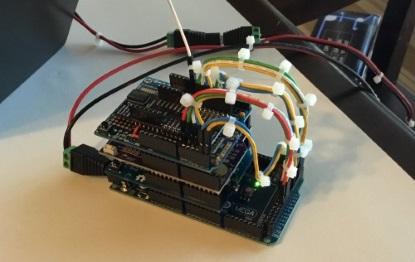
Eventually, I ended up with a jolly nice stack of boards as illustrated below. On the bottom we have an Arduino Mega. Sitting on this we have the same custom audio spectrum analyzer shield my chum Duane Benson created for my BADASS Display.

Second from the top we find a custom sensor shield, which currently carries only a real-time clock (RTC), but which is waiting to have a pressure/temperature sensor added along with a 9DOF (nine degrees of freedom) sensor boasting a 3-axis accelerometer, a 3-axis gyroscope, and a 3-axis magnetometer.
Finally, sitting proudly and pertly on top of the pile -- the source of my aforementioned problems -- we have an off-the-shelf Arduino proto-shield into which is connected the Simblee breakout board I'm using to control the Cunning Chronograph via Bluetooth by means of my iPad.
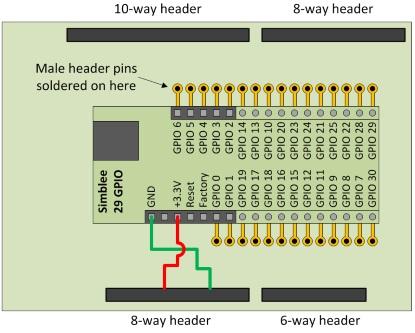
Now, before we proceed further, first take a look at the following rough illustration depicting the 29-GPIO Simblee breakout board mounted in the middle of the Arduino Uno proto-shield.

The Simblee requires a 3.3V supply. The Arduino Mega runs on 5V, but it does provide a 3.3V rail as illustrated above. The only Simblee pins that are directly connected to the Arduino at this stage are the 3.3V power and ground signals. When this shield is connected into the stack on top of the Arduino Mega, we also have 13 (lucky for some) of the Simblee's GPIOs (configured as OUTPUT) connected to the equivalent number of Arduino GPIOs (configured as INPUT_PULLUP). These signal connections are made using flying leads -- not the header pins used in the shield stack.
So, here's the situation I ran into. When I first created my stack of shields, everything worked perfectly. This past weekend, however, I decided to move the power supply and electronics into the Cunning Chronograph's cabinet. I always underestimate how long this sort of thing will take. The thing is that I want it to look professional, so I take an inordinate amount of time cutting the wires to just the right length to form the wiring harness and stuff.
Eventually, I sat back basking in the glow of a job well done, flicked on the power switch, and... nothing whatsoever happened. There was much gnashing of teeth and rending of garb at that time, let me tell you.
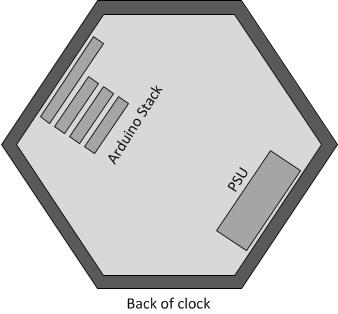
Now, just to make sure we're all tap-dancing to the same drum beat, the following illustration provides a rough idea of the scene that faced me.

This is the view as seen looking into the back of the Cunning Chronograph. The power supply is mounted on the lower-right inside face of the cabinet (I couldn’t mount it on the bottom because it would interfere with the plug-panel). Meanwhile, the Arduino stack is mounted on the upper-left inside face so as to keep it as far from the power supply as possible (I don’t know if this matters, but I want to minimize any effects the power supply might have on my magnetometer).
The long and short of it is that I whipped out my trusty multimeter and started to probe around. It didn’t take long to discover that -- with my multimeter probes on the Simblee's power and ground pins -- I was seeing only 1.5V on the 3.3V supply pin to my Simblee Breakout board.
"Hmmm, that's funny," I thought (I was being ironic -- I saw no humor in this at all). Even more interesting was the fact that -- with my multimeter probes on the Arduino's 3.3V and ground pins -- I was seeing the full 3.3V.
The next thing I did was to pull the shield carrying the Simblee off the board stack and to connect the 3.3V and GND header pins from the top of the stack via flying leads to the 3.3V and GND header pins on the shield carrying the Simblee. Eeek Alors! Everything now worked as expected.
"Ah Ha! This was just a random glitch and 'one of those things' we'll never understand," I thought (hopefully) to myself as I happily reattached the shield to the stack and powered everything up again. Arrgghh! I was back to having only 1.5V showing on the Silblee's 3.3V power pin.
How on earth (no pun intended) could I have 3.3V at the bottom of the stack and only 1.5V at the top of the stack, when the only items between the two extremes are the header pins forming the stack itself? Just where was the remaining 1.8V going to?
Suffice it to say that I eventually sorted this out and all is now as it should be, so now I'm wearing my happy face again. Unfortunately, I'm still not 100% sure as to the exact problem because there are three possibilities, and I didn’t realize this until after I'd applied my fix, which -- by some happy quirk of fate -- could have addressed all three scenarios. Can you guess what these possibilities are?
 /4
/4 
文章评论(0条评论)
登录后参与讨论