


The 8051 is an 8-bit microcontroller. This basically means that each machine language opcode in its instruction set consists of a single 8-bit value. This permits a maximum of 256 instruction codes (of which 255 are actually used in the 8051 instruction set).
The 8051 also works almost exclusively with 8-bit values. The Accumulator is an 8-bit value, as is each register in the Register Banks, the Stack Pointer (SP), and each of the many Special Function Registers (SFRs) that exist in the architecture. In reality, the only values that the 8051 handles that are truly 16-bit values are the Program Counter (PC) that internally indicates the next instruction to be executed, and the Data Pointer (DPTR) which the user program may utilize to access external RAM as well as directly access code memory. Other than these two registers, the 8051 works exclusively with 8-bit values.
For example, the ADD instruction will add two 8-bit values to produce a third 8-bit value. The SUBB instruction subtracts an 8-bit value from another 8-bit value and produces a third 8-bit value. The MUL instruction will multiply two 8-bit values and produce a 16-bit value.
This tutorial will discuss techniques that allow the 8051 developer to work with 16-bit values in the 8051's 8-bit architecture. While we will only discuss 16-bit mathematics, the techniques can be extended to any number of bits (24-bit, 32-bit, 64-bit, etc.). It's just a matter of expanding the code to support the additional bytes. The algorithms remain the same.
These tutorials will explain how to perform 16-bit addition, subtraction, and multiplication with the 8051. For the time being, 16-bit division is outside the scope of this tutorial.
Before jumping into multibyte mathematics in machine language, let's quickly review the mathematics we learned as children. For example, we learned to add two numbers, say 156 + 248, as follows:
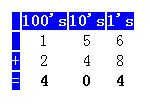
How do we calculate the above? We start in the 1's column, adding 6 + 8 = 14. Since 14 can't fit in a single column, we leave 4 in the 1's column and carry the 1 to the 10's column. We then add 5 + 4 = 9, add the 1 we carried, to get 10. Again, 10 doesn't fit in a single column. So we leave the 0 in the 10's column and carry the 1 to the 100's column. Finally, we add 1 + 2 = 3, add the 1 we carried to get 4, which is our final answer in the 100's column. The final answer, thus, is 404.
It is important to remember this when working with multibyte math, because the process is going to be the same. Let's start by doing 16-bit addition.
16-Bit Addition
16-bit addition is the addition of two 16-values. First, we must recognize that the addition of two 16-bit values will result in a value that is, at most, 17 bits long. Why is this so? The largest value that can fit in 16-bits is 256 * 256 - 1 = 65,535. If we add 65,535 + 65,535, we get the result of 131,070. This value fits in 17 bits. Thus when adding two 16-bit values, we will get a 17-bit value. Since the 8051 works with 8-bit values, we will use the following statement: "Adding two 16-bit values results in a 24-bit value". Of course, 7 of the highest 8 bits will never be used--but we will have our entire answer in 3 bytes. Also keep in mind that we will be working with unsigned integers.
Let's consider adding the following two decimal values: 6724 + 8923. The answer is, of course, 15647. How do we go about adding these values with the 8051? The first step is to always work with hexadecimal values. Simlply convert the two values you wish to add to hexadecimal. In this case, that is equivalent to the following hexadecimal addition: 1A44 + 22DB.
How do we add thes two numbers? Let's use the exact same method we used in primary school, and in the previous section:
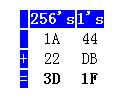
First, notice the difference. We are no longer working with a 1's, 10's, and 100's columns. We are just working with two columns: The 1's column and the 256's column. In familiar computer terms: We're working with the low byte (the 1's column) and the high byte (the 256's column). However, the process is exactly the same.
First we add the values in the 1's column (low byte): 44 + DB = 11F. Only a 2-digit hexadecimal value can fit in a single column, so we leave the 1F in the low-byte column, and carry the 1 to the high-byte column. We now add the high bytes: 1A + 22 = 3C, plus the 1 we carried from the low-byte column. We arrive at the value 3D.
Thus, our completed answer is 3D1F. If we convert 3D1F back to decimal, we arrive at the answer 15647. This matches with the original addition we did in decimal. The process works. Thus the only challenge is to code the above process into 8051 assembly language. As it turns out, this is incredibly easy.
We'll use the following table to explain how we're going to do the addition:
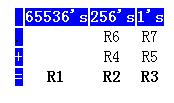
Since we're adding 16-bit values, each value requires two 8-bit registers. Essentially, the first value to add will be held in R6 and R7 (the high byte in R6 and the low byte in R7) while the second value to add will be held in R4 and R5 (the high byte in R4 and the low byte in R5). We will leave our answer in R1, R2, and R3.
Let's review the steps involved in adding the values above:
We'll now convert the above process to assembly language, step by step.
16-Bit Subtraction
16-bit subtraction is the subtraction of one 16-bit value from another. A subtraction of this nature results in another 16-bit value. Why? The number 65535 is a 16-bit value. If we subtract 1 from it, we have 65534 which is also a 16-bit value. Thus any 16-bit subtraction will result in another 16-bit value.
Let's consider the subtraction of the following two decimal values: 8923 - 6905. The answer is 2018. How do we go about subtracting these values with the 8051? As is the case with addition, the first step is to convert the expression to hexadecimal. The above decimal subtraction is equivalent to the following hexadecimal subtraction: 22DB - 1AF9.
Again, we'll go back to the way we learned it in primary school:

First we subtract the second value in the 1's column (low byte): DB - F9. Since F9 is greater than DB, we need to "borrow" from the 256's column. Thus we actually perform the subtraction 1DB - F9 = E2. The value E2 is what we leave in the 1's column.
Now we must perform the subtraction 22 - 1A. However, we must remember that we "borrowed" 1 from the 256's column, so we must subtract an additional 1. So the subtraction for the 256's column becomes 22 - 1A - 1 = 7, which is the value we leave in the 256's column.
Thus our final answer is 07E2. If we conver this back to decimal, we get the value 2018, which coincides with the math we originally did in decimal.
As we did with addition, we'll use a small table to help us conver the above process to 8051 assembly language:
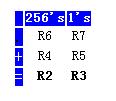
Since we're subtracting 16-bit values, each value requires two 8-bit registers. Essentially, the value to be subtracted from will be held in R6 and R7 (the high byte in R6 and the low byte in R7) while the value to be subtracted will be held in R4 and R5 (the high byte in R4 and the low byte in R5). We will leave our answer in R2, and R3.
Let's review the steps involved in subtracting the values above:
We'll now convert the above process to assembly language, step by step.
Combining the code from the two steps above, we come up with the following subroutine:
16-Bit Multiplication
16-bit multiplication is the multiplication of two 16-bit value from another. Such a multiplication results in a 32-bit value.
For the sake of example, let's multiply 25,136 by 17,198. The answer is 432,288,928. As with both addition and subtraction, let's first convert the expression into hexadecimal: 6230h x 432Eh.
Once again, let's arrange the numbers in columns as we did in primary school to multiply numbers, although now the grid becomes more complicated. The green section represents the original two values. The yellow section represents the intermediate calculations obtained by multipying each byte of the original values. The red section of the grid indicates our final answer, obtained by summing the columns in the yellow area.
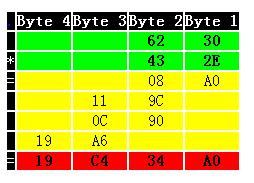
Remember how we did this in elementary school? First we multiply 2Eh by 30h (byte 1 of both numbers), and place the result directly below. Then we multiply 2Eh by 62h (byte 1 of the bottom number by byte 2 of the upper number). This result is lined up such that the right-most column ends up in byte 2. Next we multiply 43h by 30h (byte 2 of the bottom number by byte 1 of the top number), again lining up the result so that the right-most column ends up in byte 2. Finally, we multiply 43h by 62h (byte 2 of both numbers) and position the answer such that the right-most column ends up in byte 3. Once we've done the above, we add each column, with appropriate carries, to arrive at the final answer.
Our process in assembly language will be identical. Let's use our now-familiar grid to help us get an idea of what we're doing:

Thus our first number will be contained in R6 and R7 while our second number will be held in R4 and R5. The result of our multiplication will end up in R0, R1, R2 and R3. At 8-bits per register, these four registers give us the 32 bits we need to handle the largest possible multiplication. Our process will be the following:
We'll now convert the above process to assembly language, step by step.
Combining the code from the two steps above, we come up with the following subroutine:
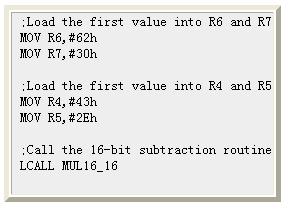
And to call our routine to multiply the two values we used in the example above, we'd use the code:
16-Bit Division
16-bit division is the division of one 16-bit value by another 16-bit value, returning a 16-bit quotient and a 16-bit remainder. I used r1/r0 for dividend/remainder and r3/r2 for divisor/quotient.
So, again, let's remember how we did division in elementary school. For example, 179 divided by 8:
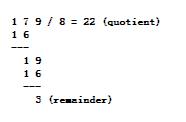
It's necessary necessary to follow this same process step by step. There is a 3-digit-dividend, so we expect 3 digits maximum for quotient. We "shift left" the divisor 2 digits (3-1) such that the number of digits in the divisor is the same as the number of digits in the dividend. So we get:
We divide the two numbers, multiply the result by the divisor and substract this result from the dividend. In this first step 179 can't be divided by 800, so the the result is 0. We subtract 0 from 179 and still have 179:

We then "shift right" the divisor 1 digit and repeat the process. 179 divided by 80 results in an answer of 2. After we subtract 160 (2x80) we are left with a remainder of 19:
We repeat the process again until the divisor has shifted into its original position:
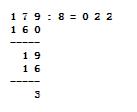
This may have been an unnecessary review of elementary school math, but it is important to remember exactly how the process is performed because we do exactly the same with the 8052 in binary system.
In this routine we will place the original dividend into R1 (high-byte) and R0 (low-byte) and the divisor in R3 (high-byte) and R2 (low-byte).
In the case of our example (179 divided by 8), the initial registers would be:

In the case of our example, once the above code is executed the registers will be as follows (including the carry bit 'C'):
At this point we can do the division itself. As we are in binary mode there is no need for a real division--it's just a comparison. At this point it's important to know the steps from above.
To see how the loop works here are the registers after each step:
1 r1/0 00000000 10110011 ;dividend
  r3/2 10000000 00000000 ;divisor
  r5/4 00000000 00000000 ;result

2 r1/0 00000000 10110011 ;dividend
  r3/2 01000000 00000000 ;divisor
  r5/4 00000000 00000000 ;result

...

8  r1/0	00000000 10110011 ;dividend
   r3/2	00000001 00000000 ;divisor
   r5/4	00000000 00000000 ;result

9  r1/0	00000000 00110011 ;dividend
   r3/2	00000000 10000000 ;divisor
   r5/4	00000000 00000001 ;result

10 r1/0 00000000 00110011 ;dividend
   r3/2 00000000 01000000 ;divisor
   r5/4 00000000 00000010 ;result

11 r1/0 00000000 00010011 ;dividend
   r3/2 00000000 00100000 ;divisor
   r5/4 00000000 00000101 ;result

12 r1/0 00000000 00000011 ;dividend
   r3/2 00000000 00010000 ;divisor
   r5/4 00000000 00001011 ;result

13 r1/0 00000000 00000011 ;dividend
   r3/2 00000000 00001000 ;divisor
   r5/4 00000000 00010110 ;result
STOP!
Register "B" is zero at this point. The remainder is already in R1/R0, and it is 3 decimal, same as above. The result is still in R5/R4, but we can see it's correct, too (10110b=22d). To finish the routine, we just "clean up" by moving R5/R4 to R3/R2.

We used small numbers here for easier explanation. Of course it works also with 16-bit numbers, that's what it was designed to do.
Taken as a whole, the above division algorithm can be converted into an easy-to-use function that can be called from your program. To call this function, you should pre-load R1/R0 with the high/low value to be divided, and R3/R2 with the high/low value that the number is to be divided by.
 /4
/4 
文章评论(0条评论)
登录后参与讨论