原创 移植最新linux到2440开发板:移植uboot2015-01(二)

2015-3-3 22:20 2368 10 10 分类: MCU/ 嵌入式 文集: 娱乐一下linux
使用eclipse+jlink+gdb在sdram中调试uboot

因为我的开发板只有nand,没有nor,所以考虑下载uboot到sdram中,用jlink来调试。
其中jlink的gdb server是运行在host机器上(windows)
而eclipse则是运行在我的虚拟机上。

一,重新编译uboot
先确保关掉编译优化及打开调试信息输出
在uboot顶层makefile,找到
ifdef CONFIG_CC_OPTIMIZE_FOR_SIZE
KBUILD_CFLAGS    += -Os
else
KBUILD_CFLAGS    += -O2
endif
将KBUILD_CFLAGS注释掉

然后在include/configs/开发板配置文件.h文件中添加:
#define CONFIG_SKIP_LOWLEVEL_INIT     1
添加这个宏定义之后,U-boot就跳过了内存初始化的部分
并且修改CONFIG_SYS_BASE的值为sdram中的地址0x3100_0000
(注,也可以改成其他的,我随手改的)


二,启动jlink的gdb server

JLink驱动下载http://www.segger.com/cms/jlink-software.html
我的linux跑在虚拟机上,所以下载了windows版本的,版本号v4.54(比较老的,因为已经装了很久了)

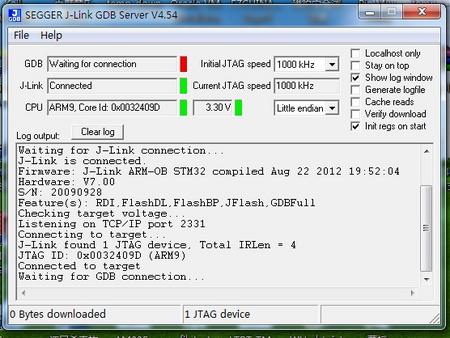
启动jlink gdb server via Jtag 如下图:
20150303215005207.jpg

20150303215112177.jpg

连接好开发板与jlink后,启动jlink gdb server将可以看到jlink认出了2440芯片,


三,配置eclipse工程,用可视化调试uboot

1,安装eclipse
sudo apt-get install eclipse-cdt

2,直接在eclipse中输入http://opensource.zylin.com/zylincdt安装插件
参照http://opensource.zylin.com/zylincdt
的步骤装好插件


3,将uboot工程导入eclipse,编译
参考下文的步骤
http://blog.csdn.net/glorin/article/details/6330590/

a,关于eclipse的启动要注意:

尽量在terminal窗口使用命令行启动eclipse,否则有可能导致eclipse找不到交叉编译器(因为PATH环境变量没有传到eclipse所致),


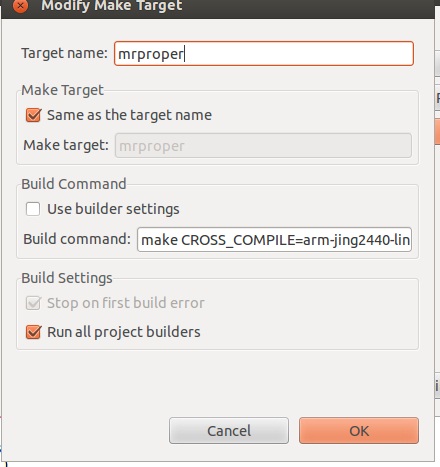
b,使用eclipse编译uboot,需要建立target,我建立三个target,如下:(参考2440命令行编译指令)
20150303220237741.jpg
20150303220313633.jpg
20150303220350877.jpg


c,  配置debug窗口注意事项
20150303220521555.jpg
20150303220658878.jpg
20150303220812876.jpg
在Initialize command中填入gdb的初始化脚本,然后点击debug按键,就可以连接到host机器上的gdb server,在sdram中调试uboot。
20150303221442154.jpg
20150303221637141.jpg
gdb的初始化脚本可参考:
http://blog.csdn.net/astonqa/article/details/7758708
http://blog.chinaunix.net/uid-10696433-id-2935782.html

我使用的脚本见下面:(使用的时候,注意根据实际情况修改ip地址和sdram的设置)
#   
# J-LINK GDB SERVER initialization  
#  
  
# This connects to a GDB Server listening   
# for commands on localhost at tcp port 2331  
  
target remote 192.168.2.100:2331 #首先连接主机的GDB Server,端口都是2331。  
  
#注意主机的GDB Server勾掉"Localhost only"选项,否则连接不上  
# Set JTAG speed to 30 kHz  
  
monitor speed 30  


# Set GDBServer to little endian   
monitor endian little  
  
   
#end   
# Reset the chip to get to a known state.  
  
monitor reset  


#   
# CPU core initialization  
#  


# Set the processor mode   
monitor reg cpsr = 0xd3  


#disable watchdog   
monitor MemU32 0x53000000 = 0x00000000  
  
     
#disable interrupt   
monitor MemU32 0x4A000008 = 0xFFFFFFFF #INTMSK  
monitor MemU32 0x4A00000C = 0x00007FFF #INTSUBMSK  
  
   
#  
#set clock
#
#FCLK= 300 MHz, HCLK = 100 MHz, PCLK = 50 MHz @12M cystall external 
#lock time  
monitor MemU32 0x4C000000 = 0x0FFF0FFF 

#CLKDIVN  
monitor MemU32 0x4C000014 = 0x0000000F 

#MPLLCON s=1,p=1,m=67
monitor MemU32 0x4C000004 = 0x00043011 

#UPLLCON s=1,p=2,m=56, CLK_UPLL=96MHz,so CLKDIVN[3]=1 
monitor MemU32 0x4C000008 = 0x00038021 

#CLKCON enable all peripheral clock
monitor MemU32 0x4C00000C = 0x001FFFF0 
   
#  
#config sdram
#

#BWSCON not using UB/LB,WAIT, 32bit data width   
monitor MemU32 0x48000000 = 0x22000000

#BANKCON6            bank6 setSDRAM type 
monitor MemU32 0x4800001C = 0x00018005

monitor MemU32 0x48000024 = 0x008404F3 #vREFRESH  
monitor MemU32 0x48000028 = 0x00000031 #vBANKSIZE -- 32M/32M --- should  

monitor MemU32 0x4800002c = 0x00000020 #vMRSRB6   


#GPACON: Enable Address lines for SDRAM
monitor MemU32 0x56000000 = 0x000003FF


# Set auto JTAG speed  
monitor speed auto  


# Setup GDB FOR FASTER DOWNLOADS   
set remote memory-write-packet-size 1024   
set remote memory-write-packet-size fixed  


# Load the program executable called "image.elf"   
# load image.elf  
  
b _start  
load  
continue  


文章评论0条评论)

登录后参与讨论
我要评论
0
10
关闭 站长推荐上一条 /2 下一条