

Water flow is often used to illustrate basic electronics in the form of analogies. In this blog, after learning the hard way, I will attempt to explain basic water flow in terms of electronics.
It started one morning with a wet carpet just outside the laundry room and the water heater. The water was warm, and the puddle started at the base of the water heater which had no drip pan. We assumed that the water heater had sprung a leak, which is a typical mode of their behavior.
While I had done some copper pipe soldering many years ago, I felt that installing a new water heater was probably beyond my basic plumbing skills, so we had the heater replaced by professionals. They showed up at 9:00 a.m. and had the job done by noon, as my wife reported while I was at work. My draining the tank ahead of time might have helped.
But then about 3:00 p.m. my wife called back to report that the carpet was still getting soaked even after sucking up the water with the carpet cleaner. And the puddle was hot, so this was not a residual puddle from water still hidden under the wall. Uh-oh -- sounds like a leaky pipe inside the wall.
The heater hot water outlet entered the laundry room wall about six feet above floor level, and I assumed it went straight down from there. I had two choices: I could drain and move the new water heater and cut through the wall behind it, or I could investigate from the other side of the wall (which happened to be the rear inside of a kitchen cabinet). Due to laziness, I chose the latter to start with.
After measuring from the laundry room side of the wall I used a three-inch hole saw to cut out the rear of the kitchen cabinet and through the drywall halfway from floor level, and luckily got centered over the pipe the first time. It was wet. Then I drilled another 3-inch diameter circular cutout two feet higher -- the pipe was dry.
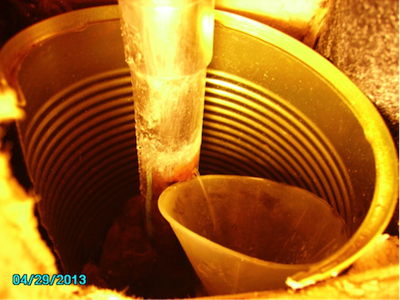
Bingo! I now knew approximately the location of the leak -- about two feet above the concrete floor. It was very fortunate that the leak was not below the concrete slab! After cutting out a larger section of wall and peeling back all the thermal insulation materials, I saw what is in the picture below. So I set up a small funnel and short drainage hose into a large cooking pot to collect the leakage while pondering (no pun intended) what to do:

The sliced-open tin can was planned as a heat shield for my brand-new propane torch to solder the pinhole closed. Yeah, right.
I shut off the cold water intake valve to the water heater, opened all the household hot water faucets, and waited for the above stream to subside. And waited... and waited... and waited.
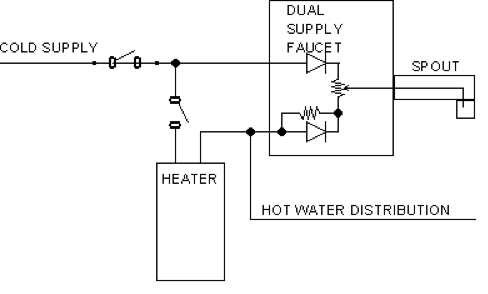
After many fruitless hours I finally concluded that maybe the shower and kitchen faucets that combined the hot and cold feeds into a single outlet might be allowing the still-pressurized cold feed to leak over into the hot system. Something like this with a "leaky" lower diode, consider the incoming cold water pressure as akin to a positive DC voltage:

My hypothesis was later confirmed by a friendly, long-experienced, retired plumber at the local home improvement center. He referred to it as "cross-feed," similar to what we know as "cross-talk." Ask these guys, they have a lot of good tips for novices. And it did work -- shutting off the outdoor curbside main cold water feed stopped the flow from the pin hole a few minutes later.
But now the situation was a lot more serious -- lack of hot water is an annoyance (cold showers, etc.), but NO water is a magnitude more of a problem. We take for granted how easy it is to flush a toilet, and it's not always mellow yellow. (Note to renovators -- always make sure your new shower/bath/kitchen faucets have two individual hot/cold controls.)
No big deal, I thought, just solder the pinhole closed once the water stops leaking out. Well, we fluxed and tried over and over again. The solder simply would not flow. Having done a lot of electronics soldering, I recognized that even with the torch going full blast the pipe was not getting hot enough. And judging from the steam hissing from the pinhole, there was still standing water in the pipe at the pinhole level, and being at the lowest elevation it had nowhere else to go.
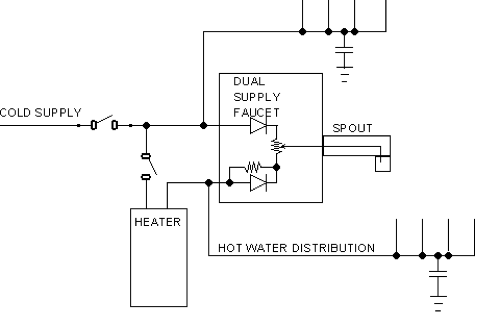
I tried snaking some 1/4-inch icemaker tubing as a siphon down the hot water pipe that by now had been disconnected from the heater (thankfully the new heater had been installed with flexible pipe with threaded attachments instead of the original soldered piping) and sucking on it to remove the standing water (gross!). It seemed to work -- for a few minutes. Then the water level rose back up to the pinhole, I could still see a small trickle leaking out again. In electronic terms, here is what was happening:

Both the hot and cold systems had water stored in the higher-elevation pipes, represented by the capacitors. Discharging at the pinhole let the remaining stored water drain back to the level of the pinhole through the "leaky-diode faucets" and slowly escape. This would take forever to drain out through the tiny pinhole, or to be sucked out through the mouth-operated siphon, which I wasn't looking forward to doing again.
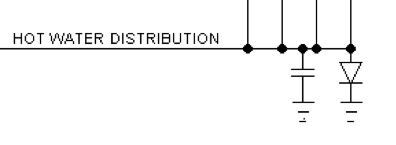
The only way to speed up the discharge process was to bite the bullet and remove the water heater again, cut into the drywall behind it, and with a brand-new, mini-hacksaw made for this purpose cut three inches of the bad section out of the pipe so that a six-inch "repair coupling" could be soldered in. This allowed most of the standing water to discharge quickly, but only down to the level of the lower cut-off pipe. Now the situation looked like this:

The capacitor voltage (water level) cannot discharge below the forward bias voltage of the silicon diode. A residual charge will remain since the electrons have nowhere to go. The standing water in the lower pipe also had nowhere to go, and the pipes still could not be soldered.
To discharge a capacitor, it must have a current path. A negative current source can discharge it. In this water case, a wet/dry shop vac coupled to the cut-off pipe through a duct-taped "impedance matching network" to seal the air flow for maximum suction transfer, along with opened water faucets throughout the house, did the job nicely. With no more standing water I was finally able to solder the new section of pipe in.
Thank goodness for duct tape and shop-vacs!
In retrospect, had I thought of using the wet/dry vac first, I could have simply attached it to the hot water pipe removed from the top of the water heater and applied the suction there. Would have saved me a lot of work, and I would have been able to solder the pinhole through the rear wall of the kitchen cabinet instead of moving the heater and cutting into the drywall.
Next time I will know better. Maybe this experience will help another neophyte with a similar plumbing emergency.
Glen Chenier is an old-timer who grew up with vacuum tubes and therefore has been amazed and fascinated by the many advances in the electronics industry since.
 /5
/5 
文章评论(0条评论)
登录后参与讨论