

表格布局管理器继承自LinearLayout线性布局管理器,用行、列方式来管理容器内的控件,表格布局不需要指定多少行列,布局内每添加一行TableRow 表示添加一行,然后在TableRow添加子控件,容器的列数由包含列数最多的行决定。
TableLayout 布局文件实例∶
<?xml version="1.0" encoding="utf-8"?>
<TableLayout xmlns:android="http://schemas.android.com/apk/res/android"
android:layout_width="match_parent"
android:layout_height="match_parent"
android:collapseColumns="3" //指定第四列不显示
android:shrinkColumns="1"//指定第二列可伸缩
android:gravity="center"
android:layout_gravity="center"
android:stretchColumns="0">
<TableRow>
<TextView
android:layout_width="wrap_content"
android:layout_height="wrap_content"
android:text="1行1列"/>
<TextView
android:layout_width="wrap_content"
android:layout_height="wrap_content"
android:text="1行2列"/>
<TextView
android:layout_width="wrap_content"
android:layout_height="wrap_content"
android:text="1行3列"/>
<TextView
android:layout_width="wrap_content"
android:layout_height="wrap_content"
android:text="1行4列"/>
TableRow>
<TextView
android:layout_width="wrap_content"
android:layout_height="wrap_content"
android:text="hello,everyone"/>
<TableRow>
<TextView
android:layout_width="wrap_content"
android:layout_height="wrap_content"
android:layout_column="1"
android:text="hello,everyone!"/>
TableRow>
<TableRow>
<TextView
android:layout_span="2"
android:layout_width="wrap_content"
android:layout_height="wrap_content"
android:text="hello android studio"/>
TableRow>
TableLayout>
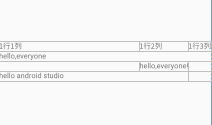
程序中定义了一个 4 行 3 列的表格,运行效果如下图所示。

为了方便大家理解,对应的表格布局如下图:

从上述 TableLayout布局文件实例中可以清晰地看出,TableLayout 内部的子元素是按照表格来布局的,效果也达到了我们的预期。第一行设置了四列,只显示了3列(因为我们指定了第四列不显示),第 2 行只设置了一列,则只显示一列,第3行设置了1列,指定为第2列,第4行设置了一列内容,指定占据两列的控件,这些都正确无误地实现了,说明这些属性是可以起作用的。下面我们就布局文件中包含的一些常用属性做一些分析;
android∶collapseColumns 指定某一列不显示。
android∶layout_width 设置当前组件的宽度,match parent 表示充满整个父元素,若使用Wrap_content 则意味着组件多大就多大。
android∶layout height 设置当前组件的高度,match parent 表示充满整个父元素,若使用Wrap_content 则意味着组件多大就多大。
android:visibility 默认为visibility ,表示显示;设置为invisibility 不显示,但是还要占据位置,留一个空白区域;设置成gone表示真正的完全隐藏。
android:stretchColumns为TableLayout容器设置属性,表示被设置的这些列可拉伸(注意:TableLayout中列的索引从0开始)
android:shrinkColumns 为TableLayout容器设置属性,表示被设置的这些列可收缩。
android:layout_columns 为TableLayout容器设置属性,指定控件在TableRow中指定列。
android:layout_columns为容器里面的控件设置属性,指定控件在TableRow中的指定列的数量。
使用代码控制表格布局管理器
TableLayout 是LinearLayout类的子类。与 LinearLayout一样,TableLayout 也可以用 Java代码来动态生成、控制布局管理器。与线性布局管理器类似,Android 提供了 Android.widget. TableLayout 和 Android.widget.TableRow 两个布局管理类,以及 Android.widget.TableLayout. LayoutParams 和 Android.widget.TableRow.LayoutParams 两个布局参数类来实现 Java 代码操作布局管理器;
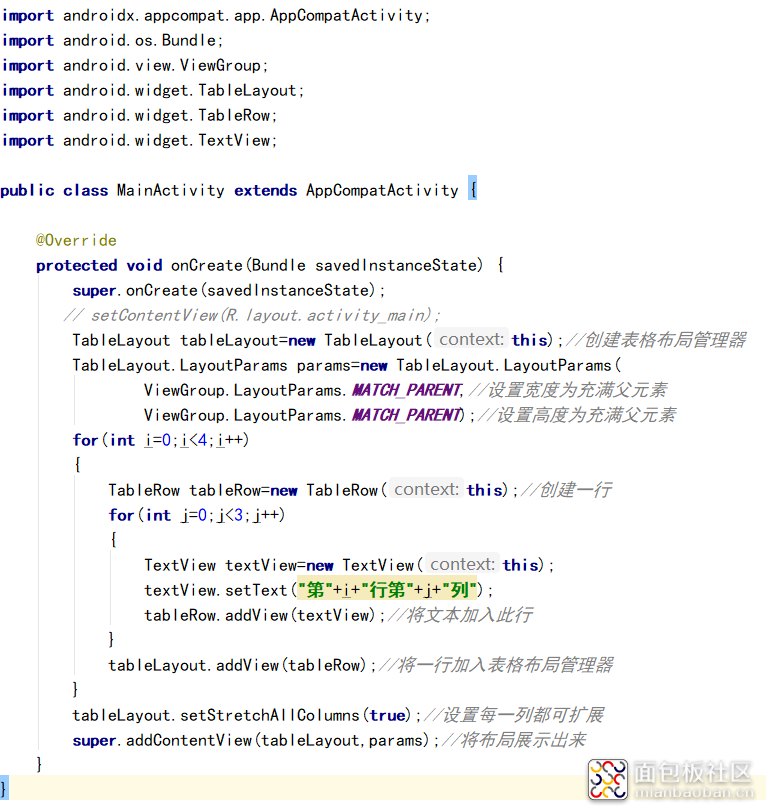
通过代码生成、控制布局管理器的代码实例如下∶

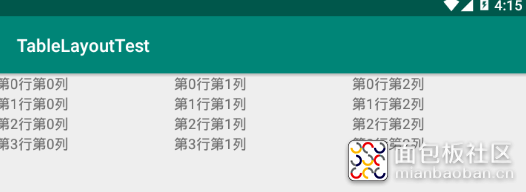
这个程序通过 Java代码动态生成表格布局管理器,并通过循环方式生成 TableRow 和 TextView,最终又通过 addContentView 方法使布局管理器在这个 Activity中展示出来。程序实现的效果如下图所示。

android studio工具及手机模拟器以及更多工程源代码下载请前往微信公众号:大鸟科创空间,回复:android studio即可获取。

作者: 大鸟科创空间, 来源:面包板社区
链接: https://mbb.eet-china.com/blog/uid-me-3949041.html
版权声明:本文为博主原创,未经本人允许,禁止转载!
 /5
/5 
文章评论(0条评论)
登录后参与讨论