

在使用布局管理器进行布局时会发现,有时候实际的需求不是一种布局管理器能够满足的,这时我们可以将多个布局管理器嵌套使用。用法和单个布局管理器的使用并无多大区别,这里就以LinearLayout、GridLayout、RelativeLayout 三者的互相嵌套为例,实现一个带标题的计算器的布局。其他嵌套情况可根据实例随意变换,此处不做过多叙述。
xml version="1.0" encoding="utf-8"?>
<RelativeLayout xmlns:android="http://schemas.android.com/apk/res/android"
android:layout_width="wrap_content"
android:layout_height="match_parent">
//在相对布局内嵌入一个线性布局
<LinearLayout
android:id="@+id/linearlayout"
android:layout_width="match_parent"
android:layout_height="wrap_content"
android:orientation="vertical">
<TextView
android:layout_width="wrap_content"
android:layout_height="wrap_content"
android:text="hello,这里是大鸟科创空间1"/>
<TextView
android:layout_width="wrap_content"
android:layout_height="wrap_content"
android:text="hello,这里是大鸟科创空间2"/>
LinearLayout>
//在相对布局内部嵌入一个网格布局,并将网格布局放在线性布局下方
<GridLayout
android:layout_width="wrap_content"
android:layout_height="wrap_content"
android:layout_below="@+id/linearlayout"
android:columnCount="4"
android:rowCount="6"
android:orientation="horizontal">
<TextView
android:layout_columnSpan="4"
android:layout_marginLeft="6dp"
android:layout_marginRight="6dp"
android:text="0"
android:textSize="60sp"/>
<Button
android:text="回退"
android:layout_columnSpan="2"
android:layout_gravity="fill" />
<Button
android:text="清空"
android:layout_columnSpan="2"
android:layout_gravity="fill" />
<Button android:text="+"/>
<Button android:text="1"/>
<Button android:text="2"/>
<Button android:text="3"/>
<Button android:text="-"/>
<Button android:text="4"/>
<Button android:text="5"/>
<Button android:text="6"/>
<Button android:text="*"/>
<Button android:text="7"/>
<Button android:text="8"/>
<Button android:text="9"/>
<Button android:text="/"/>
<Button android:text="."/>
<Button android:text="0"/>
<Button android:text="="/>
GridLayout>
RelativeLayout>
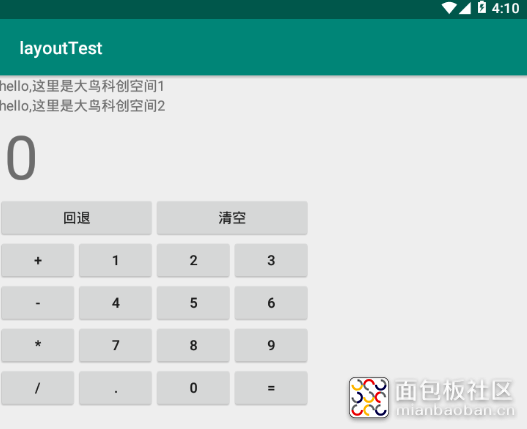
本程序在相对布局嵌入了一个线性布局和一个网格布局,并将网格布局放在线性布局的下方,程序运行效果如下图所示:

这里在最外层使用一个 RelativeLayout,在 RelativeLayout 内部使用 LinearLayout 和 GridLayout。其中LinearLayout 用来实现计算器的标题,即"hello 这里是大鸟空间1"和"hello 这里是大鸟空间2",在实际开发中,可以替换成自己需要的内容。GridLayout 其实就是计算器的布局。由于外层是 RelativeLayout,因此在确定位置时在 GridLayout 中使用了 layout_below 属性,使 GridLayout 落在LinearLayout下方。在Android 开发中,嵌套使用布局管理器很常见,这里只是给出一个示例,读者可模仿操作并尝试使用其他布局管理器进行互相嵌套。
作者: 大鸟科创空间, 来源:面包板社区
链接: https://mbb.eet-china.com/blog/uid-me-3949041.html
版权声明:本文为博主原创,未经本人允许,禁止转载!
 /2
/2 
文章评论(0条评论)
登录后参与讨论