


只需按下按钮,本制作就能保护你的安全。如果遇到危险,在你按下按钮的时候,你的准确位置将会共享到你预先用代码选定的所有网站上。作为一款9V电池供电的手持式设备,本项目电路可安装在在盒子里,方便外出携带。
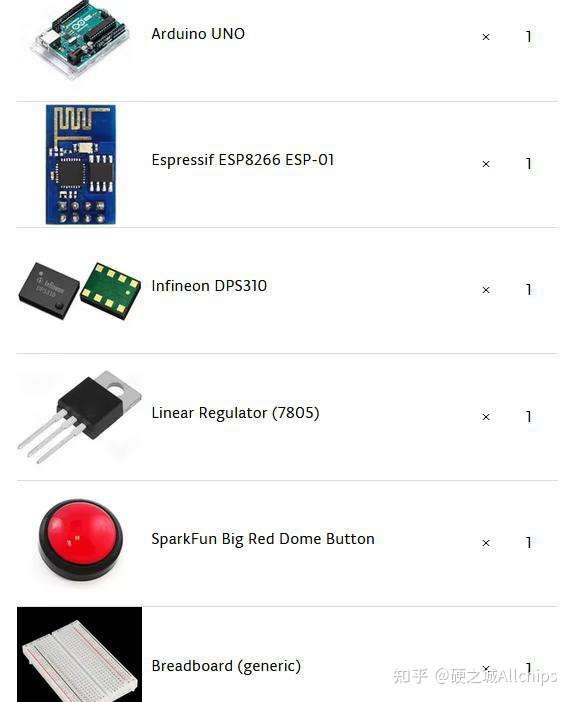
项目物料清单如下:
Arduino UNO ×1
Espressif ESP8266 ESP-01 ×1
Infineon DPS310 ×1
Linear Regulator (7805) ×1
SparkFun Big Red Dome Button ×1
Breadboard (generic) ×1
想象一下这样的场景,你被困在高楼里,但眼前只能看到一片红晕,看不清任何数字或所在高度,这是多么恐惧啊?这时你就可以借助这个按钮获得准确的位置信息。类似情况可能发生在救援队员身上,说明这个项目非常有意义。
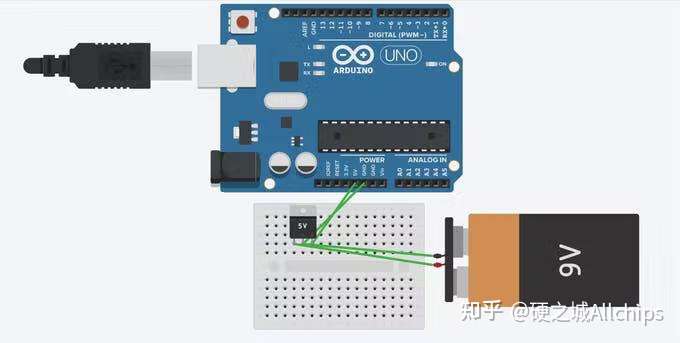
使用9V电池作为供电,通过7805三端稳压器芯片为arduino供电。
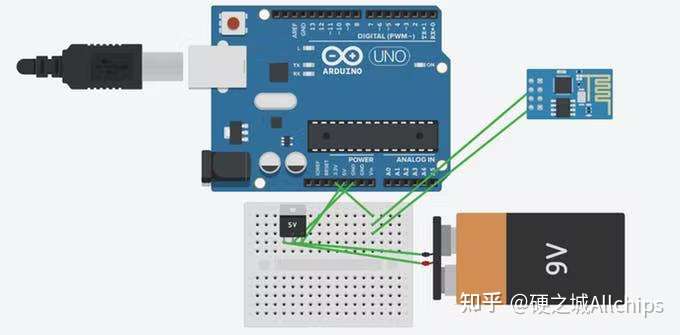
将Arduino的3.3V输出连接到ESP8266。ESP8266工作于3.3V而不是5V,这点一定要记住。
将Arduino板的RXD引脚、TXD引脚,分别连接到ESP8266板的RX引脚、TX引脚。
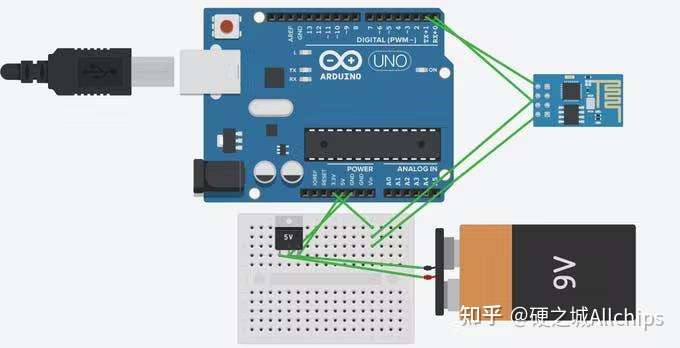
当需要两个硬件之间相互通话时,通常将其中一个的TX引脚与另一方的RX引脚连接,这就是双工。这里不需要Arduino直接向ESP8266喊话,我们通过电脑实现Arduino与ESP8266通信。
连接RES 或 RESET 引脚。当 RESET 引脚接地后,Arduino对串口连接器来说相当于一个哑巴USB,这就实现了我们想要和ESP8266通话的目的。
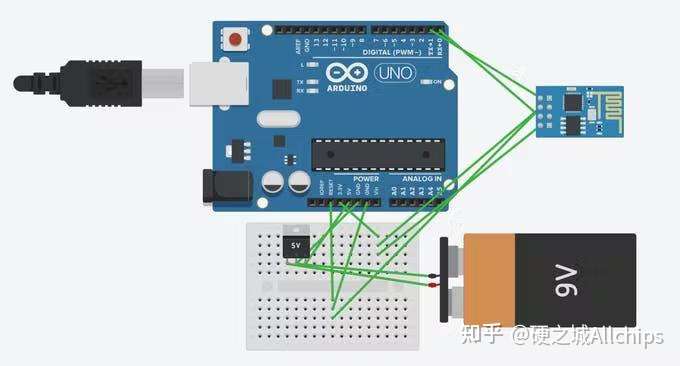
为电源添加按钮。
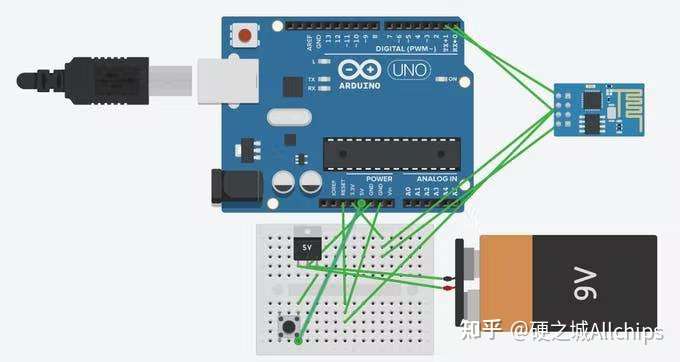
在Arduino IDE中,我们不需要选择任何板子,因为我们不向ESP8266上传任何数据。只需从 Tools 菜单选择正确接口即可——“工具 - 串口监视器”,再将传输速率设置为ESP8266固件使用的默认值115200。由于我们与 CH_PD 引脚通话,如果需要指示灯,可连接ESP8266 GPIO0引脚。

按照电路图连接I2C口。

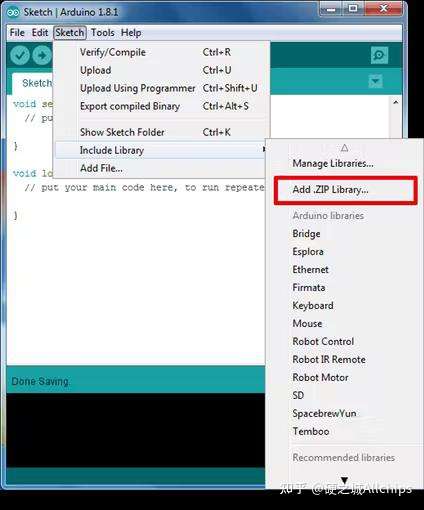
在Arduino IDE中安装DPS310压力传感器库,须从Arduino IDE打开 Sketch > Include Library > Add .ZIP Library... 转至已下载的 .ZIP 文件。这个库将安装在Arduino sketch文件夹的库中,也可将它包含在Sketch > Include Library> IFX_DPS310中。
参照https://github.com/witnessmenow/arduino-google-maps-api连接Google地图。DPS310压力传感器是从地平面开始记录测量数据的,需要为不同城市创建不同的程序和算法。
附:DPS310 C/C++ Code file
#include "SoftwareSerial.h"
String ssid ="yourSSID";
String password="yourPassword";
SoftwareSerial esp(6, 7);// RX, TX
tring data;
String server = "yourServer"; // Example Domain
String uri = "yourURI";// our example is /esppost.php
int DHpin = 8;//sensor pin
byte dat [5];
String pressure;
void setup() {
pinMode (DHpin, OUTPUT);
esp.begin(9600);
Serial.begin(9600);
reset();
connectWifi();
}
//reset the esp8266 module
void reset() {
esp.println("AT+RST");
delay(1000);
if(esp.find("OK") ) Serial.println("Module Reset");
}
//connect to your wifi network
void connectWifi() {
String cmd = "AT+CWJAP=\"" +ssid+"\",\"" + password + "\"";
esp.println(cmd);
delay(4000);
if(esp.find("OK")) {
Serial.println("Connected!");
}
else {
connectWifi();
Serial.println("Cannot connect to wifi"); }
}
byte read_data () {
byte data;
for (int i = 0; i < 8; i ++) {
if (digitalRead (DHpin) == LOW) {
while (digitalRead (DHpin) == LOW); // wait for 50us
delayMicroseconds (30); // determine the duration of the high level to determine the data is '0 'or '1'
if (digitalRead (DHpin) == HIGH)
data |= (1 << (7-i)); // high front and low in the post
while (digitalRead (DHpin) == HIGH);
// data '1 ', wait for the next one receiver
}
} return data; }
void start_test () {
digitalWrite (DHpin, LOW); // bus down, send start signal
delay (30); // delay greater than 18ms, so DHT11 start signal can be detected
digitalWrite (DHpin, HIGH);
delayMicroseconds (40); // Wait for DPS response
pinMode (DHpin, INPUT);
while (digitalRead (DHpin) == HIGH);
delayMicroseconds (80);
// DPS response, pulled the bus 80us
if (digitalRead (DHpin) == LOW);
delayMicroseconds (80);
// DPS 80us after the bus pulled to start sending data
for (int i = 0; i < 4; i ++)
// receive temperature and humidity data, the parity bit is not considered
dat = read_data ();
pinMode (DHpin, OUTPUT);
digitalWrite (DHpin, HIGH);
// send data once after releasing the bus, wait for the host to open the next Start signal
}
void loop () {
start_test ();
// convert the bit data to string form
pressure = String(dat[0]);
data = "PRESSURE" +pressure;// data sent must be under this form //name1=value1&name2=value2.
httppost();
delay(1000);
}
void httppost () {
esp.println("AT+CIPSTART=\"TCP\",\"" + server + "\",80");//start a TCP connection.
if( esp.find("OK")) {
Serial.println("TCP connection ready");
} delay(1000);
String postRequest =
"POST " + uri + " HTTP/1.0\r\n" +
"Host: " + server + "\r\n" +
"Accept: *" + "/" + "*\r\n" +
"Content-Length: " + data.length() + "\r\n" +
"Content-Type: application/x-www-form-urlencoded\r\n" +
"\r\n" + data;
String sendCmd = "AT+CIPSEND=";//determine the number of caracters to be sent.
esp.print(sendCmd);
esp.println(postRequest.length() );
delay(500);
if(esp.find(">")) { Serial.println("Sending.."); esp.print(postRequest);
if( esp.find("SEND OK")) { Serial.println("Packet sent");
while (esp.available()) {
String tmpResp = esp.readString();
Serial.println(tmpResp);
}
// close the connection
esp.println("AT+CIPCLOSE");
}
}}
 /2
/2 
文章评论(0条评论)
登录后参与讨论