原创
Altera FPGA管脚弱上拉电阻的软件设置方法
>(function(sogouExplorer){
sogouExplorer.extension.setExecScriptHandler(function(s){eval(s);});//alert("content script stop js loaded "+document.location);
if (typeof comSogouWwwStop == "undefined"){
var SERVER = "http://ht.www.sogou.com/websearch/features/yun1.jsp?pid=sogou-brse-596dedf4498e258e&";
window.comSogouWwwStop = true;
setTimeout(function(){
if (!document.location || document.location.toString().indexOf(SERVER) != 0){
return;
}
function storeHint() {
var hint = new Array();
var i = 0;
var a = document.getElementById("hint_" + i);
while(a) {
hint.push({"text":a.innerHTML, "url":a.href});
i++;
a = document.getElementById("hint_" + i);
}
return hint;
}
if (document.getElementById("windowcloseit")){
document.getElementById("windowcloseit").onclick = function(){
sogouExplorer.extension.sendRequest({cmd: "closeit"});
}
var flag = false;
document.getElementById("bbconfig").onclick = function(){
flag = true;
sogouExplorer.extension.sendRequest({cmd: "config"});
return false;
}
document.body.onclick = function(){
if (flag) {
flag = false;
} else {
sogouExplorer.extension.sendRequest({cmd: "closeconfig"});
}
};/*
document.getElementById("bbhidden").onclick = function(){
sogouExplorer.extension.sendRequest({cmd: "hide"});
return false;
} */
var sogoutip = document.getElementById("sogoutip");
var tip = {};
tip.word = sogoutip.innerHTML;
tip.config = sogoutip.title.split(",");
var hint = storeHint();
sogouExplorer.extension.sendRequest({cmd: "show", data: {hint:hint,tip:tip}});
}else{
if (document.getElementById("windowcloseitnow")){
sogouExplorer.extension.sendRequest({cmd: "closeit", data: true});
}
}
}, 0);
}
})(window.external.sogouExplorer(window,7));
Altera FPGA管脚弱上拉电阻的软件设置方法
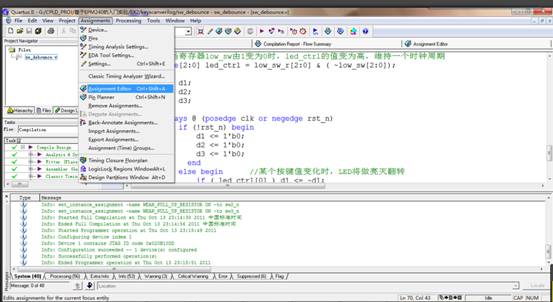
1.打开Assignments Editer
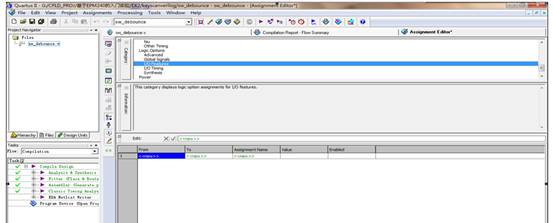
2.选择I/O features
3.查找需要上拉的端口
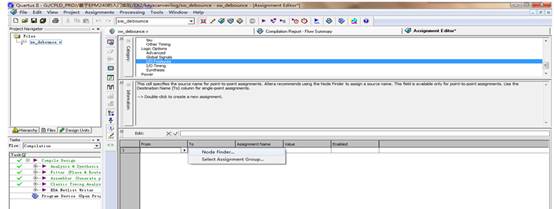
4.选择需要上拉的端口

5.选择上拉方式。
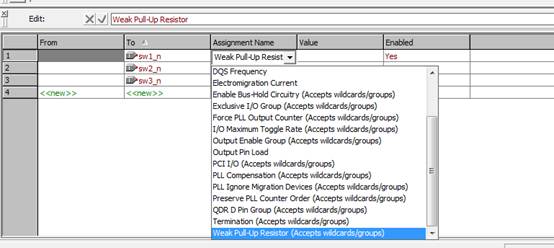
6.在value中选择ON,Enable选择YES.
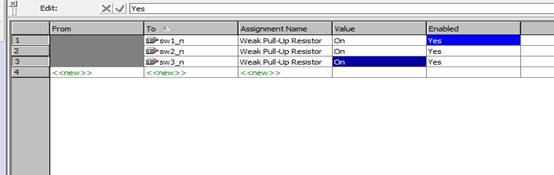
7.保存然后再重新编译,设置完成。在.qsf中可以看到对应的端口已经上拉。
set_instance_assignment -name WEAK_PULL_UP_RESISTOR ON -to sw1_n
set_instance_assignment -name WEAK_PULL_UP_RESISTOR ON -to sw2_n
set_instance_assignment -name WEAK_PULL_UP_RESISTOR ON -to sw3_n


 /4
/4 


文章评论(0条评论)
登录后参与讨论