通过前面的学习,读者应该对Service有了一个全面的了解,也知道了创建与启动Service的具体步骤与方法。下面将通过实例带领大家一起学习如何使用Service
实例:以start方式创建与启动Service
通过前面的学习,我们知道了用start方式创建以及使用 Service的4个步骤,下面我们按照这4个步骤来进行讲解。
1、 创建一个继承 Service 的类 MyService,在类中实现它的几个主要方法,为了验证生命周期的结论,我们在生命周期方法中都加入了Log。同时,为了模拟真实的开发环境,我们建立了一个线程,并在onStartCommand(Intent intent,in flags,in startld)方法中使用这个线程,在onDestroy()挂起线程,并销毁线程对象。具体的代码如下;
package com.rfstar.servicetest01;
import android.app.Service;import android.content.Intent;import android.os.IBinder;import android.util.Log;import androidx.annotation.Nullable;public class MyService extends Service { private Thread thread; private ServiceThread serviceThread; @Override public void onCreate() { super.onCreate(); Log.i("MyService","onCreate"); } @Override public int onStartCommand(Intent intent,int flags,int startId) { Log.i("MyService","onStartCommand"); serviceThread=new ServiceThread(); thread=new Thread(serviceThread); //开启一个线程 thread.start(); return super.onStartCommand(intent,flags,startId); } @Override public void onDestroy() { super.onDestroy(); //结束run方法的循环 serviceThread.flag=false; //挂起线程 thread.interrupt(); thread=null; Log.i("MyService","onDestroy"); } @Nullable @Override public IBinder onBind(Intent intent) { Log.i("MyService","onBind"); return null; } @Override public boolean onUnbind(Intent intent) { Log.i("MyService","onUnbind"); return super.onUnbind(intent); } class ServiceThread implements Runnable { //用volatile修饰保证变量在线程间的可见性 volatile boolean flag=true; @Override public void run() { while (flag) { try{ //间隔1秒 Thread.sleep(1000); } catch (InterruptedException exception) { Log.i("MyService",exception.toString()); } Log.i("MyService","thread正在进行"); } } }}复制代码2、 在 AndroidManifest.xml 中配置 Service。在讲解Activity 时,我们讲解了显式意图和隐式意图的概念,不同形式的意图在AndroidManifest.xml中需要进行不同的配置,而且我们还解释了为何多使用隐式意图的方式进行Activity间跳转。这里特别说明一下,虽然在 Service 中也存在这样两种形式的意图,但是由于在Android 5.0之后Google公司出于安全考虑,禁止了隐式声明 Intent来启动Service。因此,在开发中建议只使用显式意图,配置如下(为防止一些新入门的读者放错位置,展示出全部配置文件):
<?xml version="1.0" encoding="utf-8"?>
<manifest xmlns:android="http://schemas.android.com/apk/res/android" package="com.rfstar.servicetest01"> <application android:allowBackup="true" android:icon="@mipmap/ic_launcher" android:label="@string/app_name" android:roundIcon="@mipmap/ic_launcher_round" android:supportsRtl="true" android:theme="@style/AppTheme"> <activity android:name=".MainActivity"> <intent-filter> <action android:name="android.intent.action.MAIN" /> <category android:name="android.intent.category.LAUNCHER" /> </intent-filter> </activity> <!--加入这样一条配置即可--> <service android:name=".MyService"></service> </application></manifest>复制代码3、 通过 Context 调用 startService(Intent intent)方法来开启 Service,调用 stopServie(Intent intent)方法来终止 Service。为了实现这样的目的,我们在Activity 中使用两个按钮来分别负责Service 的开启和终止。当然这只是一个实例,在开发实践中如何使用 Service是十分灵活的,读者在开发时可以根据具体的需要来决定如何开启与终止 Service。实例代码如下所示。
MainActivity的布局文件activity_main.xml代码如下:
<?xml version="1.0" encoding="utf-8"?>
<LinearLayout xmlns:android="http://schemas.android.com/apk/res/android" xmlns:app="http://schemas.android.com/apk/res-auto" xmlns:tools="http://schemas.android.com/tools" android:layout_width="match_parent" android:layout_height="match_parent" android:orientation="vertical" tools:context=".MainActivity"> <Button android:id="@+id/startService" android:layout_width="match_parent" android:layout_height="wrap_content" android:text="start service" android:textSize="25sp"/> <Button android:id="@+id/stopService" android:layout_width="match_parent" android:layout_height="wrap_content" android:text="stop service" android:textSize="25sp"/></LinearLayout>复制代码MainActivity代码如下:
package com.rfstar.servicetest01;
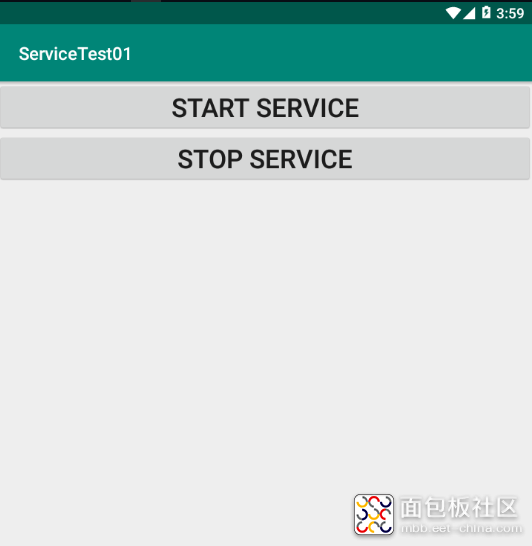
import androidx.appcompat.app.AppCompatActivity;import android.content.Intent;import android.os.Bundle;import android.view.View;import android.widget.Button;public class MainActivity extends AppCompatActivity implements View.OnClickListener{ private Button startButton; private Button stopButton; @Override protected void onCreate(Bundle savedInstanceState) { super.onCreate(savedInstanceState); setContentView(R.layout.activity_main); initView(); } private void initView() { startButton=(Button)findViewById(R.id.startService); stopButton=(Button)findViewById(R.id.stopService); startButton.setOnClickListener(this); stopButton.setOnClickListener(this); } @Override public void onClick(View view) { switch (view.getId()) { case R.id.startService: //创建意图 Intent startIntent=new Intent(this,MyService.class); //开启Service startService(startIntent); break; case R.id.stopService: //创建意图 Intent stopIntent=new Intent(this,MyService.class); // 终止服务 stopService(stopIntent); break; } }}复制代码在Activity 中对Button 按钮的点击事件进行了监听,并在点击时分别开启服务和终止服务。运行程序,效果如下图所示。
此时,点击"START SERVICE"按钮,观察Log 的输出,发现 Service 以及Service中的线程确实被开启了,Log如下∶
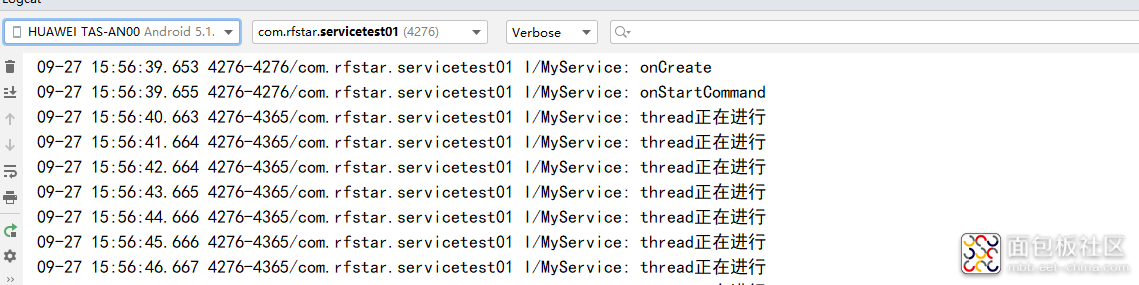
当点击"STOP SERVICE"按钮时,观察Log的输出,发现Thread不再运行,Service也被终止了,Log如下∶

从输出的Log中还可以清晰看出以start方式开启的Service的生命周期恰是上一章所阐的那样,它的生命周期方法是按照 onCreate()→onStartCommand()→Service running——调用context.stopServce()→onDestroy()这样一条路径运行的。
此时如果开启了服务,但是并没有终止服务就直接退出程序,服务是不会被终止的,大家用上面的实例可以亲手进行测试。所以当开启服务之后,它是不会自己停止的,也不会随开启者的销毁而销毁,所以一定要调用stopService()方法来终止它,至于终止的时机需要根据具体的业务来把握。
android studio工具及手机模拟器以及更多工程源代码下载请前往微信公众号:大鸟科创空间,回复:android studio即可获取。


 /4
/4 


文章评论(0条评论)
登录后参与讨论