

About a year ago now, my Playstation 3 gave up the ghost (no, this story isn't about it). For a while, the usual band-aid fix seemed to work just fine: Heat up the main chips with a heat gun to reflow the solder.
Eventually, I'd had it with this and set about doing a proper repair. This proper repair would consist of desoldering both the CPU and GPU from the console and replacing the solder balls with new ones.
To do this, I required some specialised equipment—namely, a reflow table. Being on a tight budget, I selected the Puhui T-870 reflow table. This model comprises a large infrared base plate for preheating, a heat lamp for applying focused heat on the desired component to desolder, and a thermocouple for each. Not much, but enough to perform the task adequately.
Upon receipt of the T-870, I immediately noticed a major issue. The temperature readings were far from accurate. At room temperature (25c), one thermocouple read 35c and the other read 65c!
I had an infrared thermometer, so I figured I could get away with ignoring the onboard temperature sensors and monitoring temperature manually. Boy, was I wrong. Anyway, a few failed reflow attempts later, I concluded that the Puhui T-870 was a piece of junk, as it was, and was not able to do what I needed.
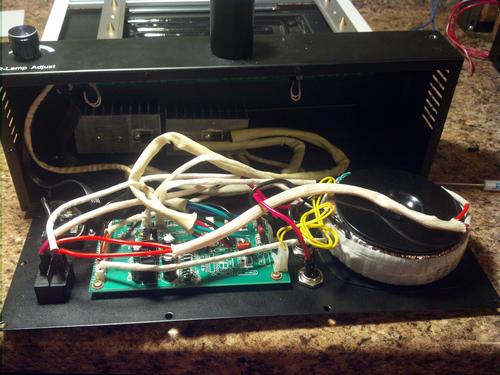
So, like any good engineer would, I cracked the sucker open and had a look. What I saw was pretty sad.
A jumbled mess of high-current wires leading to a pair of heavily heatsinked TO-220 triacs (for controlling the lamp and heatbed no doubt) hid the main board.

A jumbled mess of high current wires leading to a pair of heavily heatsinked TO-220 triacs (for controlling the lamp and heatbed no doubt) hid the main board.
The main board consisted of some power supply circuitry and an STM8 8bit microcontroller (younger brother of the STM32, I assume). There was a programming header available on the board, so I could simply reprogram the micro and attempt to compensate for the deficiencies, but without a working knowledge of that architecture, the source code, or the proper development environment for this chip, I would be fighting an uphill battle.
The sensible thing to do would be to use an architecture that I was familiar with and for which I had a development kit. Thus I chose the venerable PIC18F4550. I had experience with it, had a PicKit3 for programming and debugging, and liked its onboard USB for easy interfacing later on.
I wanted to improve the Puhui T-870 to the level of a several thousand dollar reflow table: accurate temperature sensors, an LCD display for user interaction, automated temperature curves, and a computer uplink for host software to manage everything.
All of this would be within reach with a redesigned circuit and more powerful microcontroller.
I set about my designing and quickly put a protoboard together with all of the requisite parts, but I quickly ran into a major issue. My code would not do what it was told. I tried multiple ways to perform the same operation, but to no avail. The code would apparently skip around to wherever it pleased at the time, evaluate expressions incorrectly, or actually execute different functions than the ones I was explicitly calling. I investigated this for a while but eventually threw my hands up in frustration, as I don't have any expertise in troubleshooting compilers or linkers.
This drove me to make a new decision on which controller I should use. Everybody seems to really like the AVR series, so I selected the ATMEGA324 as my new microcontroller. I set up avr-gcc and was all ready to get coding, except for one thing: I had to completely redesign my board to fit the new pinout.
Rather than try to modify my existing prototype to fit my new controller, I drew up the design in EAGLE and ran a PCB using the toner transfer method. The board turned out well except for some minor issues related to getting proper conduction between the top and bottom layers.
A few days of firmware writing, and the rest is history. I now have a functional reflow table that far exceeds the capabilities of what I originally purchased.
Speculation on original design
The original design of the T-870 obviously optimised cost over performance, and I'm sure the code is pretty terrible as well, had I access to it. The design of the thermocouple circuitry is particularly poor, consisting of a few passives and an op-amp, with no junction compensation.
Improvements I made
With my redesign, I added a discrete ADC with an onboard temperature sensor for junction compensation, a character LCD instead of the included 7-segment display, and a computer uplink for automated temperature profiles. At most, the added cost is roughly 50 dollars in components. But to get these features in a commercial reflow table, the cost increase is substantial—at least a few thousand dollars.
Seth Peterson is 24 years old and has been a maker and hacker since middle school. He graduated from the University of Dayton in Ohio in May 2012 with a BS in Computer Engineering Technology. He work for the University of Dayton Research Institute.
He submitted this article as part of Frankenstein's Fix, a design contest hosted by EE Times (US).
 /4
/4 
文章评论(0条评论)
登录后参与讨论