使用 SimpleAdapter来实现ListView有一定的扩充性,可以实现一定的自定义效果,这种自定义的效果是通过创建 item 样式来实现的。创建一个名为 item_list.xml的 item布局文件,代码如下∶
<?xml version="1.0" encoding="utf-8"?>
<LinearLayout xmlns:android="http://schemas.android.com/apk/res/android" xmlns:tools="http://schemas.android.com/tools" android:layout_width="match_parent" android:layout_height="match_parent" android:orientation="horizontal" tools:context=".MainActivity"> <ImageView android:id="@+id/item_image" android:layout_width="0dp" android:layout_height="wrap_content" android:layout_weight="1"/> <TextView android:id="@+id/item_text" android:layout_width="0dp" android:layout_height="wrap_content" android:layout_weight="1 android:textSize="24dp"/></LinearLayout>复制代码MainActivity的布局文件Activity_main.xml中加入一个ListView,代码如下:
<?xml version="1.0" encoding="utf-8"?>
<LinearLayout xmlns:android="http://schemas.android.com/apk/res/android" xmlns:tools="http://schemas.android.com/tools" android:layout_width="match_parent" android:layout_height="match_parent" android:orientation="horizontal" tools:context=".MainActivity"> <ListView android:id="@+id/listView" android:layout_width="match_parent" android:layout_height="wrap_content"/></LinearLayout>复制代码
在MainActivity中我们需要使用SimpleAdapter适配器来实现ListView,代码如下:
package com.rfstar.listviewtest02;
import androidx.appcompat.app.AppCompatActivity;import android.os.Bundle;import android.widget.ListView;import android.widget.SimpleAdapter;import java.util.ArrayList;import java.util.HashMap;import java.util.List;import java.util.Map;public class MainActivity extends AppCompatActivity {private ListView listView;private List<Map<String,Object>> dataList=new ArrayList<Map<String, Object>>();private int[] itemIdArray=new int[]{R.id.item_text,R.id.item_image};private String[] dataKeyArray=new String[]{"name","image"}; @Override protected void onCreate(Bundle savedInstanceState) { super.onCreate(savedInstanceState); setContentView(R.layout.activity_main); initData(); initView(); }private void initView() { listView=(ListView)findViewById(R.id.listView); SimpleAdapter simpleAdapter=new SimpleAdapter(this,dataList,R.layout.item_list,dataKeyArray,itemIdArray); listView.setAdapter(simpleAdapter); } private void initData() { Map<String,Object>map; for(int i=0;i<10;i++) { map=new HashMap<String,Object>(); map.put("name","大鸟科创空间"+i); map.put("image",R.mipmap.ic_launcher); dataList.add(map); } }}复制代码
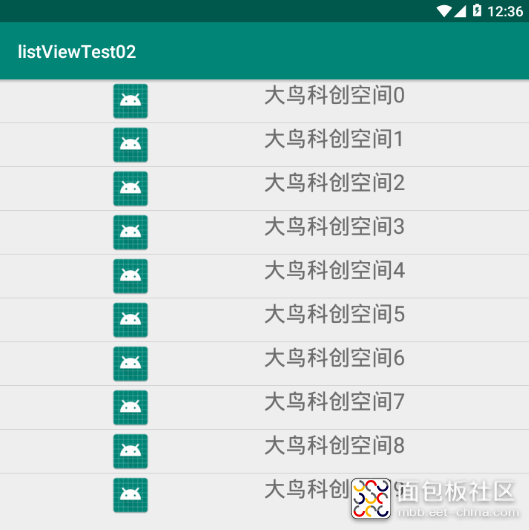
本实例代码和使用 ArrayAdapter实现列表的代码大同小异,区别主要在于数据集的不同,以及实例化 Adapter 时的不同。SimpleAdapter 在实例化时需要传入5个参数,分别是上下文对象、List,Object>>格式的数据集、item的布局对象、数据集中Map键的数组、item 中控件的id数组。当 SimpleAdapter 实例化完成后,系统会根据传入的两个数组自动将数据集注入 item 中。使用 SimpleAdapter 适配器实现的 ListView 能够实现更加复杂的状况,在实际开发中有时会使用到。但是,它有一个非常大的缺陷。想象一下,如果在每个item 中都有一个按钮,需要给这个按钮添加点击事件,这就变得无法处理了。此时只能依靠使用 BaseAdapter 实现的 ListView。下一章节我会给大家将BaseAdapter的使用。运行程序效果如下图:
android studio工具及手机模拟器以及更多工程源代码下载请前往微信公众号:大鸟科创空间,回复:android studio即可获取。


 /2
/2 


curton 2021-5-26 19:46