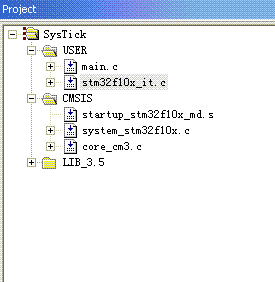


半个月没有碰我的stm32开发板了,生疏了不少。这次除了学习SysTick以外,还自己花了点心思琢磨怎样建立keil工程比较方便。下面就是我今天使用的工程目录,非常简洁,以后就用这个吧,看着舒心。

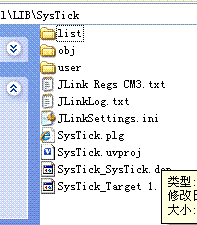
而接下来这个是windows管理器下的目录,相信大部分人都和我一样吧,不多说。

还要提一下,在使用库函数时,很多人喜欢每建立一个工程就将那个文件夹复制一遍。我觉得没有必要这样,将从ST官网上下载的函数包独立放在一个地方就行了,只要在工程里指定包含路径即可,毕竟修改库函数还是挺少见的。当然如果有必要修改库函数的话就不能这样。
言归正传,开始SysTick的探讨。
实现功能:定时1s中断,取反led灯。
3.5版的库抛弃了2.0版以前的大部分函数,对这个定时器的配置方式作了较大的更改。在我们看来,新版的库反而不如旧版的库操作方便了。但是意法半导体的工程师们这样做肯定有他们的道理。个人觉得这样做更加凸显示出嘀嗒定时器的使用场合。因为这个是M3核内的定时器,设计的目的主要是用于操作系统的节拍时钟,估计意法半的设计师们有意告诉我们如果不跑操作系统,那就不要使用SysTick。
改版以后,我们如果要使用SysTick,需要做的事情很简单了。
我们看一看3.5版的库自带模板的main.c里面的说明。
/* Setup SysTick Timer for 1 msec interrupts.
------------------------------------------
1. The SysTick_Config() function is a CMSIS function which configure:
- The SysTick Reload register with value passed as function parameter.
- Configure the SysTick IRQ priority to the lowest value (0x0F).
- Reset the SysTick Counter register.
- Configure the SysTick Counter clock source to be Core Clock Source (HCLK).
- Enable the SysTick Interrupt.
- Start the SysTick Counter.
2. You can change the SysTick Clock source to be HCLK_Div8 by calling the
SysTick_CLKSourceConfig(SysTick_CLKSource_HCLK_Div8) just after the
SysTick_Config() function call. The SysTick_CLKSourceConfig() is defined
inside the misc.c file.
3. You can change the SysTick IRQ priority by calling the
NVIC_SetPriority(SysTick_IRQn,...) just after the SysTick_Config() function
call. The NVIC_SetPriority() is defined inside the core_cm3.h file.
4. To adjust the SysTick time base, use the following formula:
Reload Value = SysTick Counter Clock (Hz) x Desired Time base (s)
- Reload Value is the parameter to be passed for SysTick_Config() function
- Reload Value should not exceed 0xFFFFFF
*/
if (SysTick_Config(SystemCoreClock / 1000))
{
/* Capture error */
while (1);
}
上面说得很清楚,我们只要调用SysTick_Config()函数,系统就为我们做了大量的事情。
1.该函数的参数就是预装值
2.中断设置成最低级别,并将计数寄存器清零。
3.配置SysTick的时钟为HCLK。(还可以是HCLK/8)
4.使能嘀嗒定时器的中断
5.开始计数。
这么说来,我们只要调用了SysTick_Config()函数,连NVIC都不用去配置了,系统已经直接打开了中断,我们只要去填写SysTick_Handler( )就行了,而且该函数的参数就是预装值。多方便!
但是方便的同时也造成了不方便。不方便之处就是,一旦使用了SysTick,就只能用中断来定时,不能采用查询方式。固件库并没有提供我们改变工作方式的接口,如果要使用查询,那就得直接操作寄存器了,这就是麻烦之处。这正好说明了,ST的工程师们不希望我们随便来使用SysTick 。但还他们还是够意思的,后面至少告诉了我们怎样去改变中断优先级,怎样改变计数的时钟源,还有怎样去改变预装值。
所以上面这条语句
if (SysTick_Config(SystemCoreClock / 1000))
{
/* Capture error */
while (1);
}
的作用显而易见了。
在if条件里调用SysTick_Config(),该函数是一定会执行的,一旦执行,就会进行我们上面讨论的初始化。另外,无论系统的时钟(HCLK)是多少,都将定时器的定时为1ms,SystemCoreClock其实就是HCLK,在我们的例子中就是72MHz。
看看SysTick_Config()的实现,就知道这条语句为什么要这么写
static __INLINE uint32_t SysTick_Config(uint32_t ticks)
{
if (ticks > SysTick_LOAD_RELOAD_Msk) return (1); /* Reload value impossible */
SysTick->LOAD = (ticks & SysTick_LOAD_RELOAD_Msk) - 1; /* set reload register */
NVIC_SetPriority (SysTick_IRQn, (1<<__NVIC_PRIO_BITS) - 1); /* set Priority for Cortex-M0 System Interrupts */
SysTick->VAL = 0; /* Load the SysTick Counter Value */
SysTick->CTRL = SysTick_CTRL_CLKSOURCE_Msk |
SysTick_CTRL_TICKINT_Msk |
SysTick_CTRL_ENABLE_Msk; /* Enable SysTick IRQ and SysTick Timer */
return (0); /* Function successful */
}
下面是main函数的代码
//main.c
#include "stm32f10x.h"
GPIO_InitTypeDef GPIO_InitStructure;
__IO uint32_t TimingDelay;
void rcc_cfg()
{
;
}
void gpio_cfg()
{
RCC_APB2PeriphClockCmd(RCC_APB2Periph_GPIOA, ENABLE);
GPIO_InitStructure.GPIO_Speed = GPIO_Speed_50MHz;
GPIO_InitStructure.GPIO_Pin = GPIO_Pin_8;
GPIO_InitStructure.GPIO_Mode = GPIO_Mode_Out_PP;
GPIO_Init(GPIOA, &GPIO_InitStructure);
}
void Delay(__IO uint32_t nTime)
{
TimingDelay = nTime;
while(TimingDelay != 0);
}
int main(void)
{
rcc_cfg();
gpio_cfg();
if (SysTick_Config(SystemCoreClock / 1000))
{
/* Capture error */
while (1);
}
/* Infinite loop */
while (1)
{
/* Set PA8 */
GPIO_WriteBit(GPIOA, GPIO_Pin_8, Bit_SET);
Delay(1000);
/* Reset PA8 */
GPIO_WriteBit(GPIOA, GPIO_Pin_8, Bit_RESET);
Delay(1000);
}
}
下面是中断函数源码
//system_stm32f10x.c
extern __IO uint32_t TimingDelay;
void SysTick_Handler(void)
{
if (TimingDelay != 0x00)
{
TimingDelay--;
}
}
注意红色显示的语句,使用外部变量的方法。
 /5
/5 
用户377235 2015-10-4 17:20
用户438376 2013-4-24 20:45
用户402268 2012-11-19 17:19