作者:OpenGL
https://juejin.im/post/5ccdb8d3f265da03a1583c1c
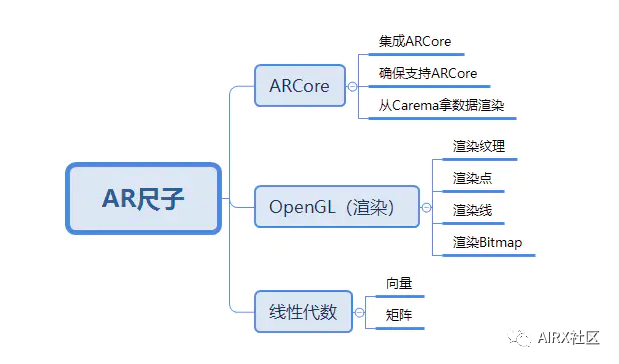
苹果推出ARKit之后。Google相继也推出了ARCore。但相对应的苹果在iPhone中都预装了AR尺子。但是Android手机中,用到ARCore的AR应用却少之又少。所以这里带大家熟悉,并写一个AR尺子。
预览
Google官方示例
(1)Google官方ARCore API地址:
https://developers.google.cn/ar/reference/java/
(2)Google官方ARCore Demo地址:
https://github.com/google-ar
集成ARCore
1.向 manifest 添加 AR 选项。并声明Camera权限
<manifest xmlns:android="http://schemas.android.com/apk/res/android"package="com.jtl.arcoredemo">//声明Camera权限<uses-permission android:name="android.permission.CAMERA" /><uses-feature android:name="android.hardware.camera" /><applicationandroid:allowBackup="true"android:icon="@mipmap/ic_launcher"android:label="@string/app_name"android:roundIcon="@mipmap/ic_launcher_round"android:supportsRtl="true"android:theme="@style/AppTheme"><activity android:name=".MainActivity"><intent-filter><action android:name="android.intent.action.MAIN"/><category android:name="android.intent.category.LAUNCHER"/></intent-filter></activity>//添加AR选项,在启动应用时会判断是否安装了ARCore<meta-data android:name="com.google.ar.core" android:value="required" /></application></manifest>
2.添加依赖库
android {...1.8compileOptions {sourceCompatibility 1.8targetCompatibility 1.8}}Gradle中添加ARCore的依赖库(截至2019.5.4,最新版本为1.8.0)dependencies {implementation fileTree(dir: 'libs', include: ['*.jar'])implementation 'com.android.support:appcompat-v7:28.0.0'implementation 'com.android.support.constraint:constraint-layout:1.1.3'testImplementation 'junit:junit:4.12'androidTestImplementation 'com.android.support.test:runner:1.0.2'androidTestImplementation 'com.android.support.test.espresso:espresso-core:3.0.2'implementation "com.google.ar.sceneform:core:1.8.0"}
3.请求摄像机权限
这里引入一个PermissionHelper类。
/*** 权限帮助类*/public final class PermissionHelper {private static final int CAMERA_PERMISSION_CODE = 0;private static final String CAMERA_PERMISSION = Manifest.permission.CAMERA;/*** 是否有相机权限* @param activity* @return*/public static boolean hasCameraPermission(Activity activity) {return ContextCompat.checkSelfPermission(activity, CAMERA_PERMISSION)== PackageManager.PERMISSION_GRANTED;}/*** 请求相机权限* @param activity*/public static void requestCameraPermission(Activity activity) {ActivityCompat.requestPermissions(activity, new String[]{CAMERA_PERMISSION}, CAMERA_PERMISSION_CODE);}/*** 展示申请权限的相应解释* @param activity* @return*/public static boolean shouldShowRequestPermissionRationale(Activity activity) {return ActivityCompat.shouldShowRequestPermissionRationale(activity, CAMERA_PERMISSION);}/*** 打开设置界面** @param activity*/public static void launchPermissionSettings(Activity activity) {Intent intent = new Intent();intent.setAction(Settings.ACTION_APPLICATION_DETAILS_SETTINGS);intent.setData(Uri.fromParts("package", activity.getPackageName(), null));activity.startActivity(intent);}}
在Activity中做相应的权限申请操作
protected void onResume() {super.onResume();// ARCore 申请相机权限操作if (!PermissionHelper.hasCameraPermission(this)) {PermissionHelper.requestCameraPermission(this);return;}}public void onRequestPermissionsResult(int requestCode, String[] permissions, int[] grantResults) {if (!PermissionHelper.hasCameraPermission(this)) {Toast.makeText(this, "该应用需要相机权限", Toast.LENGTH_LONG).show();//弹出相应解释if (!PermissionHelper.shouldShowRequestPermissionRationale(this)) {// 直接跳至设置 修改权限PermissionHelper.launchPermissionSettings(this);}finish();}}
初识Session
1.什么是Session:
Session也称为会话,是ARCore最核心的一个类。他可以获取相机数据。并算出相应的锚点信息以及视矩阵,投影矩阵等。这里的部分内容会在后面进行具体叙述。
2.初始化Session
首先判断设备是否支持ARCore
@Overrideprotected void onResume() {super.onResume();// ARCore 申请相机权限操作...Exception exception =null;String msg =null;//初始化Sessionif (mSession==null){try {//判断是否安装ARCoreswitch (ArCoreApk.getInstance().requestInstall(this,!isInstallRequested)){case INSTALL_REQUESTED:isInstallRequested=true;break;case INSTALLED:Log.i(TAG,"已安装ARCore");break;}mSession=new Session(this);} catch (UnavailableArcoreNotInstalledException| UnavailableUserDeclinedInstallationException e) {msg = "Please install ARCore";exception = e;} catch (UnavailableApkTooOldException e) {msg = "Please update ARCore";exception = e;} catch (UnavailableSdkTooOldException e) {msg = "Please update this app";exception = e;} catch (UnavailableDeviceNotCompatibleException e) {msg = "This device does not support AR";exception = e;} catch (Exception e) {msg = "Failed to create AR session";exception = e;}//有异常说明不支持或者没安装ARCoreif (msg != null) {Log.e(TAG, "Exception creating session", exception);return;}}//该设备支持并且已安装ARCoretry {//Session 恢复resume状态mSession.resume();} catch (CameraNotAvailableException e) {Log.e(TAG, "Camera not available. Please restart the app.");mSession = null;return;}}
3.开始或恢复Session(会话)
protected void onResume() {super.onResume();// ARCore 申请相机权限操作...Exception exception =null;String msg =null;//初始化Sessionif (mSession==null){//判断是否支持ARCore...}//该设备支持并且已安装ARCoretry {//Session 恢复resume状态mSession.resume();} catch (CameraNotAvailableException e) {Log.e(TAG, "Camera not available. Please restart the app.");mSession = null;return;}}
4.暂停关闭Session(会话)
protected void onPause() {super.onPause();if (mSession!=null){mSession.pause();}}protected void onDestroy() {super.onDestroy();if (mSession!=null){mSession.close();}}
OpenGL渲染
1.简单介绍:
首先这里只是简单介绍一下OpenGL,具体的会在后面进行具体叙述。
OpenGL是一个渲染协议。很多渲染引擎底层就是用OpenGL实现的。现在的移动手机都是用的OpenGL ES2.0,几乎涵盖了所有的苹果和Android手机。Android上有个叫做GLSurfaceView的控件。就是Google已经封装好的一个渲染控件。它的底层API都是Google 封装好的native方法,也就是俗称的JNI方法。他需要实现一个Render接口。这个接口有三个回调方法。每一个GLSurfaceView都会有一个相对应的GL线程,专门用来绘制。每个GL线程都有相应的resume和pause方法。用来resume绘制和pause绘制。
2.GLSurfaceView
xml布局
<android.support.constraint.ConstraintLayoutxmlns:android="http://schemas.android.com/apk/res/android"xmlns:app="http://schemas.android.com/apk/res-auto"xmlns:tools="http://schemas.android.com/tools"android:layout_width="match_parent"android:layout_height="match_parent"tools:context=".MainActivity"><android.opengl.GLSurfaceViewandroid:id="@+id/gl_main_show"android:layout_width="0dp"android:layout_height="0dp"app:layout_constraintTop_toTopOf="parent"app:layout_constraintBottom_toBottomOf="parent"app:layout_constraintStart_toStartOf="parent"app:layout_constraintEnd_toEndOf="parent"/></android.support.constraint.ConstraintLayout>
初始化
public class MainActivity extends AppCompatActivity implements GLSurfaceView.Renderer {//用来使Session能够根据手机横竖屏,输出相应分辨率的数据private DisplayRotationHelper mDisplayRotationHelper;private GLSurfaceView mShowGLSurface;//初始化相应数据private void initData(){mShowGLSurface=findViewById(R.id.gl_main_show);mDisplayRotationHelper=new DisplayRotationHelper(this);// Set up renderer.mShowGLSurface.setPreserveEGLContextOnPause(true);mShowGLSurface.setEGLContextClientVersion(2);//OpenGL版本为2.0mShowGLSurface.setEGLConfigChooser(8, 8, 8, 8, 16, 0); // Alpha used for plane blending.mShowGLSurface.setRenderer(this);//实现Render接口mShowGLSurface.setRenderMode(GLSurfaceView.RENDERMODE_CONTINUOUSLY);//RENDERMODE_CONTINUOUSLY渲染模式为实时渲染。}}
实现 Render接口的三个回调方法
/*** GLSurfaceView创建时被回调,可以做一些初始化操作* @param gl* @param config*/public void onSurfaceCreated(GL10 gl, EGLConfig config) {//设置每一帧清屏颜色 传入参数为RGBAGLES20.glClearColor(0.1f,0.1f,0.1f,1.0f);}/*** GLSurfaceView 大小改变时调用* @param gl* @param width GLSurfaceView宽* @param height GLSurfaceView高*/public void onSurfaceChanged(GL10 gl, int width, int height) {//改变视口 方便 OpenGLES做 视口变换GLES20.glViewport(0,0,width,height);}/*** GLSurfaceView绘制每一帧调用,此处不在主线程中,而是在GL线程中。* 部分跨线程数据,需要做线程同步。不能直接更新UI(不在主线程)* @param gl*/public void onDrawFrame(GL10 gl) {//清空彩色缓冲和深度缓冲 清空后的颜色为GLES20.glClearColor()时设置的颜色GLES20.glClear(GLES20.GL_COLOR_BUFFER_BIT|GLES20.GL_DEPTH_BUFFER_BIT);}
GLSurfaceView的 resume和pause
protected void onResume() {super.onResume();//ARCore的相应初始化操作...//GLSurfaceView onResumemShowGLSurface.onResume();mDisplayRotationHelper.onResume();}protected void onPause() {super.onPause();if (mSession!=null){//由于GLSurfaceView需要Session的数据。所以如果Session先pause会导致无法获取Session中的数据mShowGLSurface.onPause();//GLSurfaceView onPausemDisplayRotationHelper.onPause();mSession.pause();}}
3. 渲染数据
这里引入了一个BackgroundRenderer。它才是抽离出来的真正的用来渲染的类。
private BackgroundRenderer mBackgroundRenderer;/*** GLSurfaceView创建时被回调,可以做一些初始化操作* @param gl* @param config*/public void onSurfaceCreated(GL10 gl, EGLConfig config) {//设置每一帧清屏颜色 传入参数为RGBAGLES20.glClearColor(0.1f,0.1f,0.1f,1.0f);mBackgroundRenderer=new BackgroundRenderer();mBackgroundRenderer.createOnGlThread(this);}/*** GLSurfaceView 大小改变时调用* @param gl* @param width GLSurfaceView宽* @param height GLSurfaceView高*/public void onSurfaceChanged(GL10 gl, int width, int height) {//方便 OpenGLES做 视口变换GLES20.glViewport(0,0,width,height);mDisplayRotationHelper.onSurfaceChanged(width,height);}/*** GLSurfaceView绘制每一帧调用,此处不在主线程中,而是在GL线程中。* 部分跨线程数据,需要做线程同步。不能直接更新UI(不在主线程)* @param gl*/public void onDrawFrame(GL10 gl) {//清空彩色缓冲和深度缓冲 清空后的颜色为GLES20.glClearColor()时设置的颜色GLES20.glClear(GLES20.GL_COLOR_BUFFER_BIT|GLES20.GL_DEPTH_BUFFER_BIT);if (mSession==null){return;}//设置纹理IDmSession.setCameraTextureName(mBackgroundRenderer.getTextureId());//根据设备渲染Rotation,width,height。session.setDisplayGeometry(displayRotation, viewportWidth, viewportHeight);mDisplayRotationHelper.updateSessionIfNeeded(mSession);try {Frame frame=mSession.update();//获取Frame数据mBackgroundRenderer.draw(frame);//渲染frame数据} catch (CameraNotAvailableException e) {e.printStackTrace();}}
5.项目地址
(1)ArRuler:
https://github.com/13046434521/ArRuler
(2)ARRulerDemo:
https://github.com/13046434521/ARRulerDemo
推荐阅读
AIRX
国内领先的AI、AR、VR技术学习与交流平台
扫码关注我们
AR Portal
AR开发者交流群:626914771
AR开发交流:891555732


 0
0