章节重点
在C++面试时,经常被问到如果高效获取线程ID,但不少同学都不知道如何回答。
重点是通过__thread关键字。
重点内容

视频讲解:https://www.bilibili.com/video/BV1VeZbYxELd/
测试获取线程ID的性能
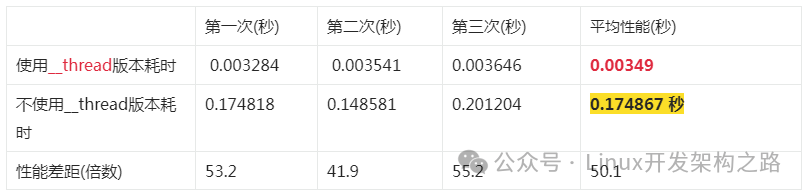
单线程,测试3次,每次获取100万次线程ID。
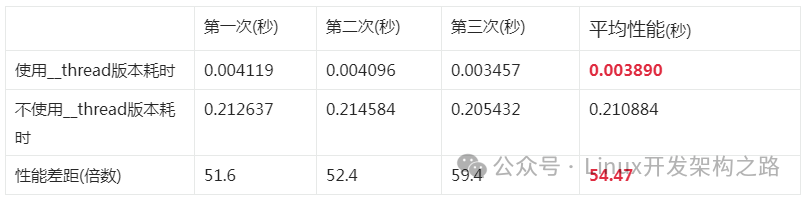
4个线程,测试3次,每次每个线程获取100万次线程ID。
代码改动
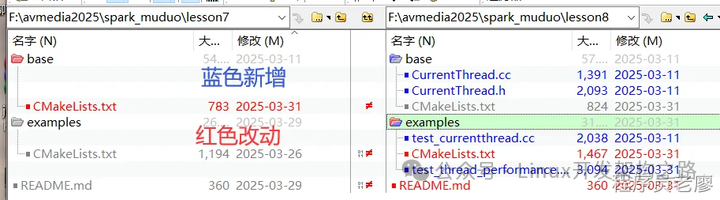
lesson8
-
base/CurrentThread.h/cc
-
examples/test_currentthread.cc
-
examples/test_thread_performance.cc
1 线程局部存储__thread关键字的作用
我来详细分析 CurrentThread 的设计原理和性能优化,并给出时序图。
1.1 设计原理分析
1.1.1 线程局部存储(thread local store, TLS)机制
__thread int t_cachedTid = 0;// 线程局部存储变量// int g_t_cachedTid = 0;// 全局变量,多线程共享__thread char t_tidString[32];__thread int t_tidStringLength = 6;__thread const char* t_threadName = "unknown";
-
使用 __thread 关键字实现线程局部存储
-
每个线程都有自己独立的变量副本
和 int g_t_cachedTid = 0;// 全局变量,多线程共享 不一样
-
变量的生命周期与线程相同
-
避免了多线程访问时的同步开销,内存模型:
// 内存布局示意Thread 1: [t_cachedTid = 1001]Thread 2: [t_cachedTid = 1002]Thread 3: [t_cachedTid = 1003]
-
每个线程有独立的内存区域
-
变量存储在线程的栈或TLS段中
-
线程间互不影响
1.1.2 懒加载模式
inline int tid(){ if (__builtin_expect(t_cachedTid == 0, 0)) { cacheTid(); } return t_cachedTid;}
-
采用懒加载策略,只在第一次调用时获取线程ID
-
使用 __builtin_expect 优化分支预测,为什么能优化?这里实测和
inline int tid(){ if (t_cachedTid == 0) { cacheTid(); } return t_cachedTid;}
没啥区别,所以不用理会这个优化。
-
后续调用直接返回缓存值,避免系统调用
1.2 性能优化分析
1.2.1 减少系统调用
-
系统调用(syscall(SYS_gettid))是相对昂贵的操作
-
通过缓存机制,将系统调用次数从每次获取都调用降低到每个线程只调用一次
-
在多线程环境下,性能提升更加明显
1.2.2 字符串预格式化
void cacheTid(){ if (t_cachedTid == 0) { t_cachedTid = gettid(); t_tidStringLength = snprintf(t_tidString, sizeof t_tidString, "%5d ", t_cachedTid); }}
-
预先计算并缓存线程ID的字符串表示
-
避免重复的整数到字符串转换操作
-
缓存字符串长度,避免重复计算
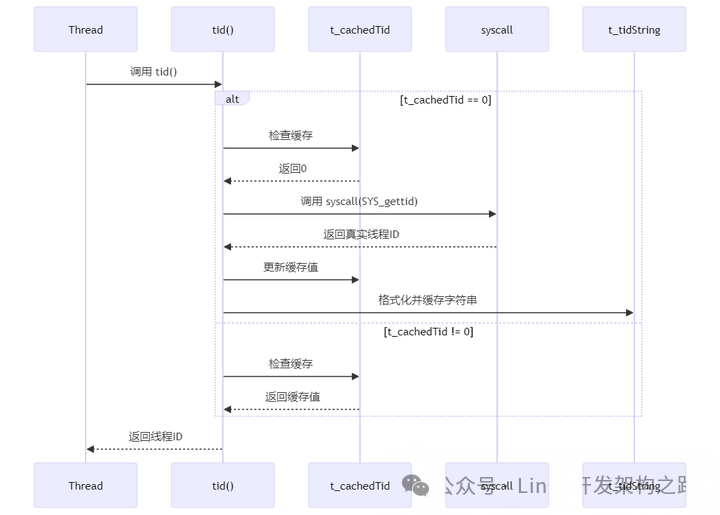
1.3 CurrentThread::tid() 函数时序图
1.4 使用场景
这种设计特别适合:
1.日志系统
-
频繁获取线程ID用于日志记录
-
需要线程标识进行问题追踪
2.高并发服务器
-
需要频繁获取线程ID的场景
-
对性能要求较高的系统
1.5 是否可以不用__thread
只使用 extern int t_cachedTid 而不使用 __thread 的风险分析。
1.5.1 数据竞争问题
如果不使用__thread关键字,那t_cachedTid变成所有线程共享了。
// 不使用__thread的情况extern int t_cachedTid; // 全局变量,所有线程共享void cacheTid(){ if (t_cachedTid == 0) { t_cachedTid = gettid(); // 危险!多线程同时访问 }}
-
多个线程同时执行 cacheTid()
-
可能导致线程A写入的ID被线程B覆盖
-
最终可能所有线程都得到错误的线程ID
1.5.2 实际案例分析
假设有两个线程同时执行:
// 线程Aif (t_cachedTid == 0) // 检查为0t_cachedTid = gettid(); // 假设得到ID=100// 但此时线程B可能已经覆盖了这个值// 线程Bif (t_cachedTid == 0) // 也检查为0t_cachedTid = gettid(); // 假设得到ID=200// 覆盖了线程A的值
1.5.3 正确的做法
// 使用__thread的情况__thread int t_cachedTid = 0; // 每个线程独立存储void cacheTid(){ if (t_cachedTid == 0) { t_cachedTid = gettid(); // 安全!每个线程有自己的存储空间 }}
1.5.4 小结
在现代多线程程序中,应该始终使用 __thread 来保证线程局部存储的正确性和性能。这是C++中处理线程局部数据的最佳实践。
2 使用和不使用__thread缓存线程id性能差异测试
2.1 测试代码
测试范例:examples/test_thread_performance.cc
using namespace mymuduo;// 不使用__thread的版本class NonThreadLocal {public: static int getTid() { return static_cast<int>(::syscall(SYS_gettid)); }};// 测试函数void testPerformance(int iterations) { std::cout << "开始性能测试,迭代次数: " << iterations << std::endl; // 测试使用__thread的版本 { Timestamp start = Timestamp::now(); for (int i = 0; i < iterations; ++i) { CurrentThread::tid(); } Timestamp end = Timestamp::now(); double time = timeDifference(end, start); std::cout << "使用__thread版本耗时: " << time << " 秒" << std::endl; } // 测试不使用__thread的版本 { Timestamp start = Timestamp::now(); for (int i = 0; i < iterations; ++i) { NonThreadLocal::getTid(); } Timestamp end = Timestamp::now(); double time = timeDifference(end, start); std::cout << "不使用__thread版本耗时: " << time << " 秒" << std::endl; }}// 多线程测试void multiThreadTest(int threadCount, int iterations) { std::cout << "\n开始多线程测试,线程数: " << threadCount << ", 每个线程迭代次数: " << iterations << std::endl; std::vectorthreads; // 测试使用__thread的版本 { Timestamp start = Timestamp::now(); for (int i = 0; i < threadCount; ++i) { threads.emplace_back([iterations]() { for (int j = 0; j < iterations; ++j) { CurrentThread::tid(); } }); } for (auto& thread : threads) { thread.join(); } Timestamp end = Timestamp::now(); double time = timeDifference(end, start); std::cout << "多线程使用__thread版本总耗时: " << time << " 秒" << std::endl; } threads.clear(); // 测试不使用__thread的版本 { Timestamp start = Timestamp::now(); for (int i = 0; i < threadCount; ++i) { threads.emplace_back([iterations]() { for (int j = 0; j < iterations; ++j) { NonThreadLocal::getTid(); } }); } for (auto& thread : threads) { thread.join(); } Timestamp end = Timestamp::now(); double time = timeDifference(end, start); std::cout << "多线程不使用__thread版本总耗时: " << time << " 秒\n" << std::endl; }}int main() { // 单线程测试 std::cout << "=== 单线程测试 ===" << std::endl; testPerformance(1000000); // 100万次迭代 // 多线程测试 std::cout << "\n=== 多线程测试 ===" << std::endl; multiThreadTest(4, 1000000); // 4个线程,每个线程100万次迭代 return 0;}
性能测试程序,它包含以下测试场景:
1.单线程测试:
-
对比使用和不使用 __thread 时获取线程ID的性能
-
每个版本执行100万次迭代
-
使用 Timestamp 类精确测量执行时间
2.多线程测试:
-
创建4个线程同时运行
-
每个线程执行100万次迭代
-
对比多线程环境下两种实现的性能差异
要编译和运行这个测试,你需要执行以下命令:
cd buildcmake ..make./bin/test_thread_performance
2.2 测试结果
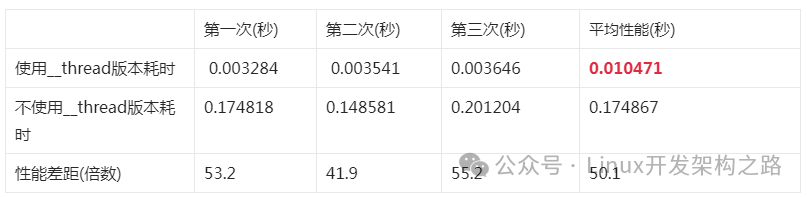
单线程,测试3次,每次获取100万次线程ID。
|
|
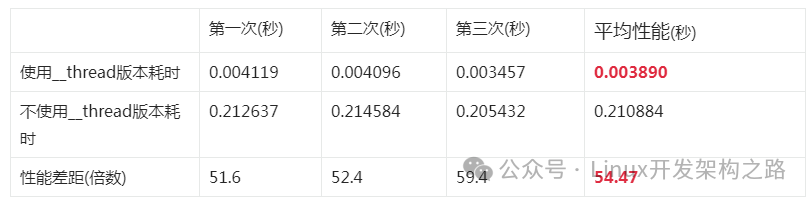
4个线程,测试3次,每次每个线程获取100万次线程ID。
3 章节总结
面试时被问到项目优化,可以讲使用__thread关键字缓存各自线程的ID,这样日志需要获取线程ID时有更好的性能,通过测试对比性能有50倍左右的差距。
具体实现过程大家可以看 1.3 CurrentThread::tid() 函数时序图 章节。
 0
0