之前的文章《STM32 串口详解》介绍了串口驱动,串口在嵌入式领域不仅是一个通讯接口,还是一种调试工具,其好用程度不亚于硬件仿真。有些环境不方便连接Jlink进行硬件仿真,或者并不是必现的问题,我们需要定位出现问题的地方,可以选择保存log的方式,但是需要后续读取,且受到Flash大小的限制,如果可以放置一台计算机到现场,使用串口打印无疑是最好的办法,在C语言中 printf函数输出各种类型的数据,使用格式控制输出各种长度的字符,甚至输出各种各样的图案,需要将串口重定向到printf函数。
0 1 硬件打印在STM32的应用中,我们常常对printf进行重定向的方式来把打印信息printf到我们的串口助手。在MDK环境中,我们常常使用MicroLIB+fputc的方式实现串口打印功能,即:串口重映射
代码中记得添加一下头文件
#include < stdio.h >
兼容不同IDE的putchar重映射。
/* With GCC/RAISONANCE, small printf (option LD Linker->Libraries->Small printf set to 'Yes') calls __io_putchar() */
当然也需要配置下串口,不需要配置中断。
void UART_Init(void){ USART_InitTypeDef USART_InitStructure; GPIO_InitTypeDef GPIO_InitStructure; /* Enable GPIO clock */ RCC_AHB1PeriphClockCmd(RCC_AHB1Periph_GPIOA, ENABLE); /* Enable UART1 clock */ RCC_APB2PeriphClockCmd(RCC_APB2Periph_USART1, ENABLE); /* Connect PXx to USARTx_Tx*/ GPIO_PinAFConfig(GPIOA, 9, GPIO_AF_USART1); /* Connect PXx to USARTx_Rx*/ GPIO_PinAFConfig(GPIOA, 10, GPIO_AF_USART1); /* Configure USART Tx as alternate function */ GPIO_InitStructure.GPIO_OType = GPIO_OType_PP; GPIO_InitStructure.GPIO_PuPd = GPIO_PuPd_UP; GPIO_InitStructure.GPIO_Mode = GPIO_Mode_AF; GPIO_InitStructure.GPIO_Pin = GPIO_Pin_9; GPIO_InitStructure.GPIO_Speed = GPIO_Speed_50MHz; GPIO_Init(GPIOA, &GPIO_InitStructure); /* Configure USART Rx as alternate function */ GPIO_InitStructure.GPIO_Mode = GPIO_Mode_AF; GPIO_InitStructure.GPIO_Pin = GPIO_Pin_10; GPIO_Init(GPIOA, &GPIO_InitStructure); USART_InitStructure.USART_BaudRate = 115200; USART_InitStructure.USART_WordLength = USART_WordLength_8b; USART_InitStructure.USART_StopBits = USART_StopBits_1; USART_InitStructure.USART_Parity = USART_Parity_No; USART_InitStructure.USART_HardwareFlowControl = USART_HardwareFlowControl_None; USART_InitStructure.USART_Mode = USART_Mode_Rx | USART_Mode_Tx; /* USART configuration */ USART_Init(USART1, &USART_InitStructure); /* Enable USART */ USART_Cmd(USART1, ENABLE);}
打印函数
PUTCHAR_PROTOTYPE{ /* Place your implementation of fputc here */ /* e.g. write a character to the USART */ USART_SendData(USART1, (uint8_t) ch); /* Loop until the end of transmission */ while (USART_GetFlagStatus(USART1, USART_FLAG_TC) == RESET) {} return ch;}
不同的IDE也要对应的的配置。
Keil配置,需要勾选MicroLIB选项。

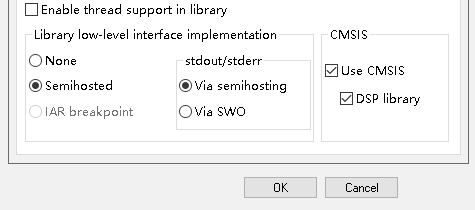
IAR配置
打印效果

有些时候,我们需要只是在办公室调试,芯片没有额外的串口提供我们调试,使用IDE打印也不失为一条好办法。
2.1、IAR
代码如下
printf("\r\n======================================================================"); printf("\r\n= (C) COPYRIGHT 2020 ="); printf("\r\n= ="); printf("\r\n= ST207 USART_Printf ="); printf("\r\n= ="); printf("\r\n= By Firefly ="); printf("\r\n======================================================================"); printf("\r\n\r\n");
IAR打印效果

配置方法,打开TerminalIO:进入调试->view->Terminal I/O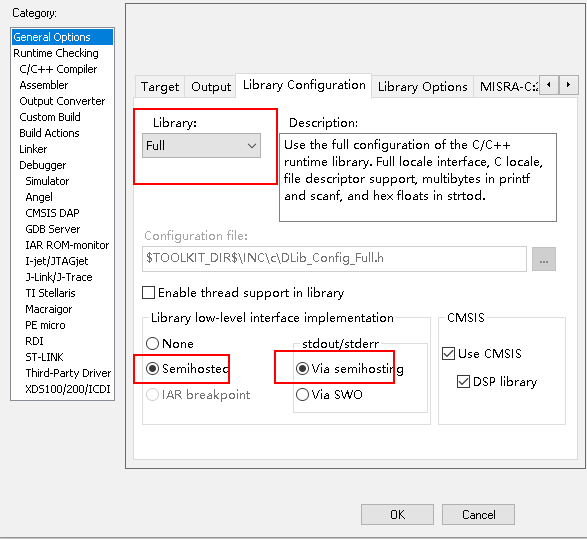
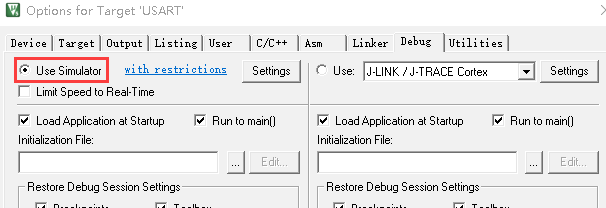
2.2、Keil
目前我还没有找到解决办法。网上可以找到勾选Use Simulator,但这是模拟调试的,并不是硬件调试,不符合我的要求。
 0
0