- 零、想法起源
- 一、ESP8266版DapLink
- 二、开发环境使用usbip连接ESP8266 DapLink调试器
- 三、把ESP8266 DapLink调试器变成板载调试器
- 四、ESP-IDF版本的DapLink
零、想法起源
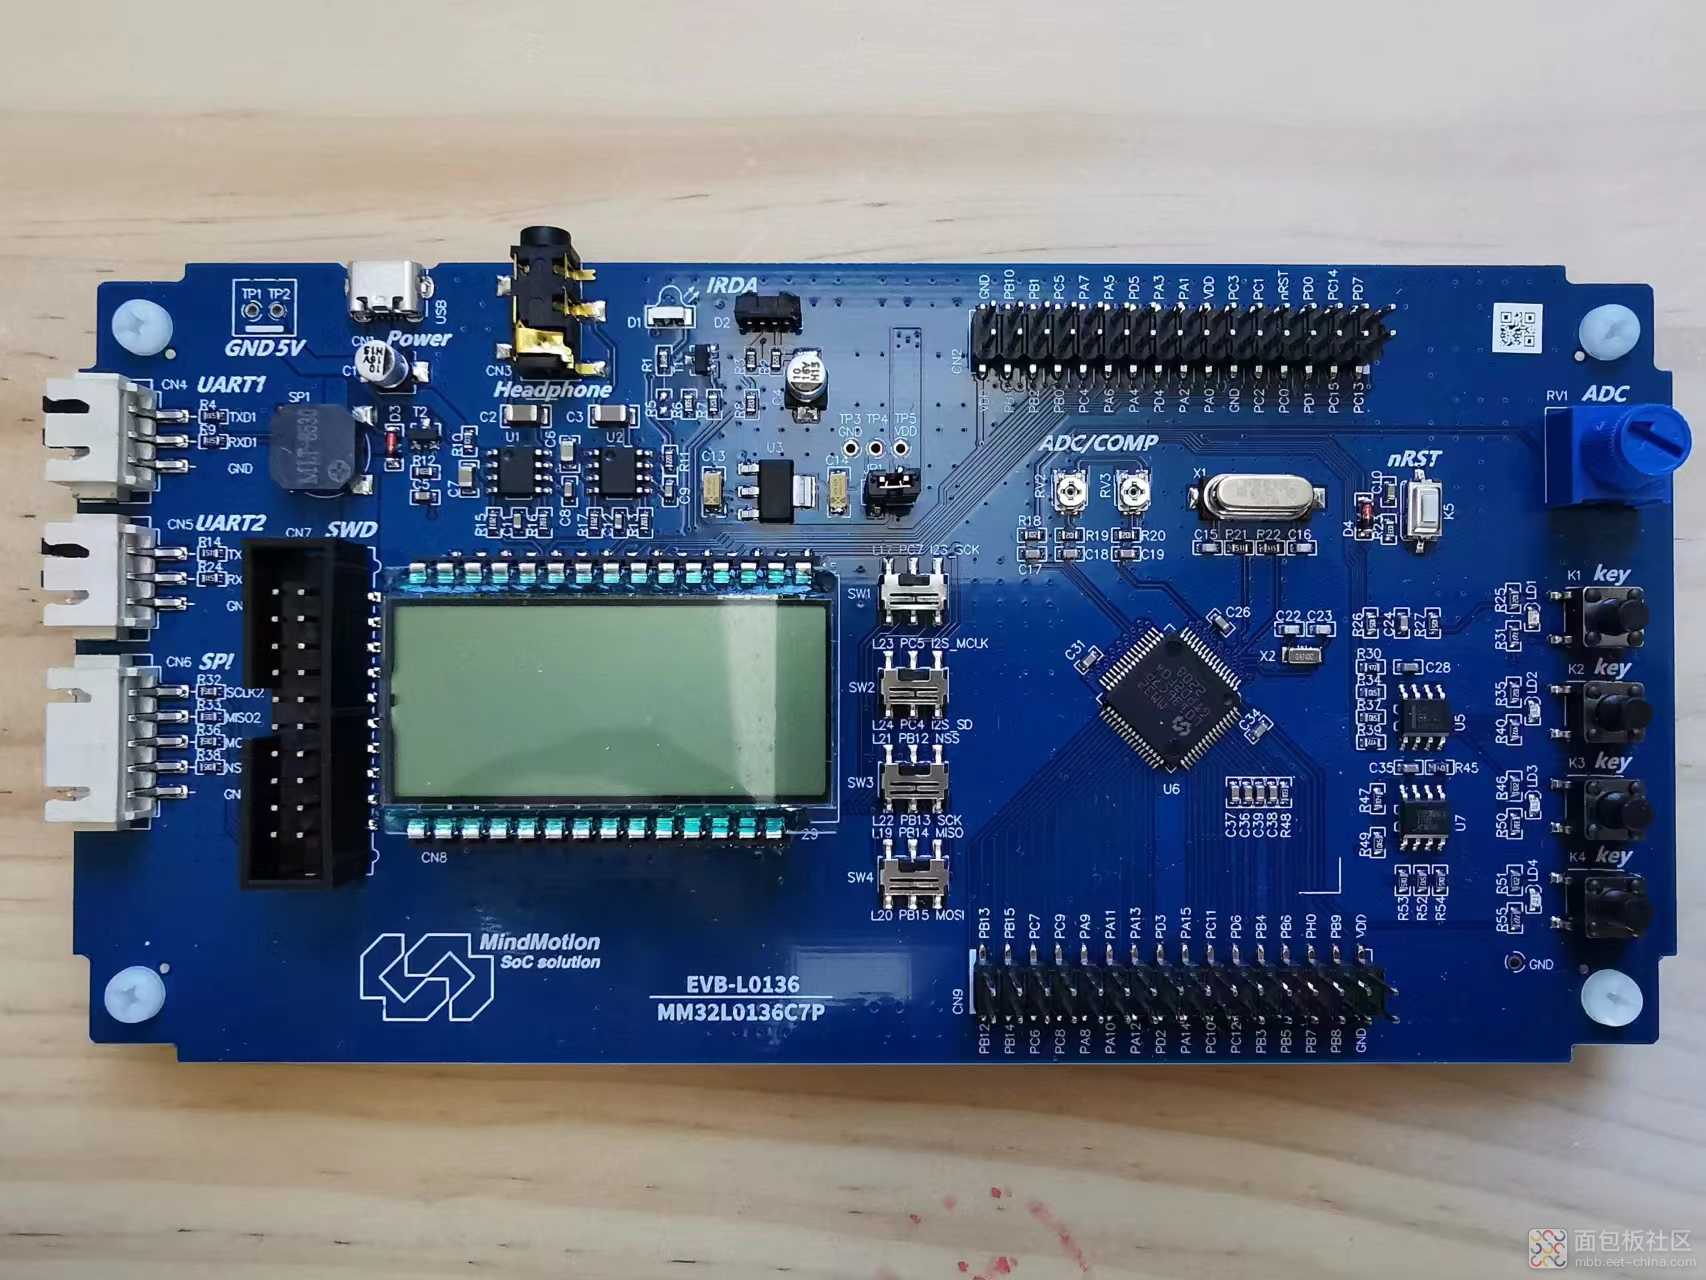
灵动微电子 EVB-L0136 开发板上提供了SWD调试接口,就是下图液晶屏右边的那个接口:
![image.png image.png](https://static.assets-stash.eet-china.com/forum/202212/18/113812swai2f32w1zgi8ja.png)
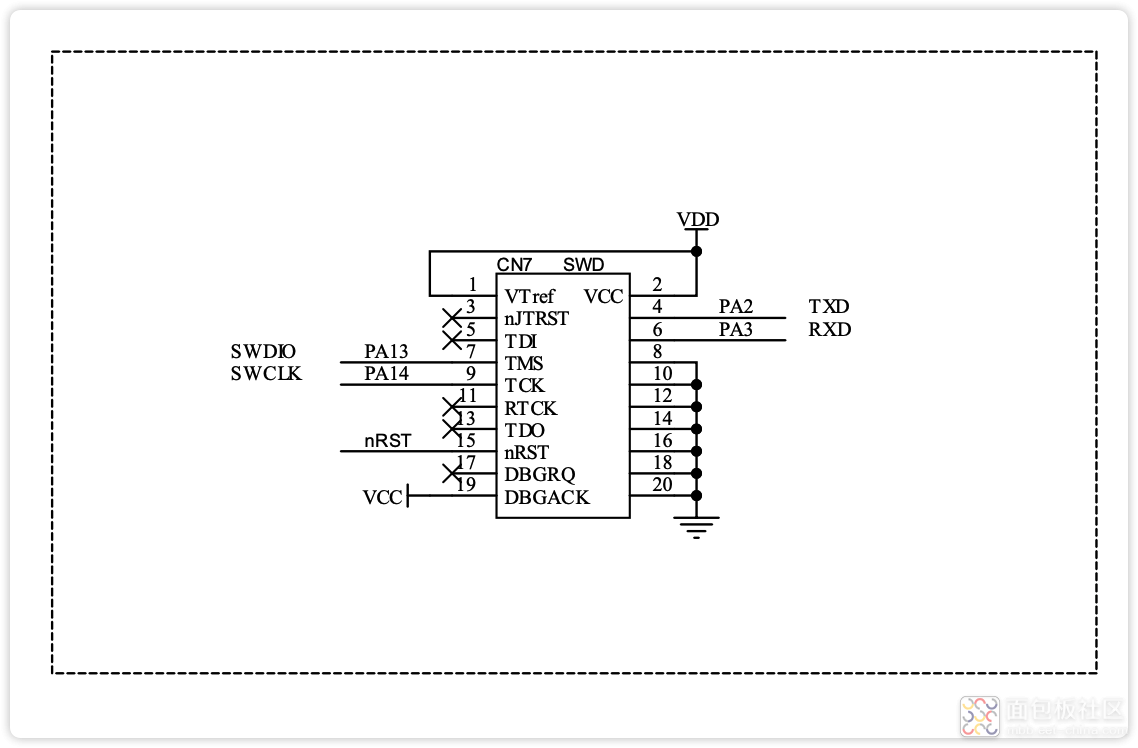
从原理图上,也可以详细了解:
![image.png image.png](https://static.assets-stash.eet-china.com/forum/202212/18/114014czdu5z3dfi66a3tt.png)
不过,这个只是SWD接口,而不是板载调试器。
如果手头有CMSIS-DAP的同学,可以很方便的连接使用:
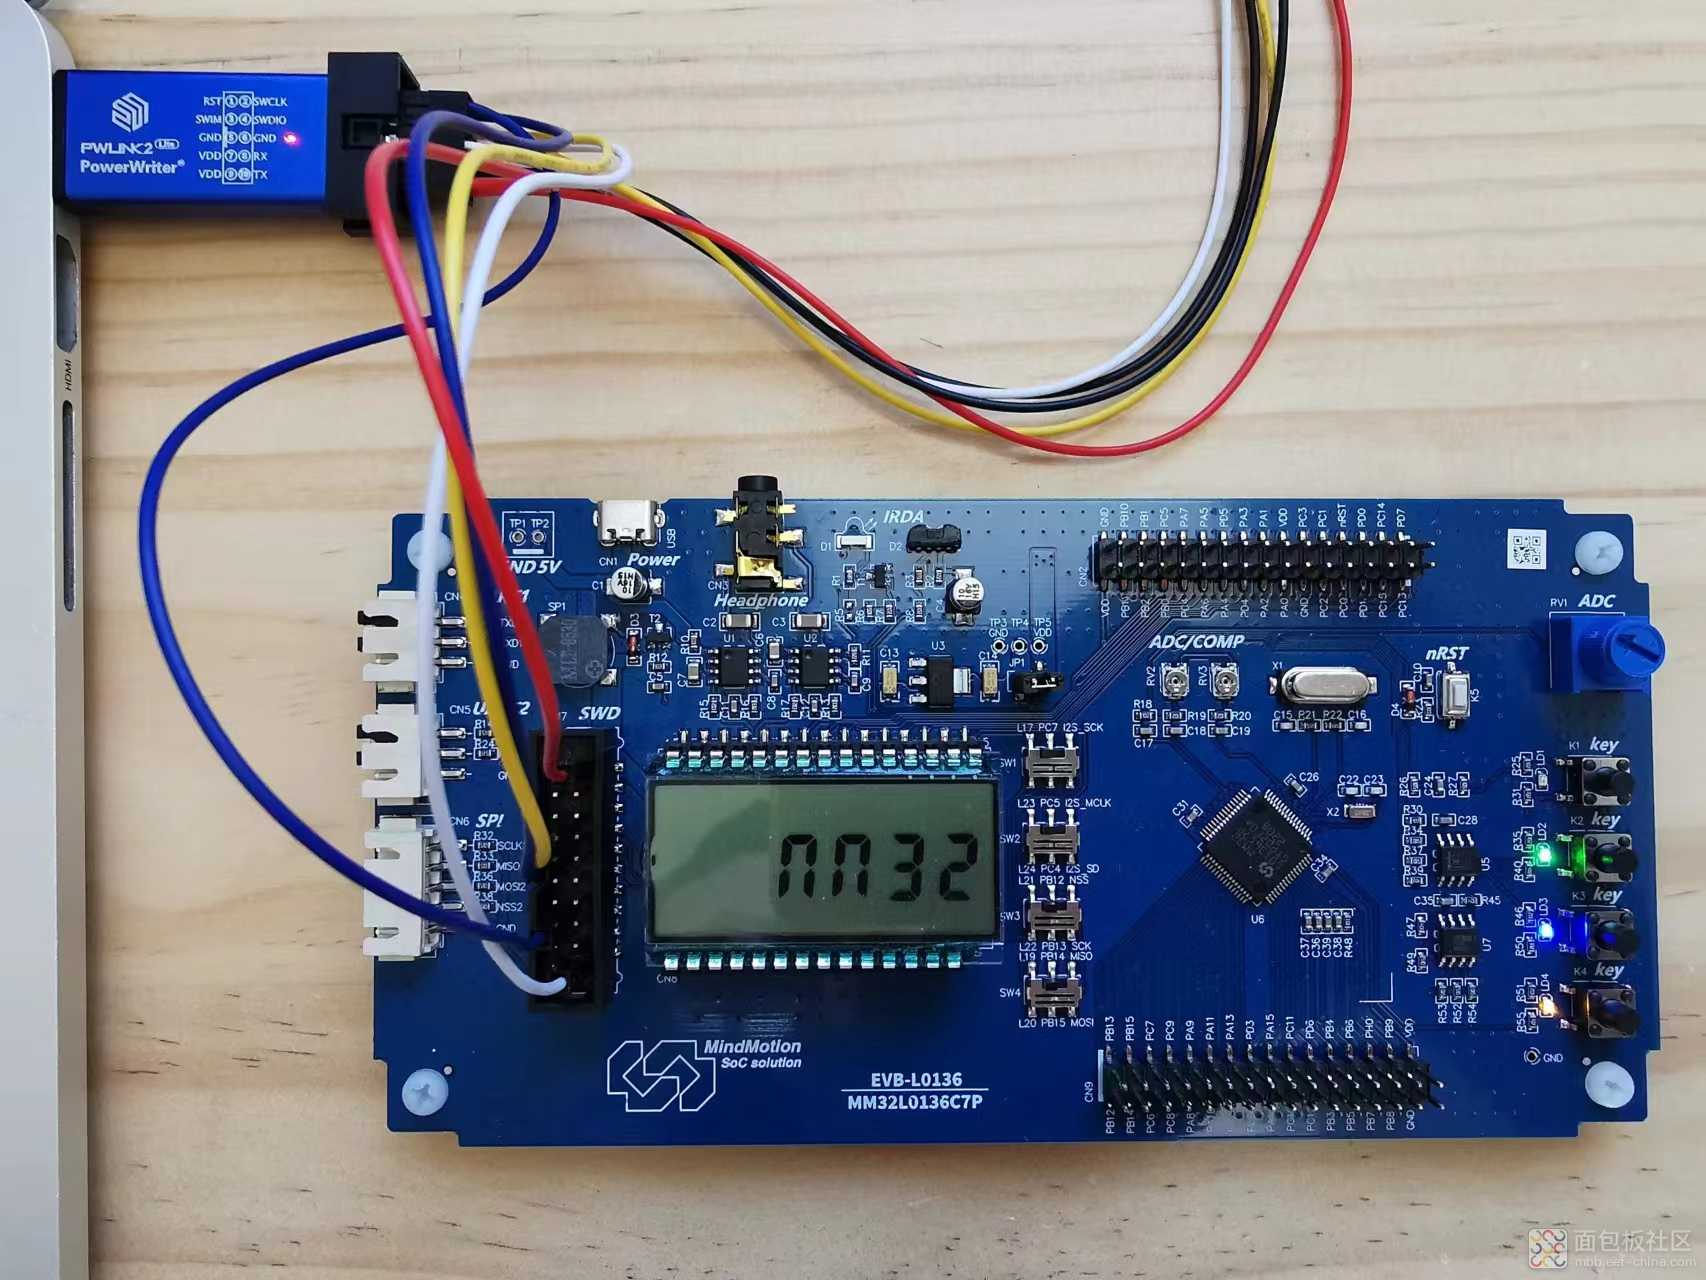
![image.png image.png](https://static.assets-stash.eet-china.com/forum/202212/18/114403xzs9ti3452gzzys0.png)
BUT,这么好的一块板子,没有自带调试器,让很多新进的同学有点手足无措。
虽然,如果有其他支持该接口协议的板子,可以把线飞过来,但是终究不方便。
经过一番了解,因为CMSIS-DAP是一个开放的协议,所以有超级超级多的第三方制作的调试器,淘宝上有不少。
当然,也有很多大佬,基于此提供了开源的DIY方案,所以有很多基于ESP8266、ESP32、STM32F103、GD32等的调试器。
既然如此,那我们也可以找依照适合自己手头设备的的方案,自己DIY一个。
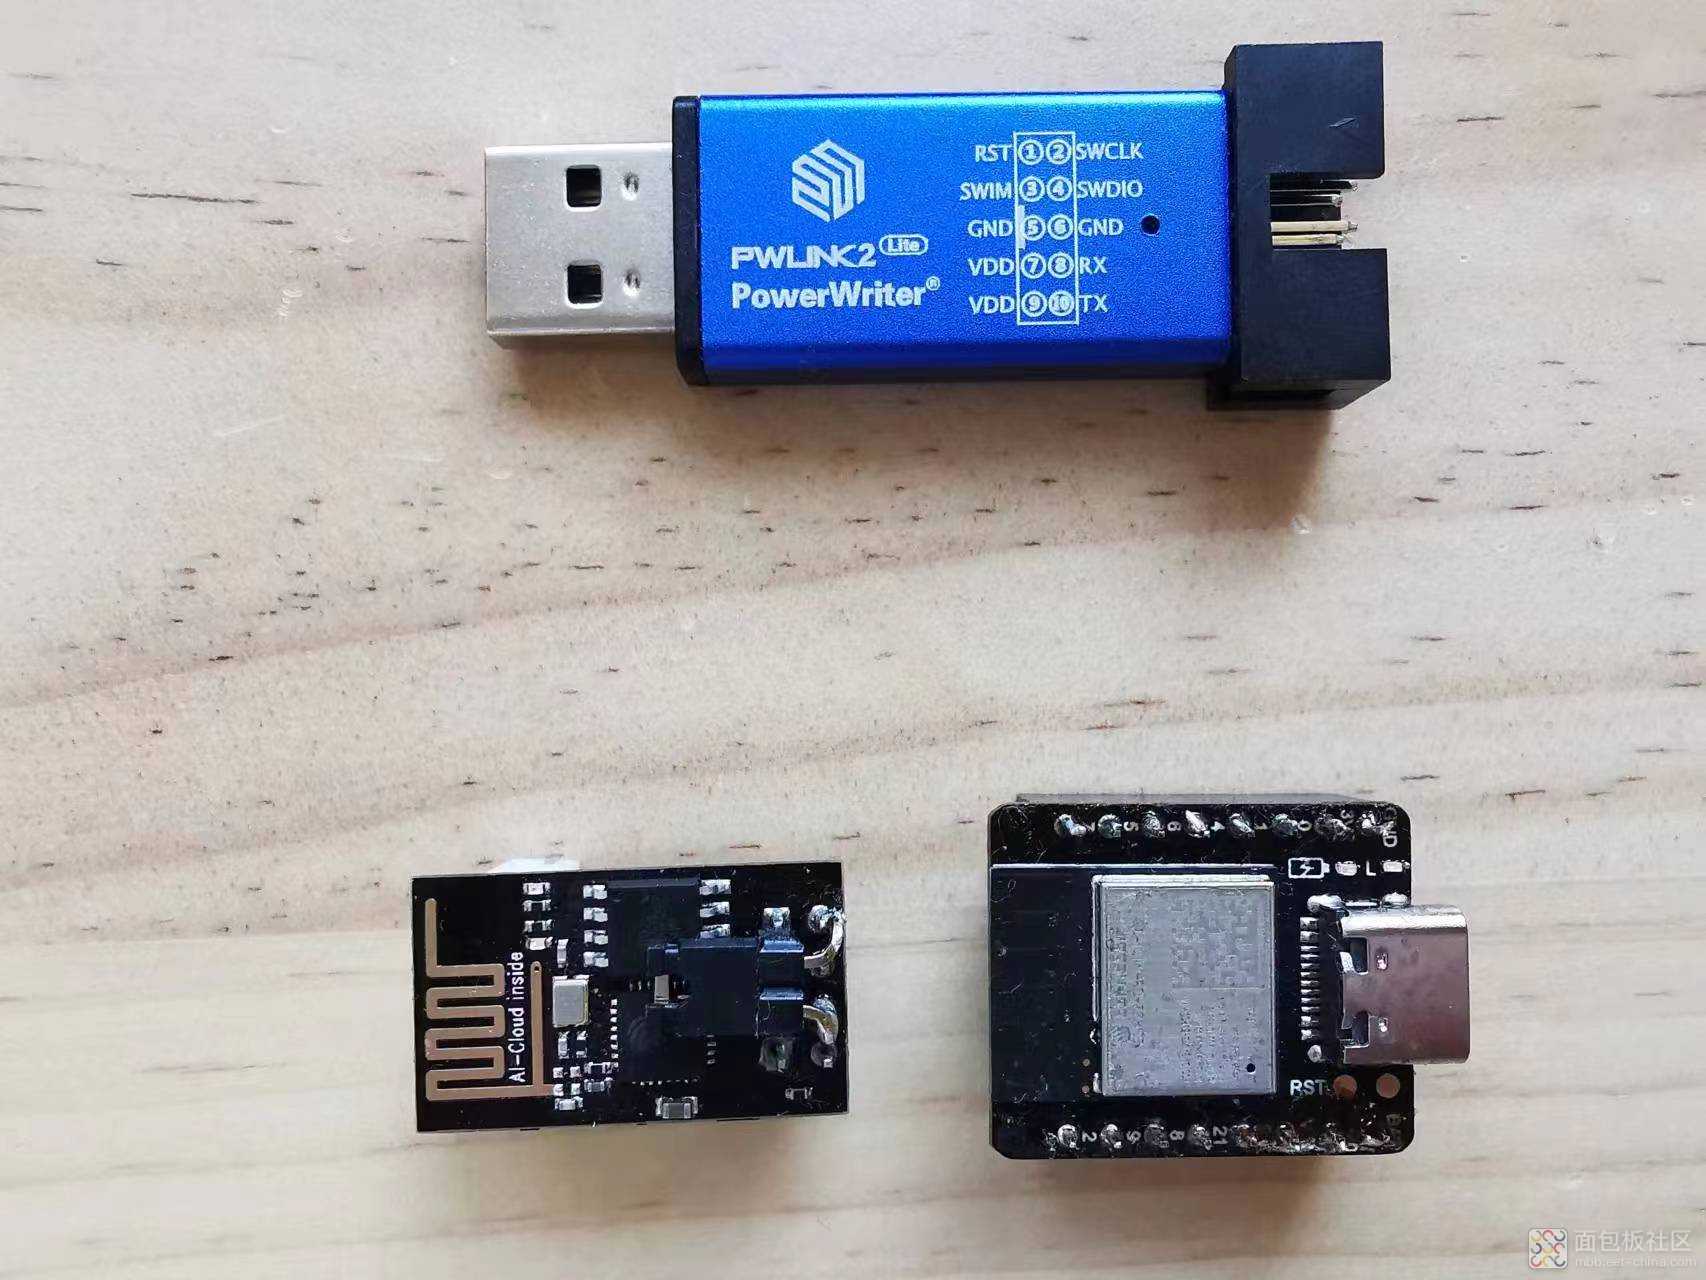
我手头刚好有ESP8266和ESP32-C3的小板,用来DIY再合适不过了:
![image.png image.png](https://static.assets-stash.eet-china.com/forum/202212/18/120900xdlz13sktccongll.png)
左边是ESP8266-01,最最最基础廉价的一款。右边的是DFRobot的ESP32-C3,超级小巧的一款。
基于ESP的开源方案,通常有两种:
- 直接用Arduino IDE编译的版本:https://github.com/thevoidnn/esp8266-wifi-cmsis-dap
- 用ESP-IDF编译的版本:https://github.com/windowsair/wireless-esp8266-dap
下面,就ESP8266-01、ESP32-C3两块开发板DIY进行示范。
一、ESP8266版DapLink:
这个版本,是专门针对ESP8266的,头文件调用也写死了
#include <ESP8266WiFi.h>
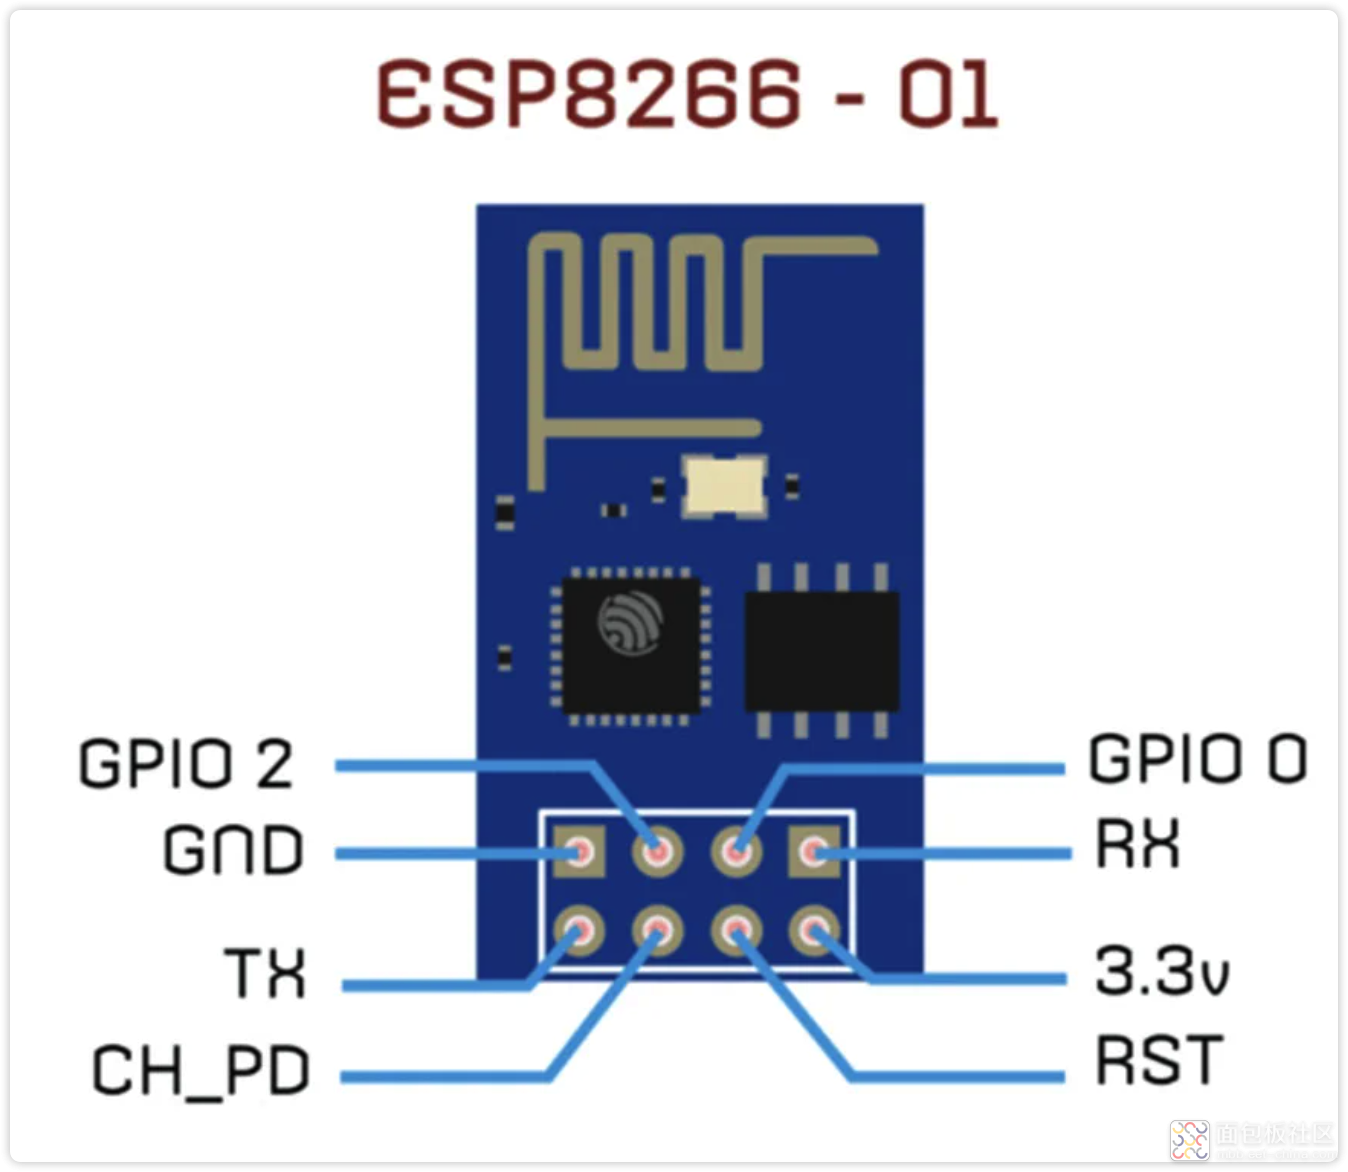
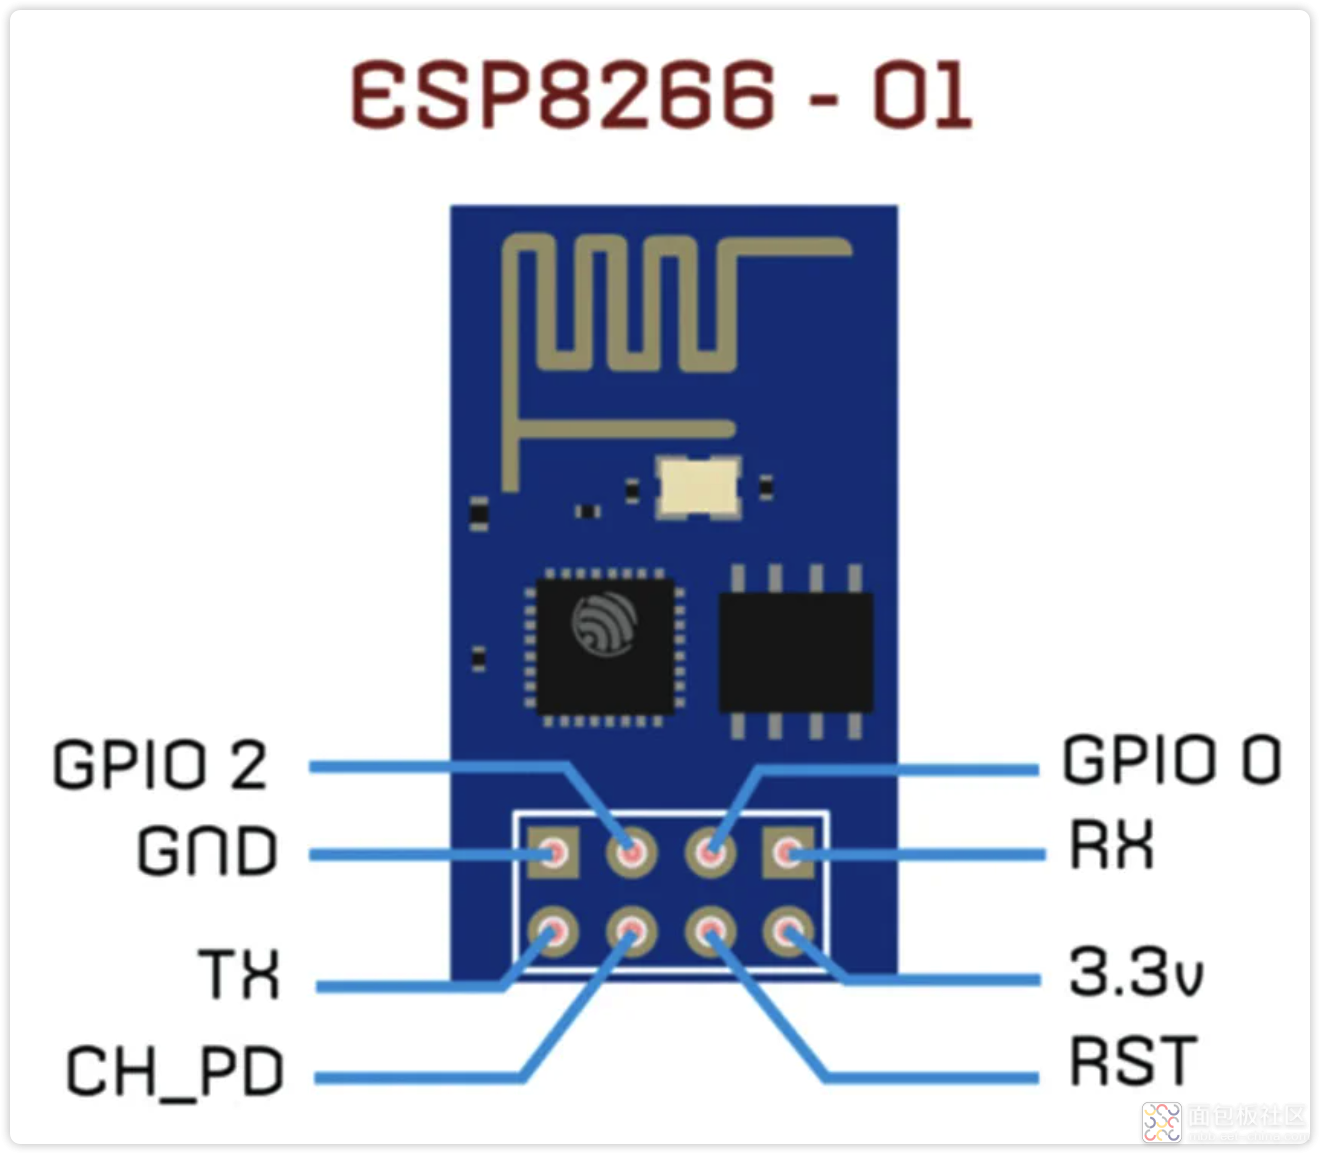
复制代码我手头的ESP8266板子具体引脚如下:
![image.png image.png](https://static.assets-stash.eet-china.com/forum/202212/18/133248fvzq9id1y2fdd122.png)
![image.png image.png](https://static.assets-stash.eet-china.com/forum/202212/18/162322oowtsbms9auqns8u.png)
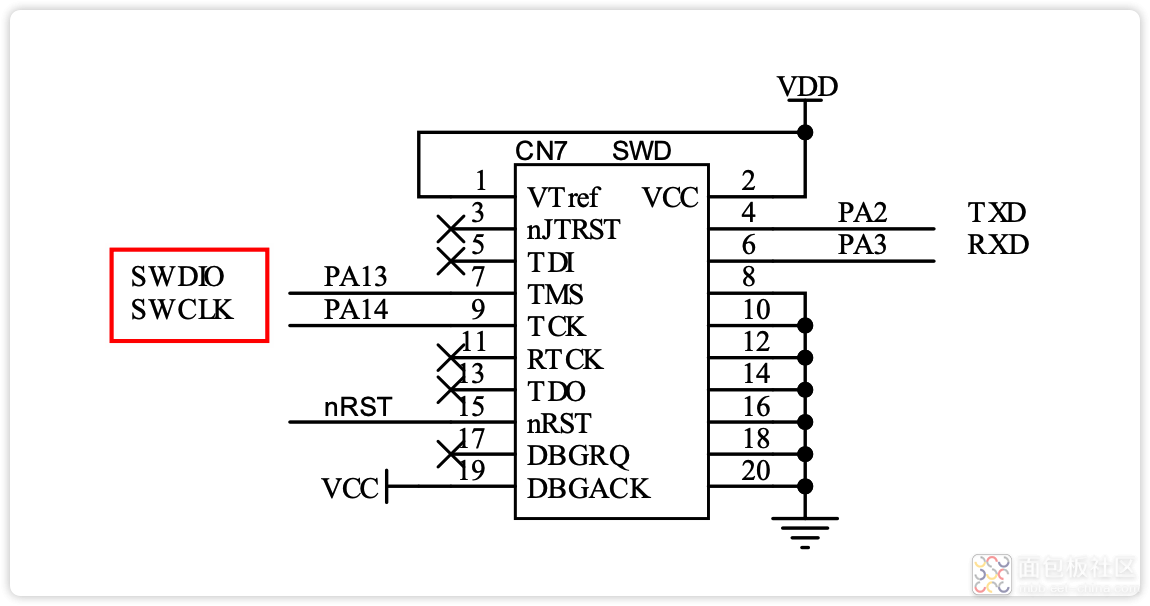
基础的调试下载功能,只需要连接上灵动微电子 EVB-L0136 开发板调试接口的SWDIO和SWCLK:
![image.png image.png](https://static.assets-stash.eet-china.com/forum/202212/18/133723i1gfe6rerww77kg7.png)
我这个ESP8266-01上,刚好有GPIO0、GPIO2口是空出来的,可以使用。
如果你有其他版本的ESP8266,引脚足够,那么SWD接口的nRST引脚也可以使用起来。
然后,从 https://github.com/thevoidnn/esp8266-wifi-cmsis-dap 下载固件,下载完成后,使用Arduino IDE打开。
源码附件包:
![](static/image/filetype/zip.gif)
2022-12-18 14:46 上传
点击文件名下载附件
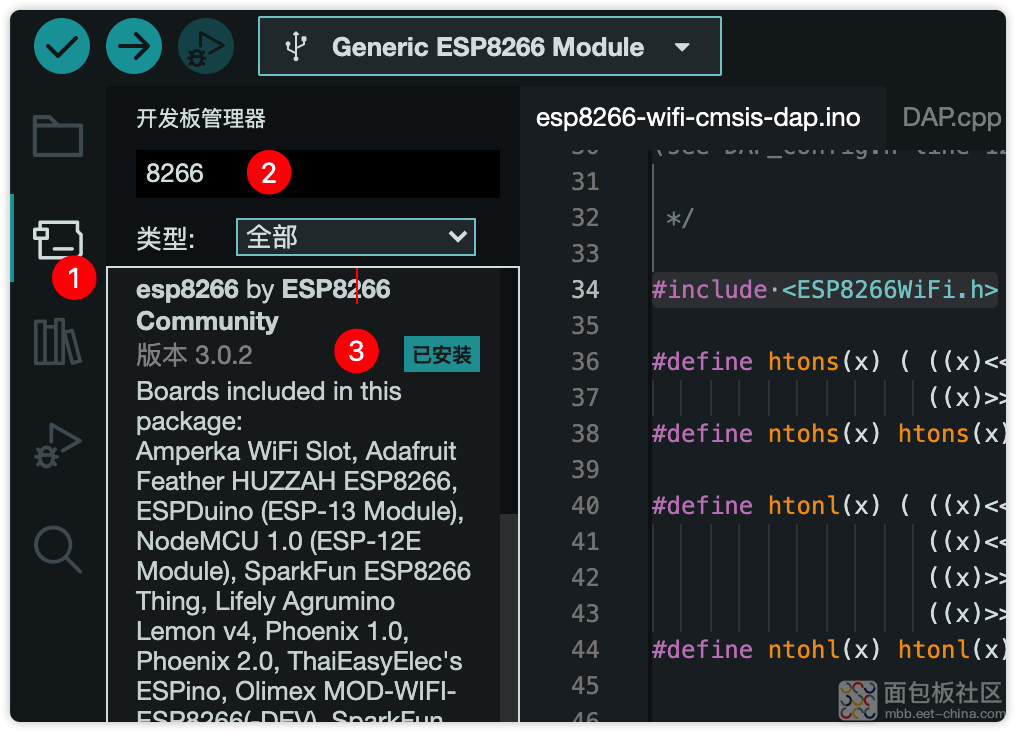
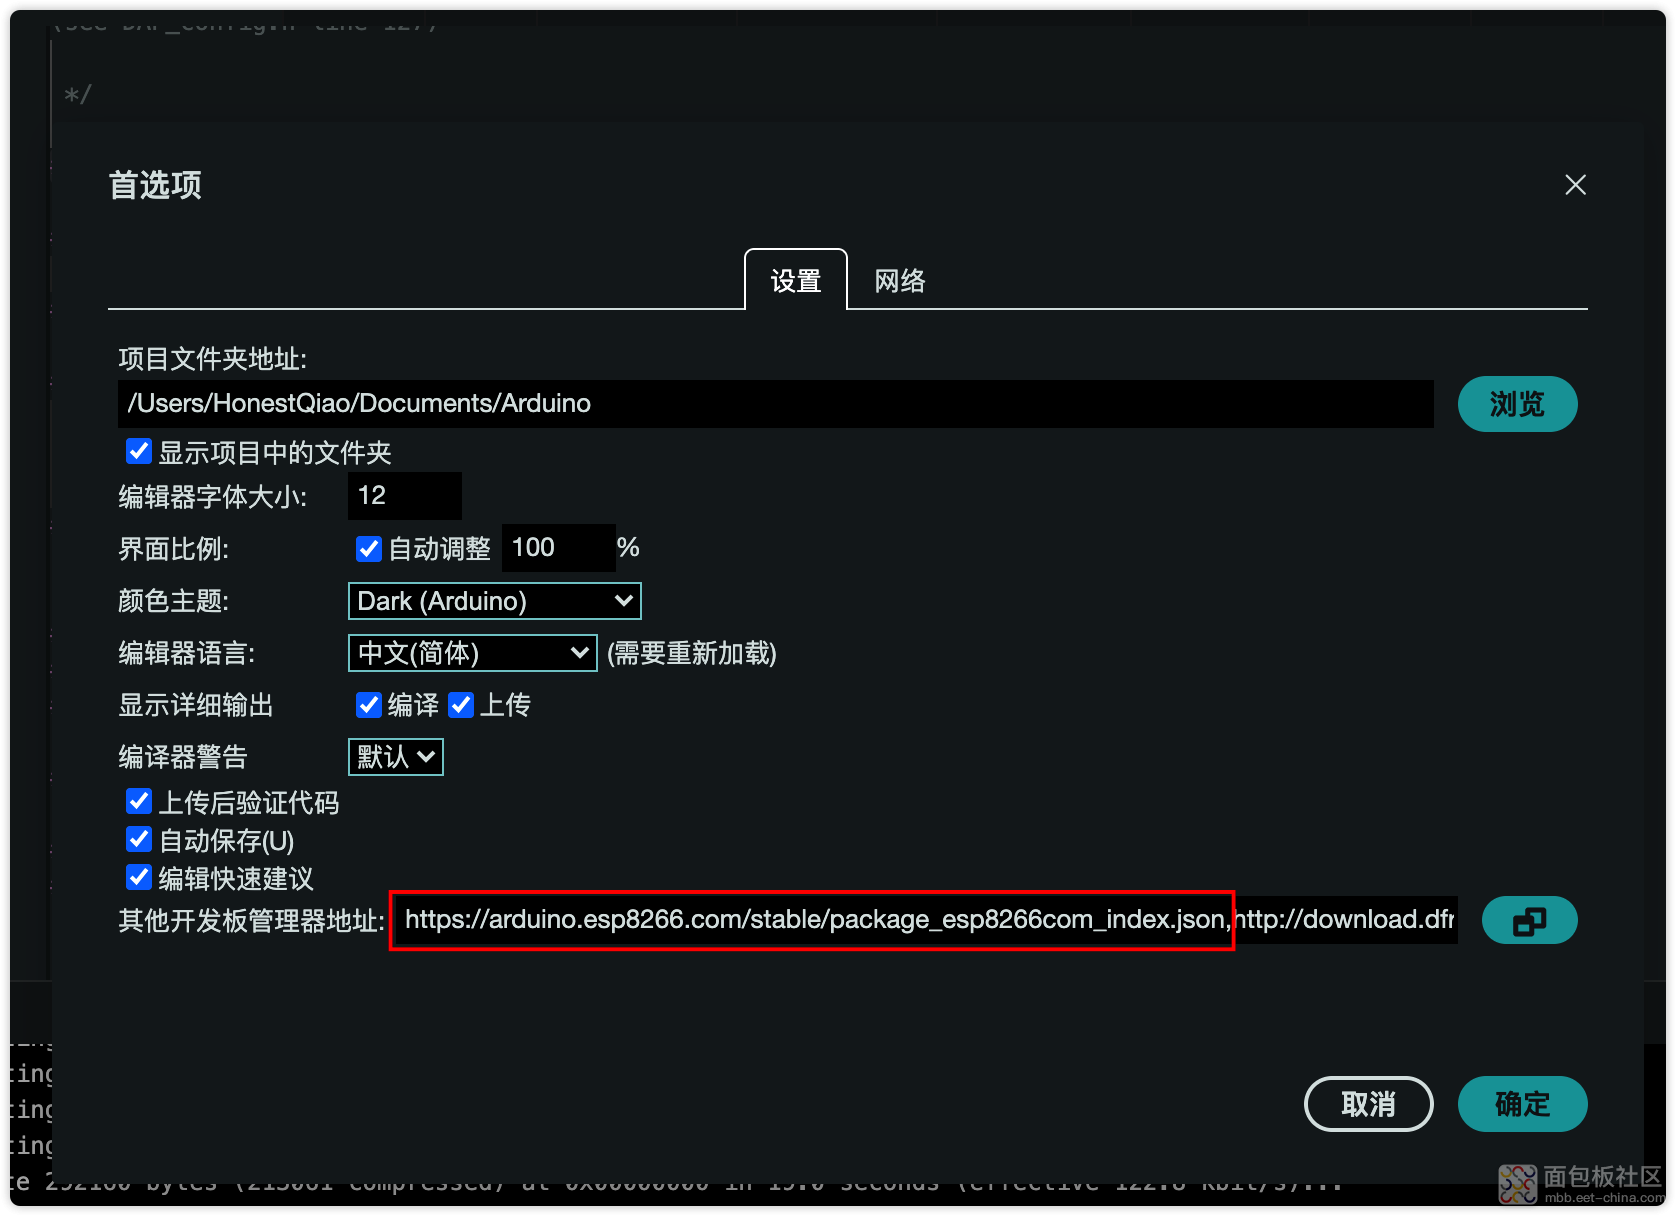
如果你的Arduino IDE没有进行过ESP8266的开发,那么需要先添加开发板,否则可以跳过1、2
1. 在设置中添加ESP8266开发板的支持包地址:https://arduino.esp8266.com/stable/package_esp8266com_index.json
![image.png image.png](https://static.assets-stash.eet-china.com/forum/202212/18/134330ackav8qd0qzaqyva.png)
2. 安装ESP8266支持包:
![image.png image.png](https://static.assets-stash.eet-china.com/forum/202212/18/134410djnvy4k7f00yrtjr.png)
3. 将ESP8266接到电脑:
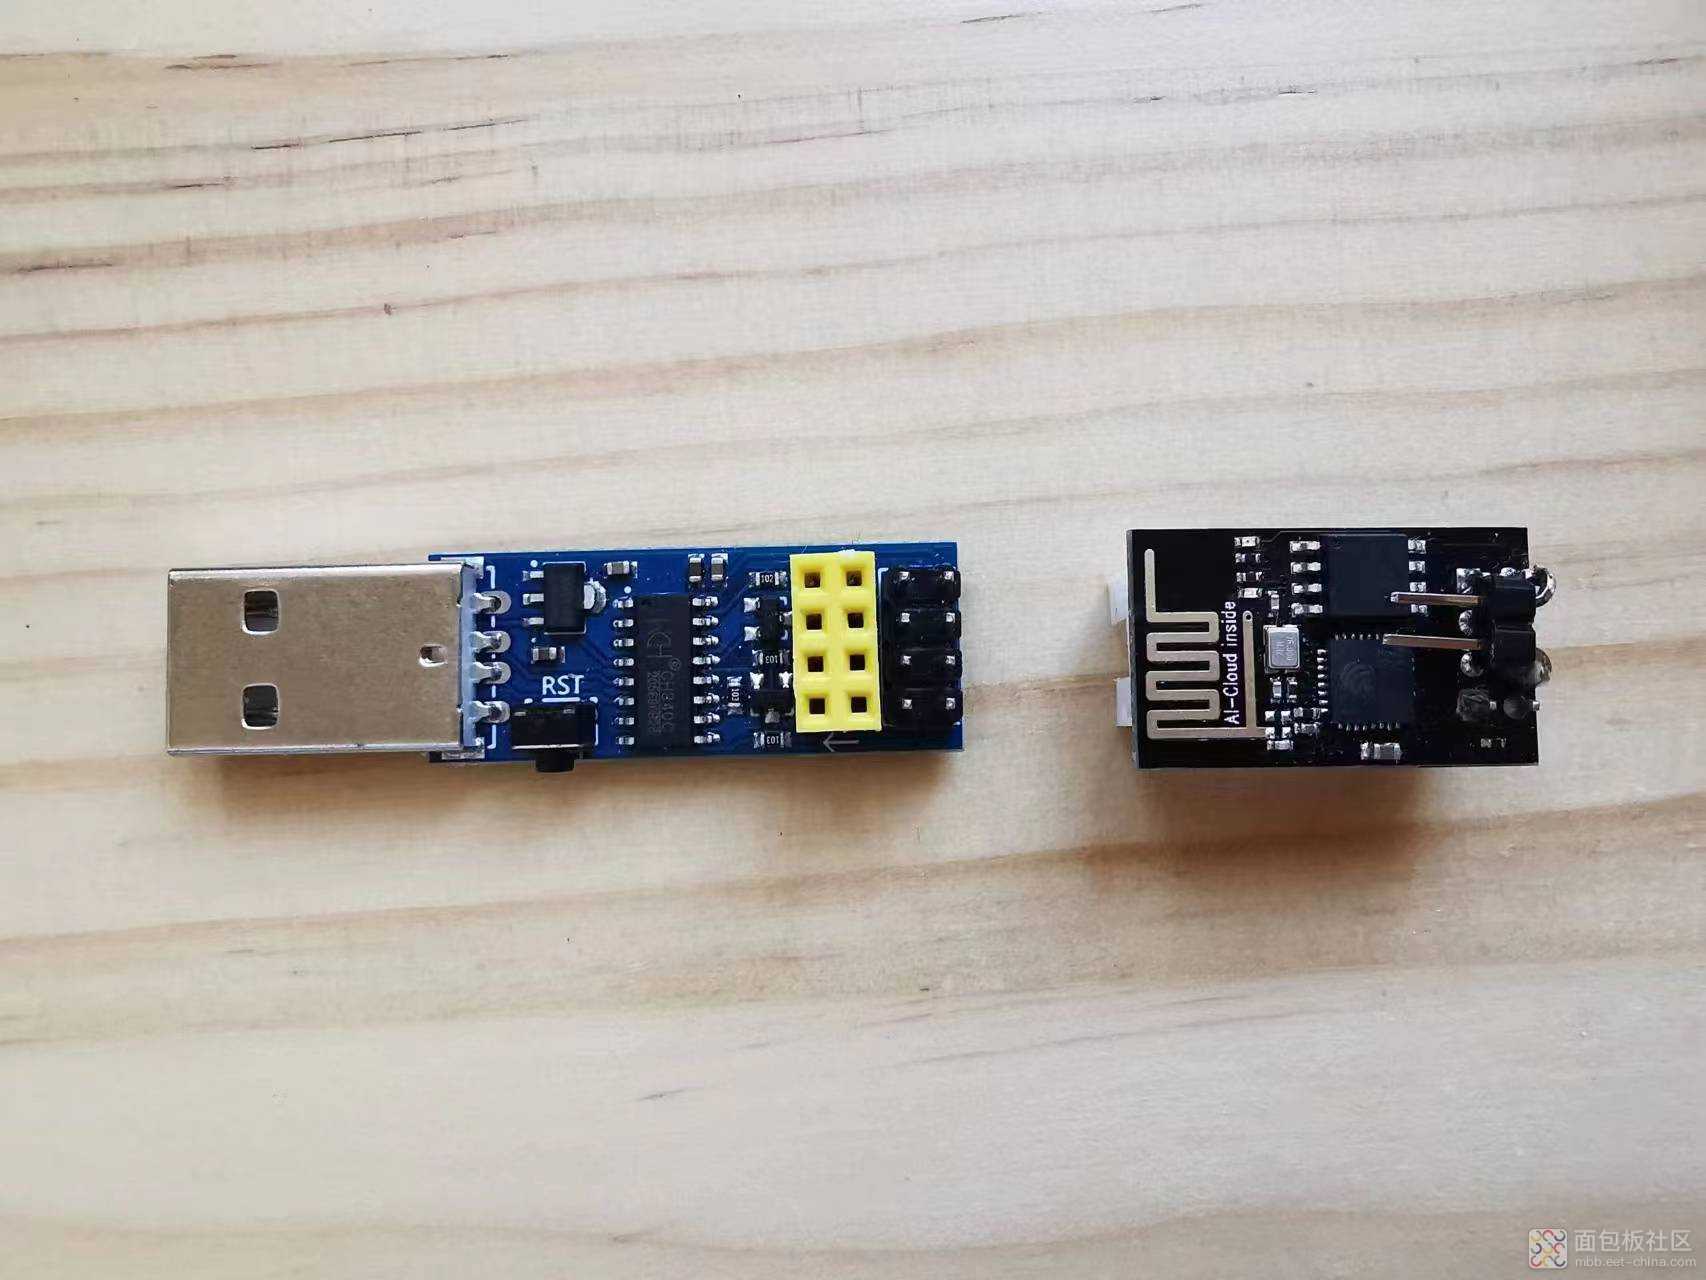
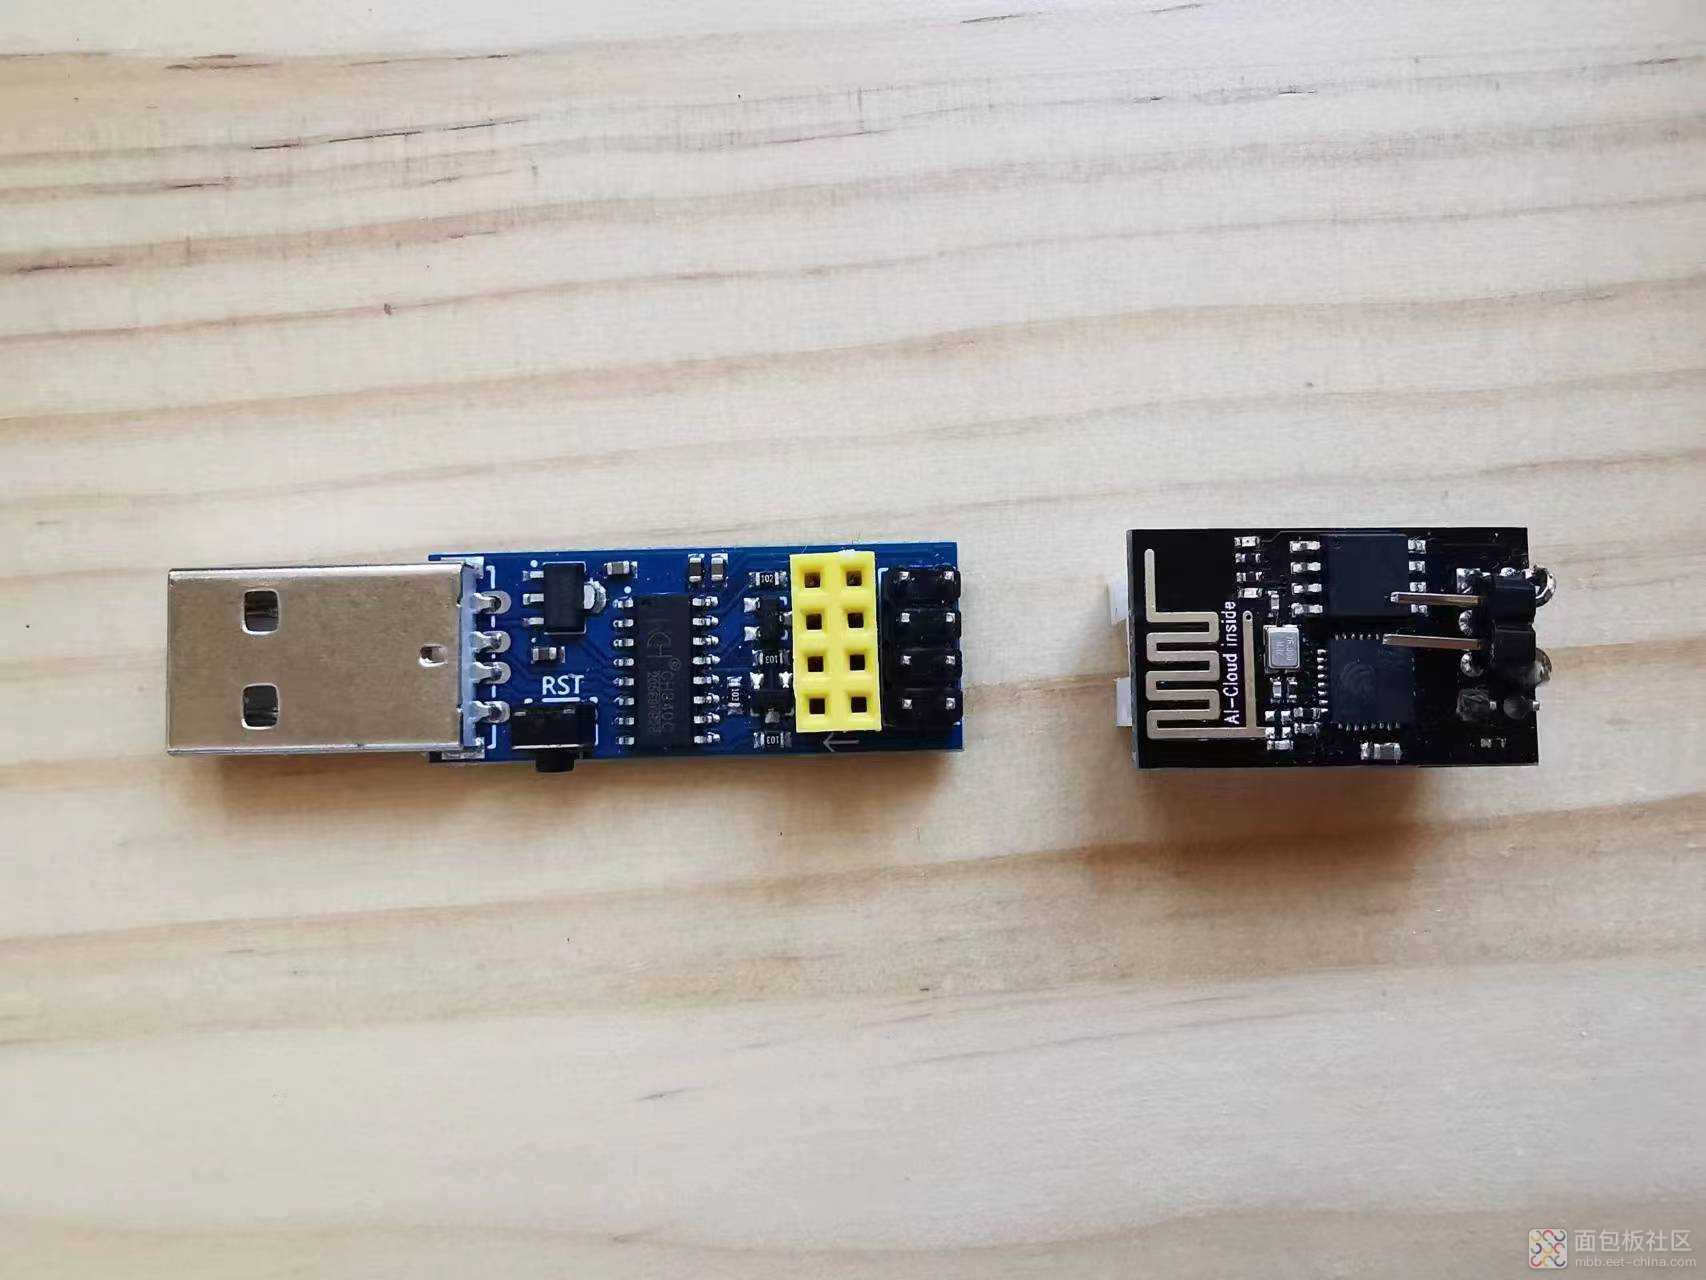
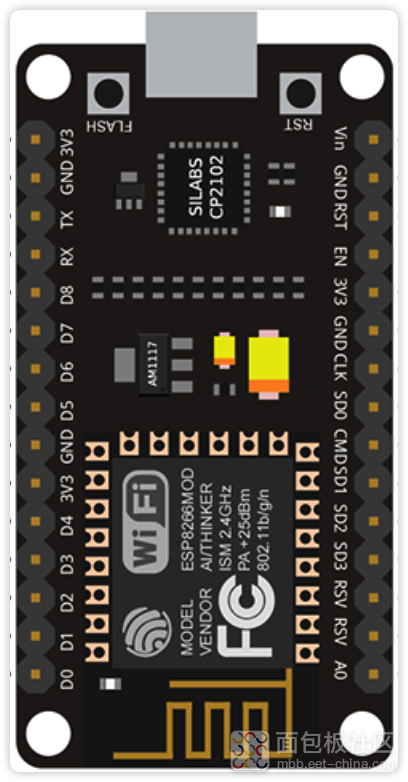
如果你用的是下面的ESP8266,那么恭喜你,连接很简单,插上USB接口即可:
![image.png image.png](https://static.assets-stash.eet-china.com/forum/202212/18/135542zvtqbt3kgg0b2r0x.png)
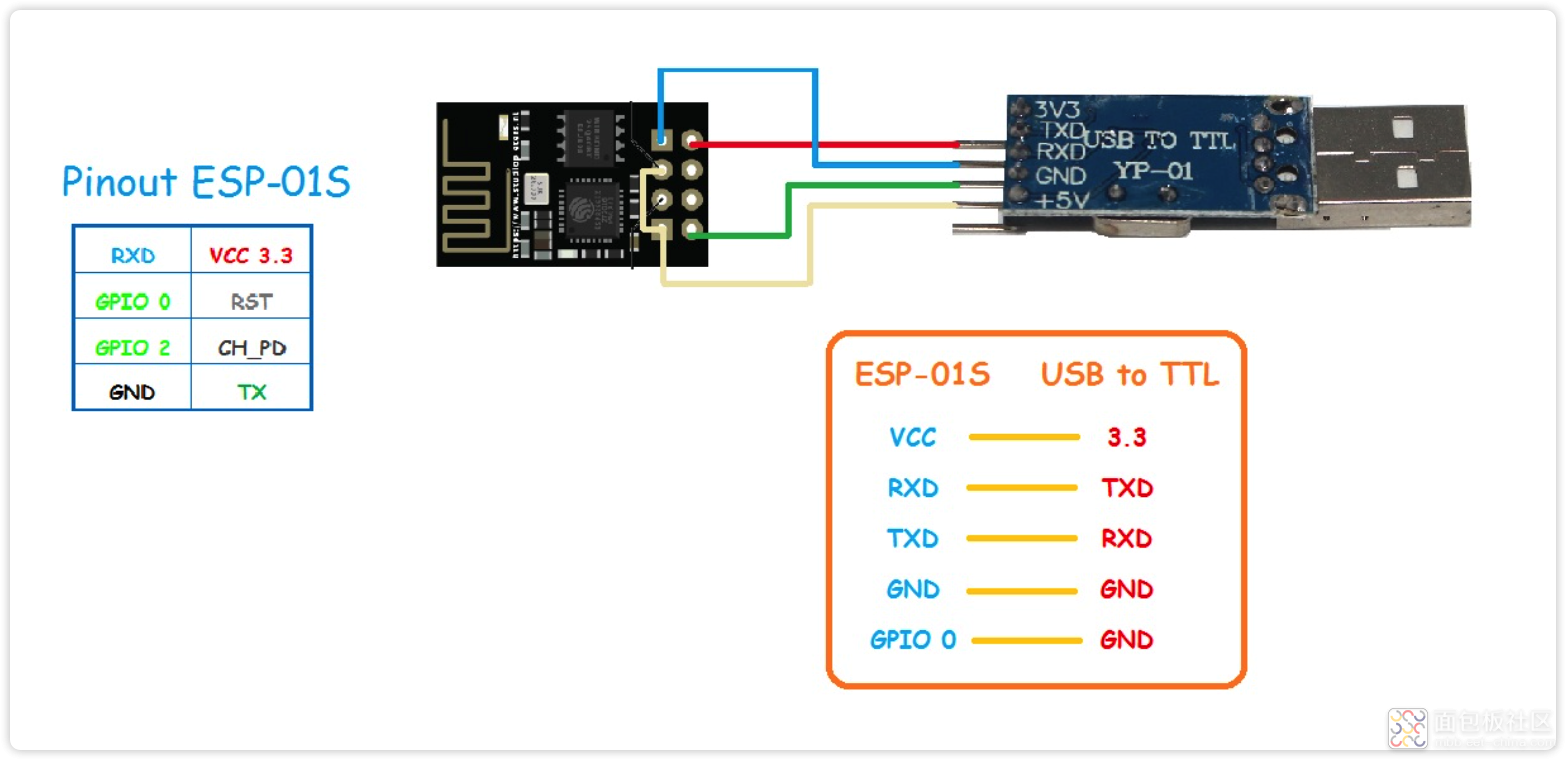
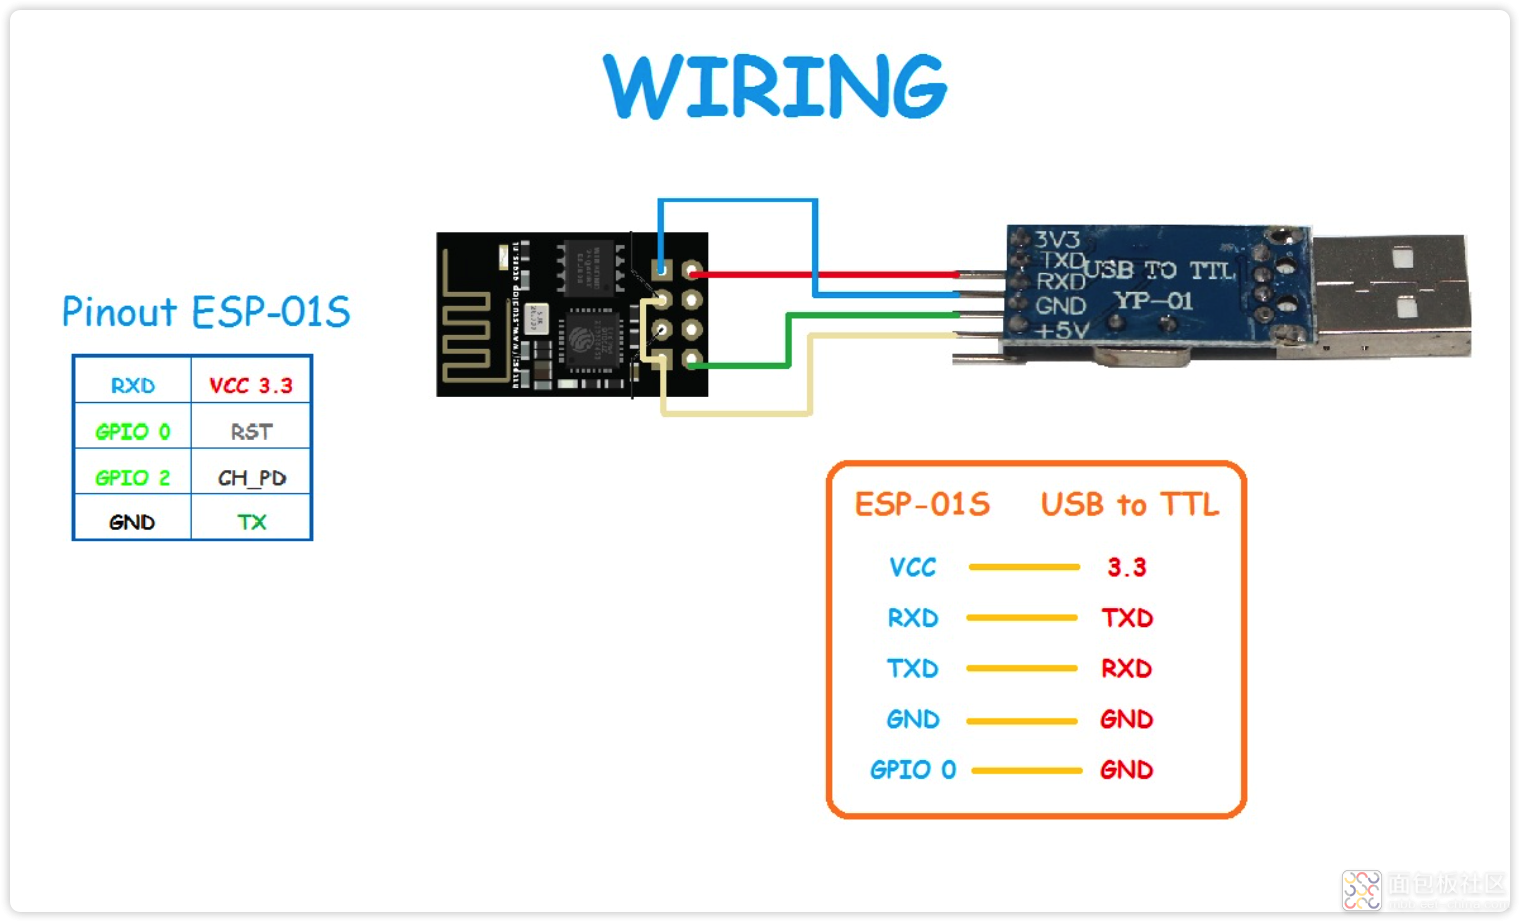
如果你用的是我那样的ESP8266-01,那么就需要USB2TTL来辅助:
![image.png image.png](https://static.assets-stash.eet-china.com/forum/202212/18/162651h35kx73h76x63khx.png)
![image.png image.png](https://static.assets-stash.eet-china.com/forum/202212/18/140202y9xp3yonys5zqqic.png)
或者直接用一个专用下载器:
![image.png image.png](https://static.assets-stash.eet-china.com/forum/202212/18/135737zuazllbj83zjzkgy.png)
![image.png image.png](https://static.assets-stash.eet-china.com/forum/202212/18/162407e4faefeq3q9a2qq2.png)
我就是使用的专用下载器,很方便的。
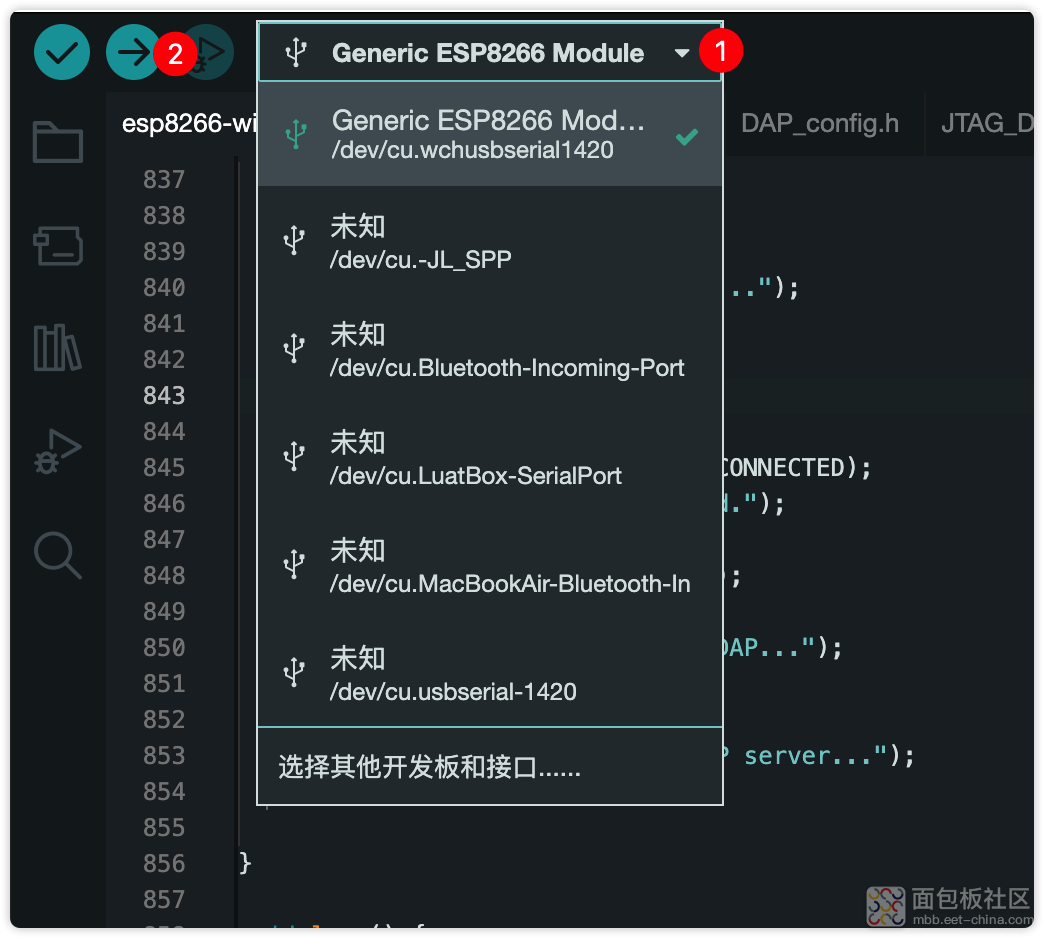
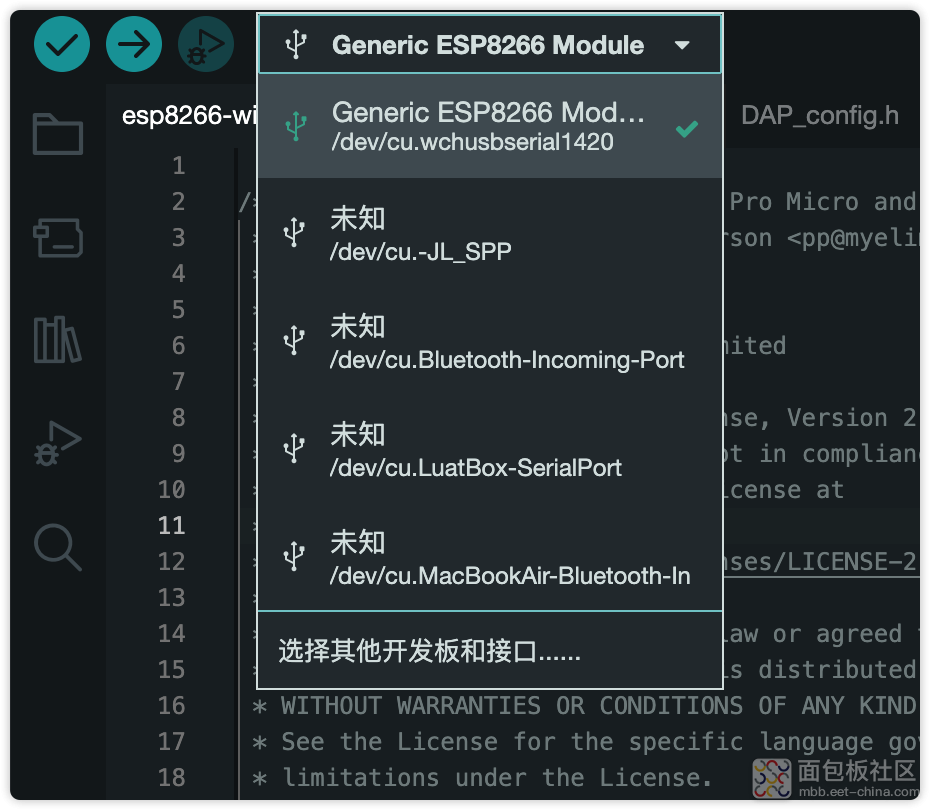
4. 选择好串口,编译下载:
![image.png image.png](https://static.assets-stash.eet-china.com/forum/202212/18/140326vu4efvrupe4v6zv6.png)
![image.png image.png](https://static.assets-stash.eet-china.com/forum/202212/18/162505gobxlat8x9tlh408.png)
如果能够编译下载成功,那么工作就完成了大半了,后面只需要做一下简单设置即可。
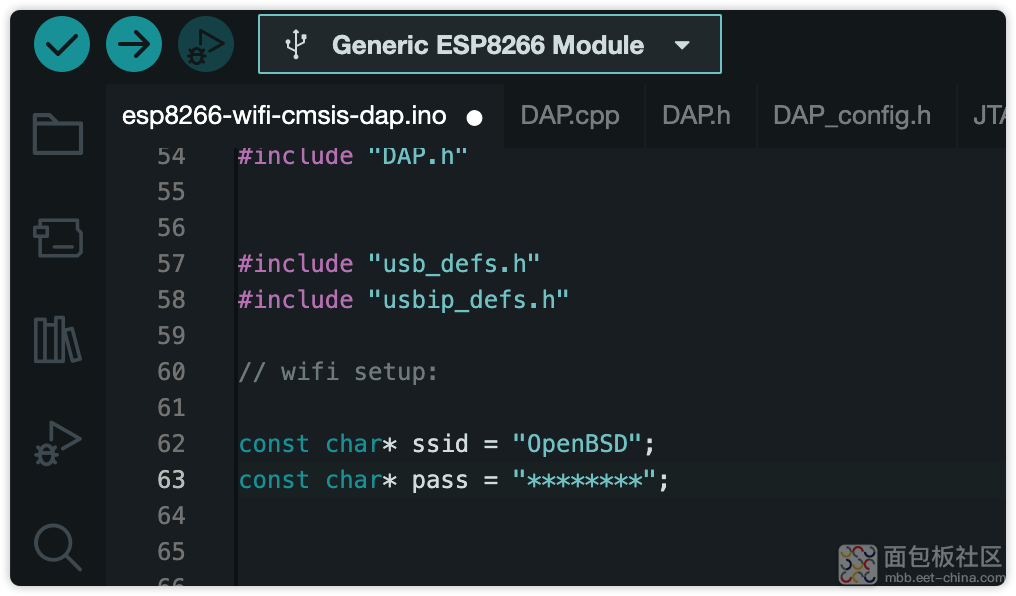
5. WiFi连接设置:
![image.png image.png](https://static.assets-stash.eet-china.com/forum/202212/18/162545f57i7d38777t238x.png)
![image.png image.png](https://static.assets-stash.eet-china.com/forum/202212/18/140540j2hak0d4khkdiii9.png)
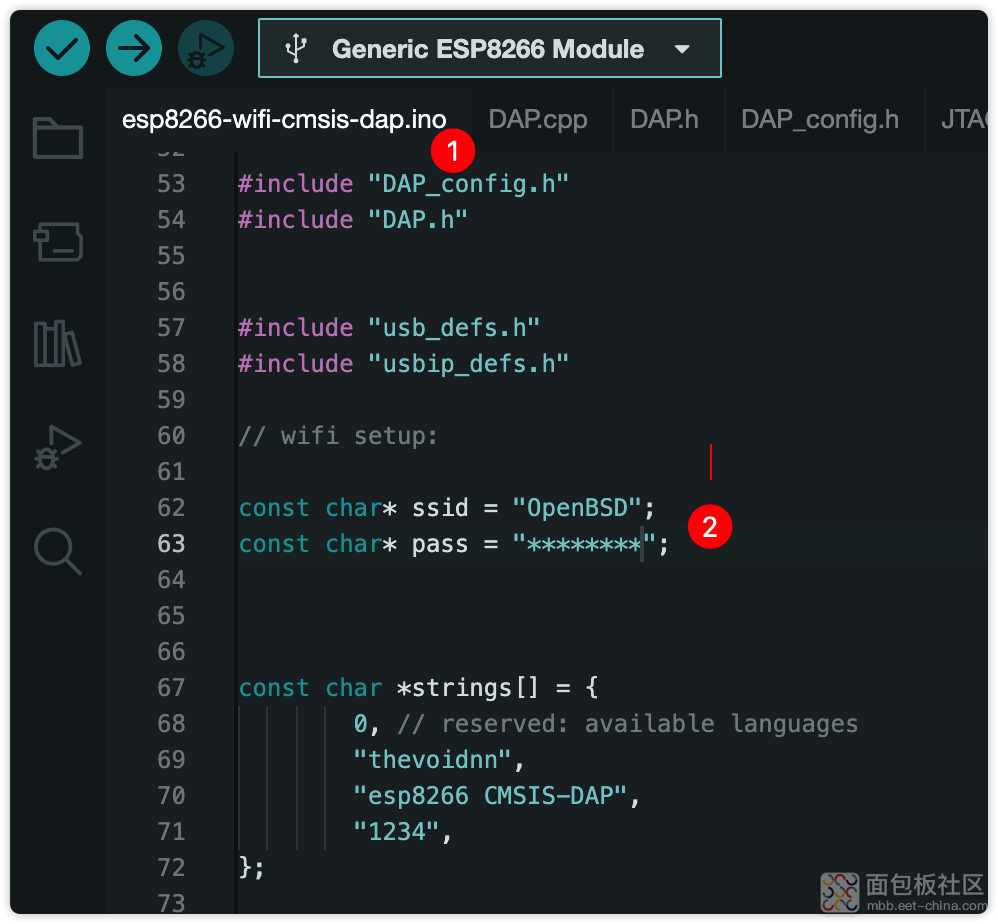
将上述文件中的ssid和pass修改为你所在环境对应的,注意仅支持2.4G WiFi,不支持5G WiFi。
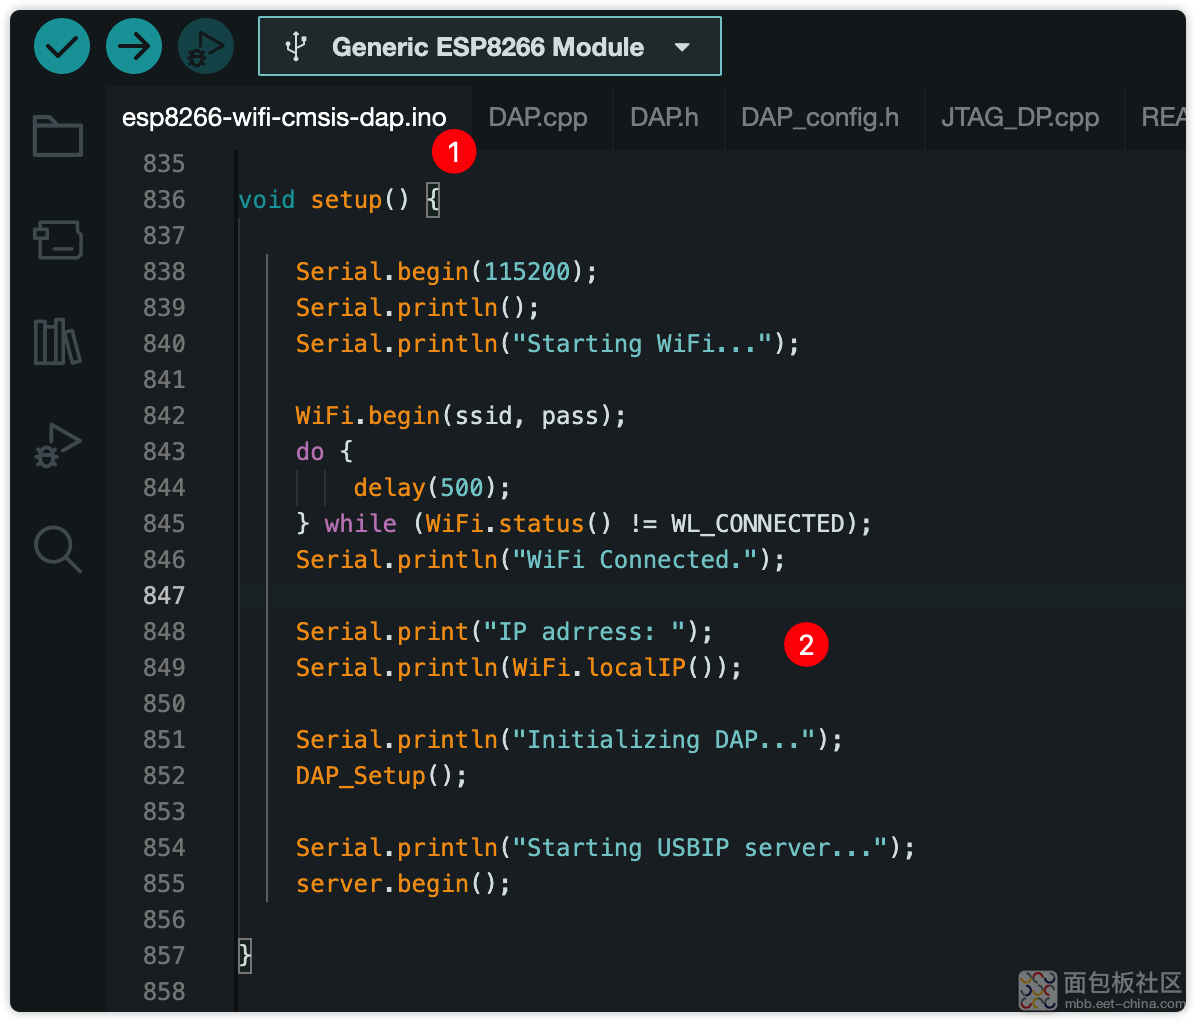
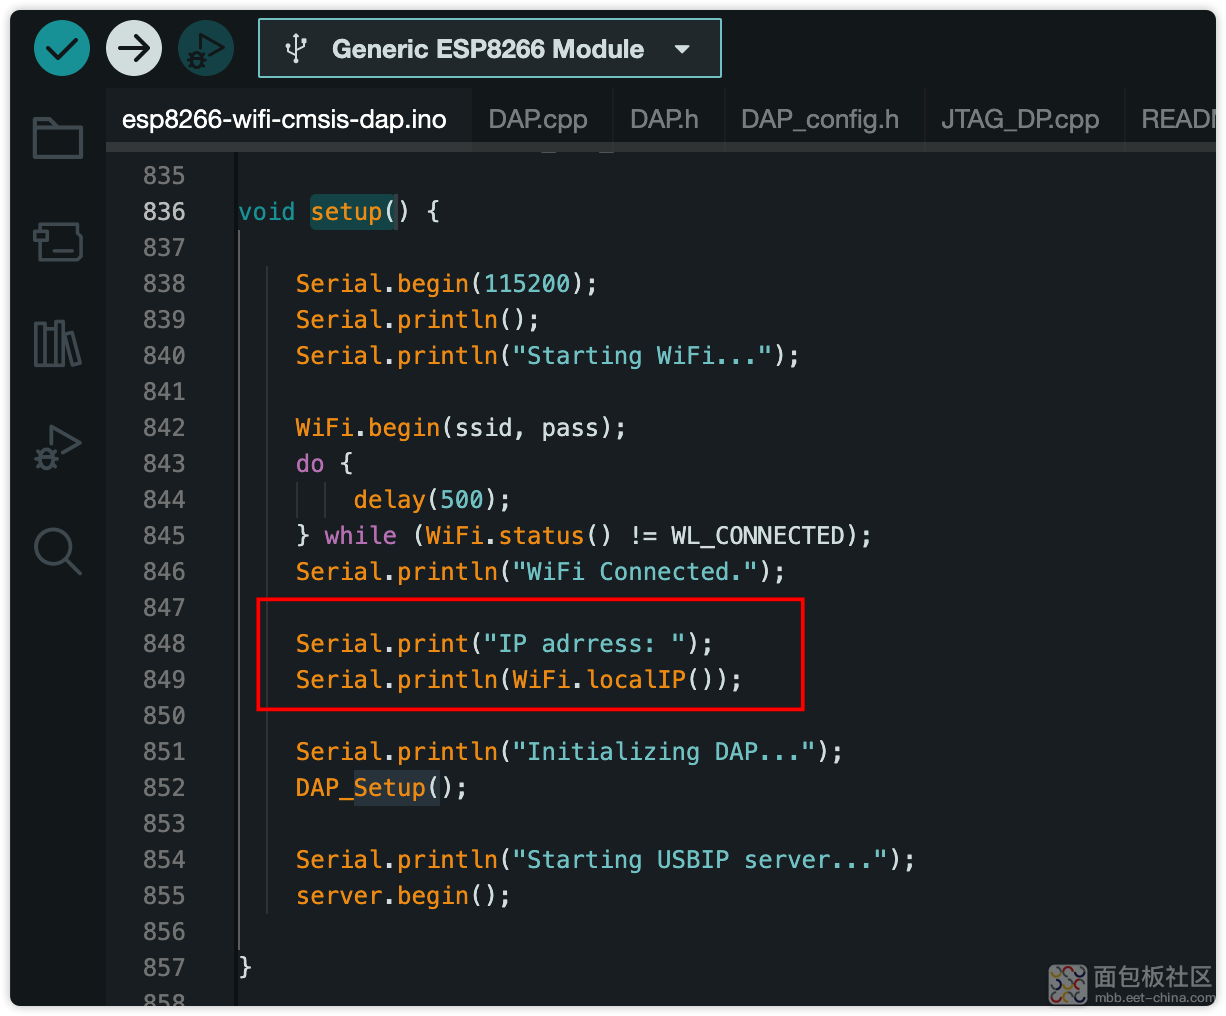
默认的代码,在WiFi连接后,没有输出ip,所以我们添加一点点代码,输出IP信息,方便查看:
Serial.print("IP adrress: "); Serial.println(WiFi.localIP());
复制代码![image.png image.png](https://static.assets-stash.eet-china.com/forum/202212/18/162602cn60tzo663onlqju.png)
![image.png image.png](https://static.assets-stash.eet-china.com/forum/202212/18/140729egjnwg3eotjs3woa.png)
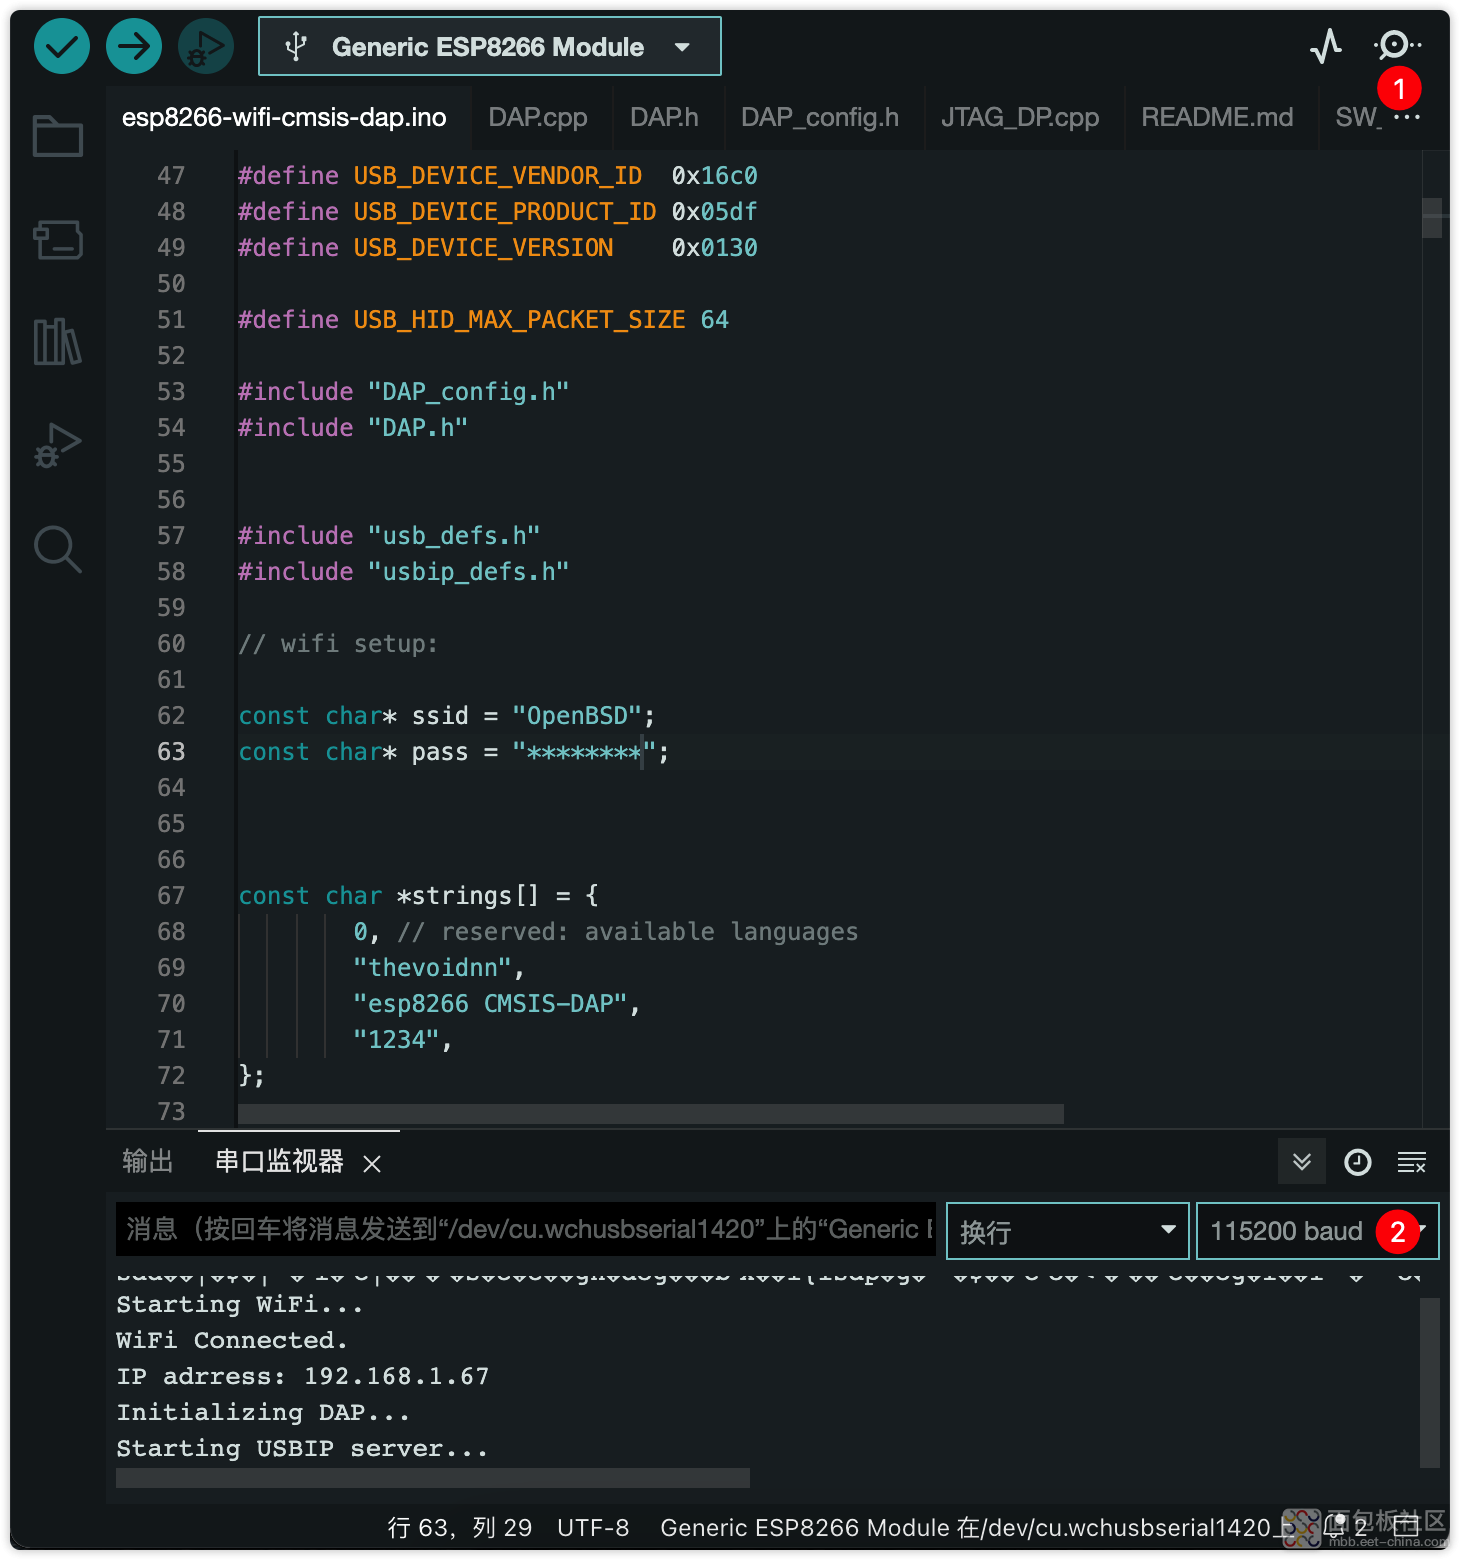
6. 再次编译下载,并通过Arduino IDE的串口调试器,查看启动情况:
![image.png image.png](https://static.assets-stash.eet-china.com/forum/202212/18/162842zk0uf6iwo6co4y8i.png)
![image.png image.png](https://static.assets-stash.eet-china.com/forum/202212/18/141118nefpfcb0w4yxs8ef.png)
通过上述输出,可以看到ESP8266成功联网,且IP地址为192.168.1.67,并启动了DAP服务。
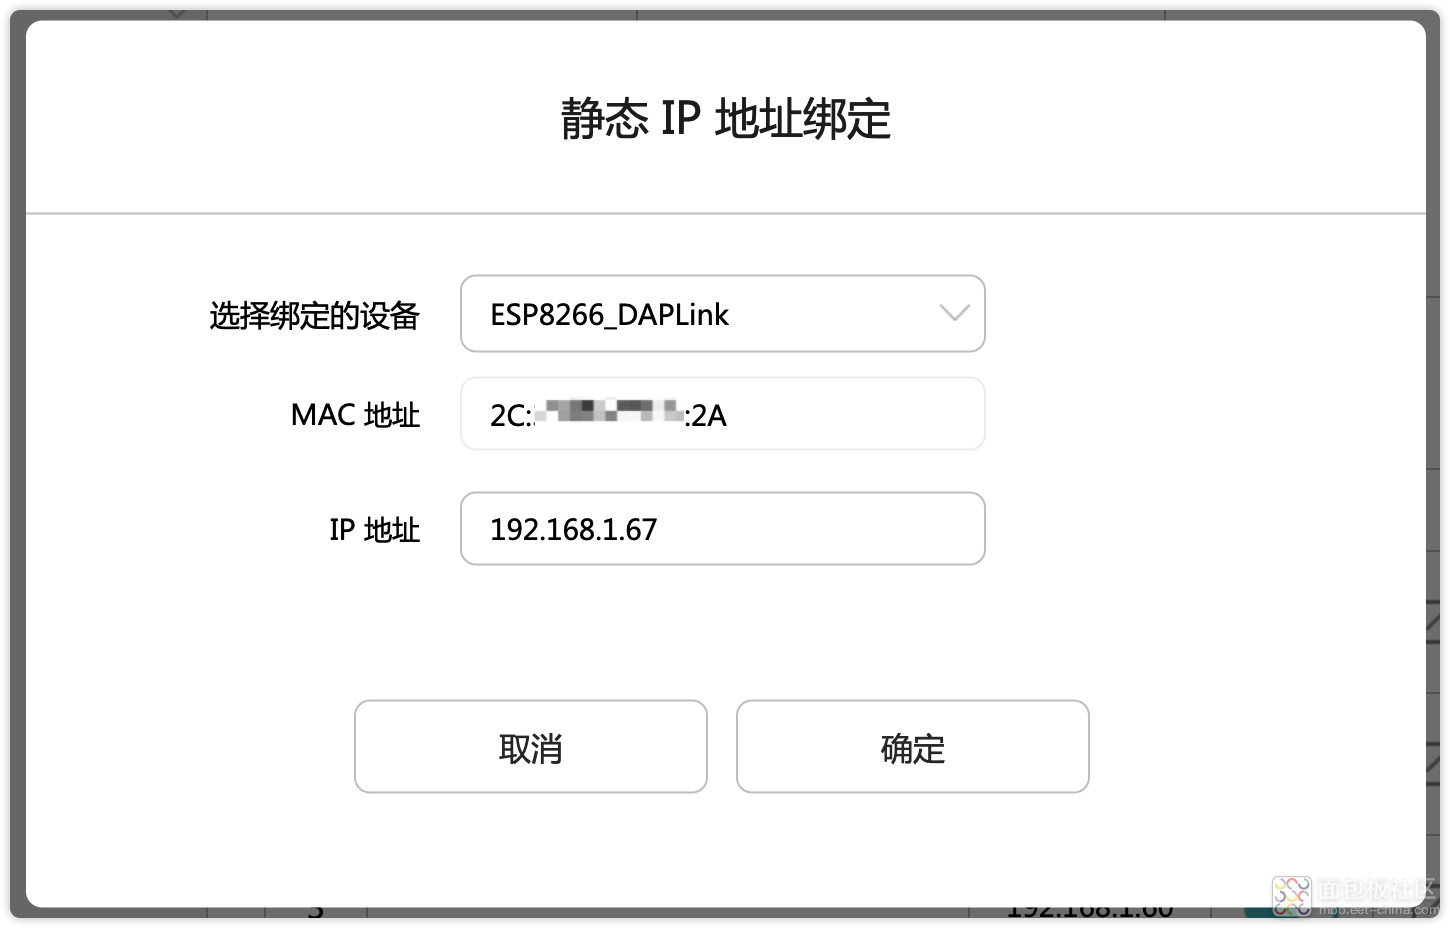
当然,也可以在WiFi路由器中,查看并绑定起IP地址:
![image.png image.png](https://static.assets-stash.eet-china.com/forum/202212/18/141244xw1d7i6rrcb6x11d.png)
![image.png image.png](https://static.assets-stash.eet-china.com/forum/202212/18/141424pwkm9dut8mkhkt9h.png)
这样就可以避免IP发生了变化。
7. 配置DapLink的地址:
![image.png image.png](https://static.assets-stash.eet-china.com/forum/202212/18/162723nwzg8cmfvmm8c6mc.png)
![image.png image.png](https://static.assets-stash.eet-china.com/forum/202212/18/142617rv1c8txny8vzt2cn.png)
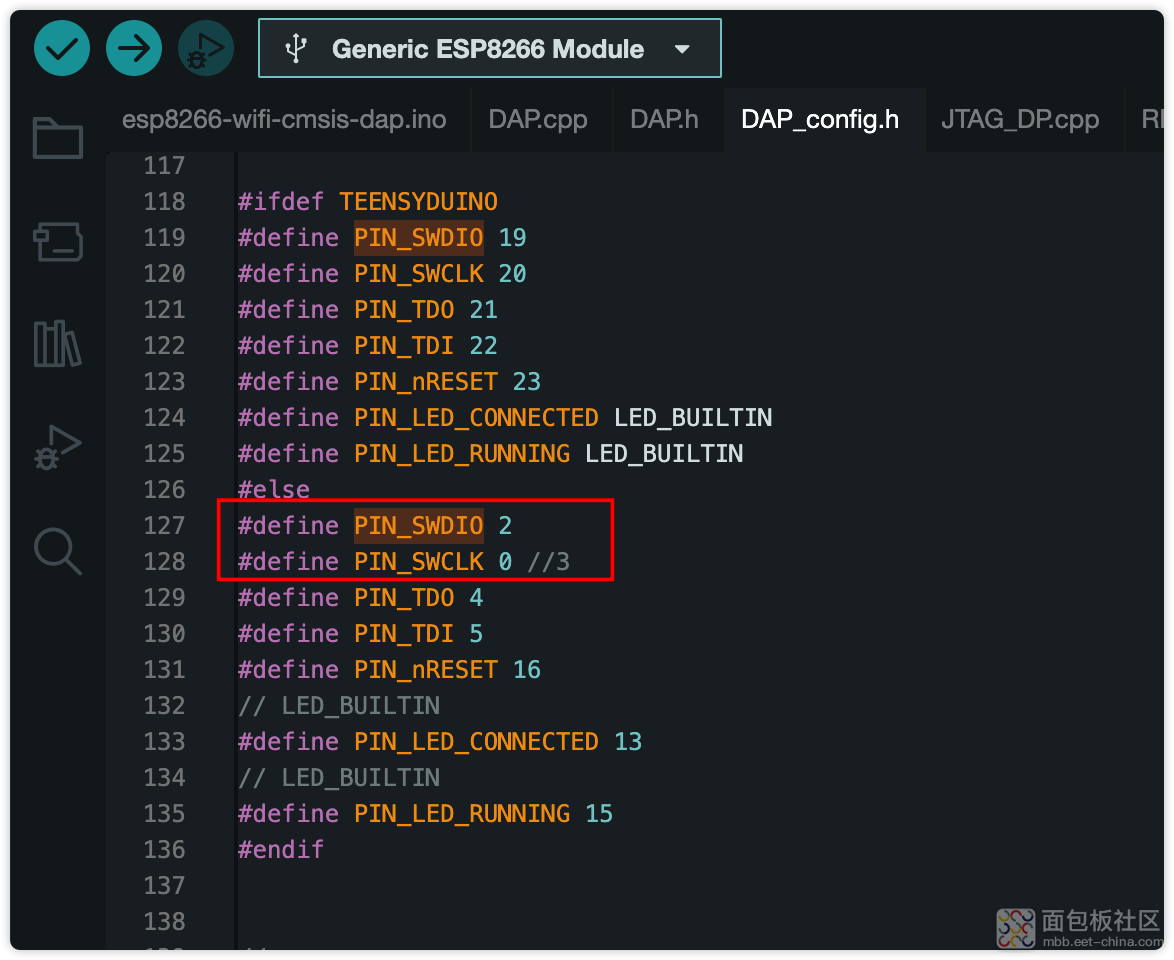
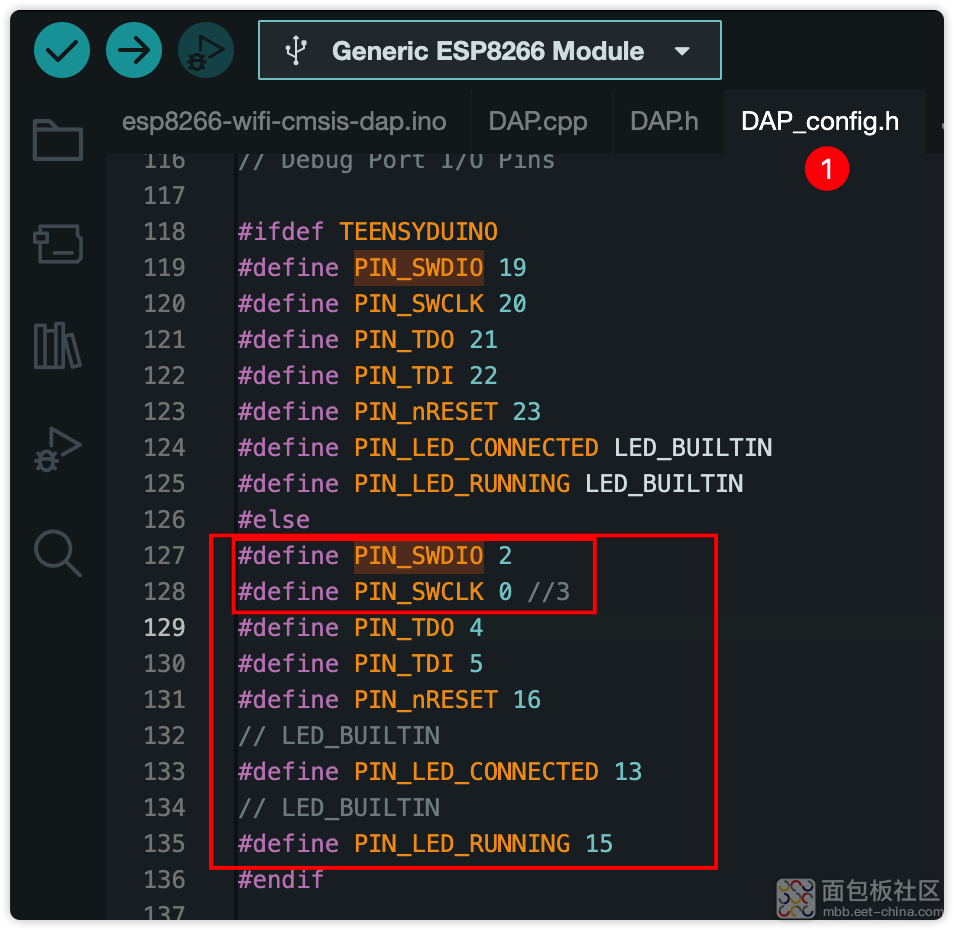
上述Pin接口,通常情况下不用修改,除非你知道自己在干什么。
一般情况下,只需要SWDIO、SWCLK即可,如果有空余的接口,那么nRESET也可以用上,这样下载代码后,就不用按板子上的RST重启。
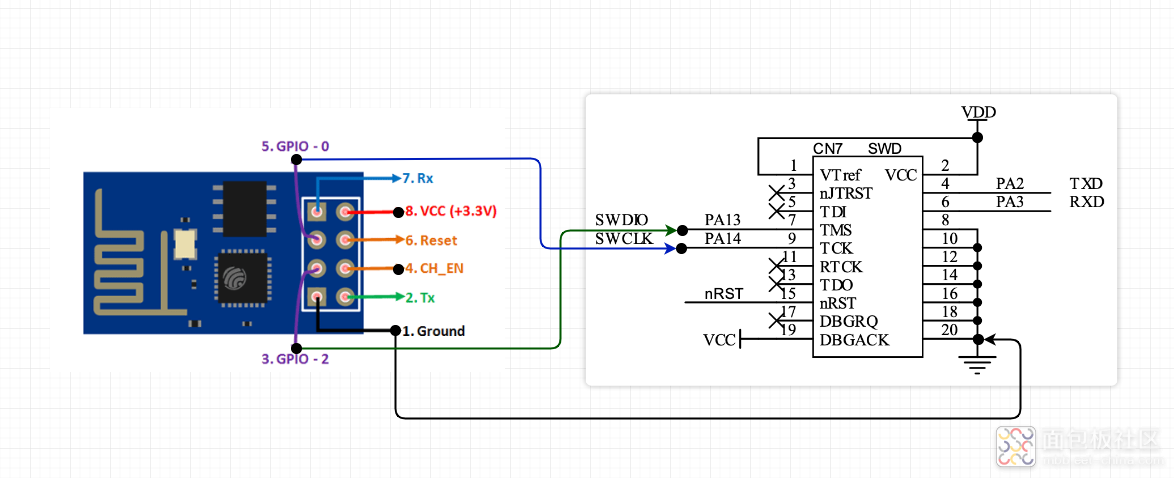
8. 连接灵动微电子 EVB-L0136 开发板:
![ESP8266-DapLink-1.drawio.png ESP8266-DapLink-1.drawio.png](https://static.assets-stash.eet-china.com/forum/202212/18/164917dxo0pb06qvc7ip46.png)
在测试正常以前,ESP8266还需要连接在下载器或者USB2TTL上,方便查看是否有问题。
测试正常以后,就可以不用挂下载器或者USB2TTL,直接连在灵动微电子 EVB-L0136 开发板即可,此时可以使用开发板为ESP8266供电,非常方便。
通过上述步骤,我们就已经在ESP8266上面,完成了DapLink的DIY工作了。
二、开发环境使用usbip连接ESP8266 DapLink调试器:
之前说过,是实现了一个WiFI CMSIS-DAPLink,那么就需要工具,将其挂接到开发环境所在的电脑上,使得Keil能够识别。
如果使用openocd之类的进行下载和调试,则直接配置连接到其ip即可。
下面主要说Keil中的使用,这借助usbip工具即可。
这个工具也是开源的,其Windows版本地址为:https://github.com/cezanne/usbip-win
Linux版本的,可以使用系统自带的包管理面命进行安装,如sudo apt-get install usbip。
因为后续主要说明Keil联调,所以以下的步骤为Windows下面的操作。
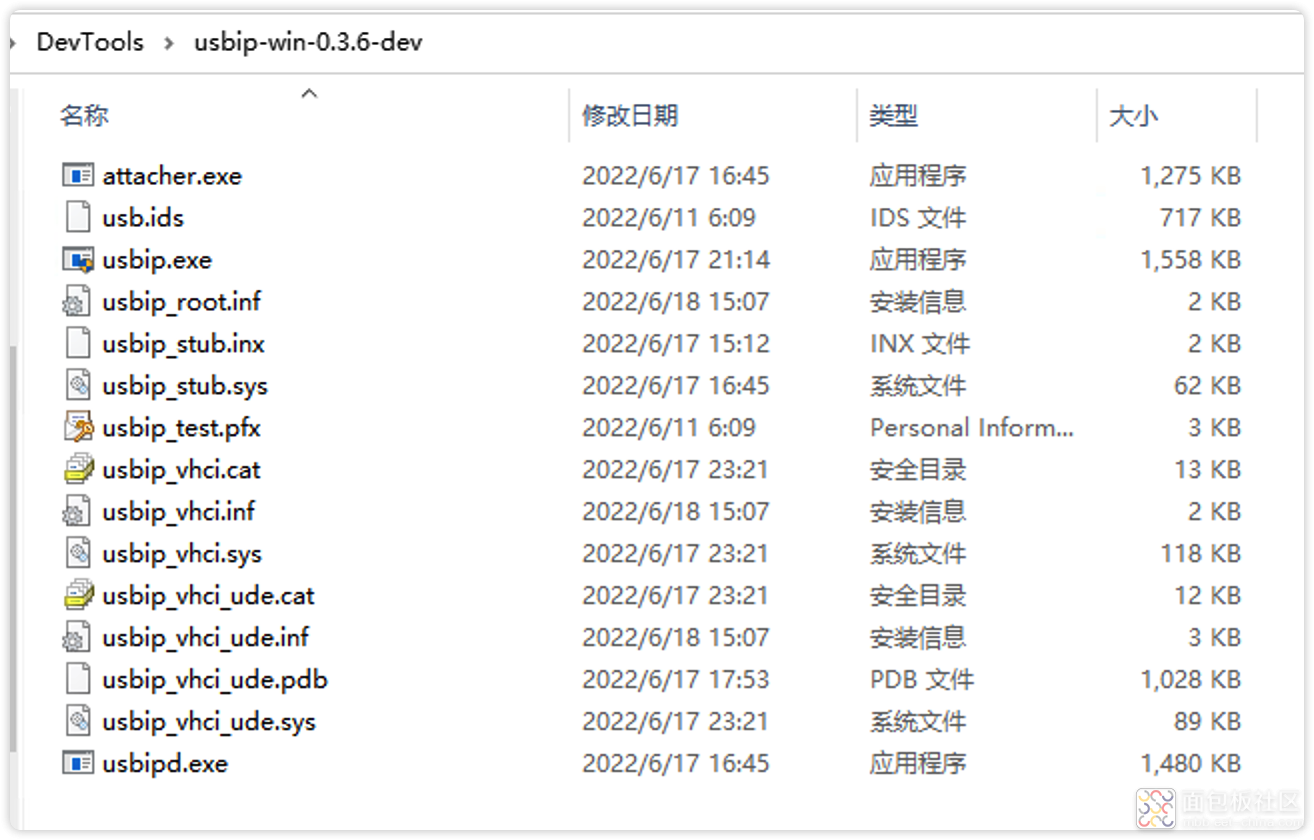
1. 首先下载usbip-win的发布版本,附件包:
![](static/image/filetype/zip.gif)
2022-12-18 14:46 上传
点击文件名下载附件
,下载后解压:![image.png image.png](https://static.assets-stash.eet-china.com/forum/202212/18/160520nbiibxmhx9px26w2.png)
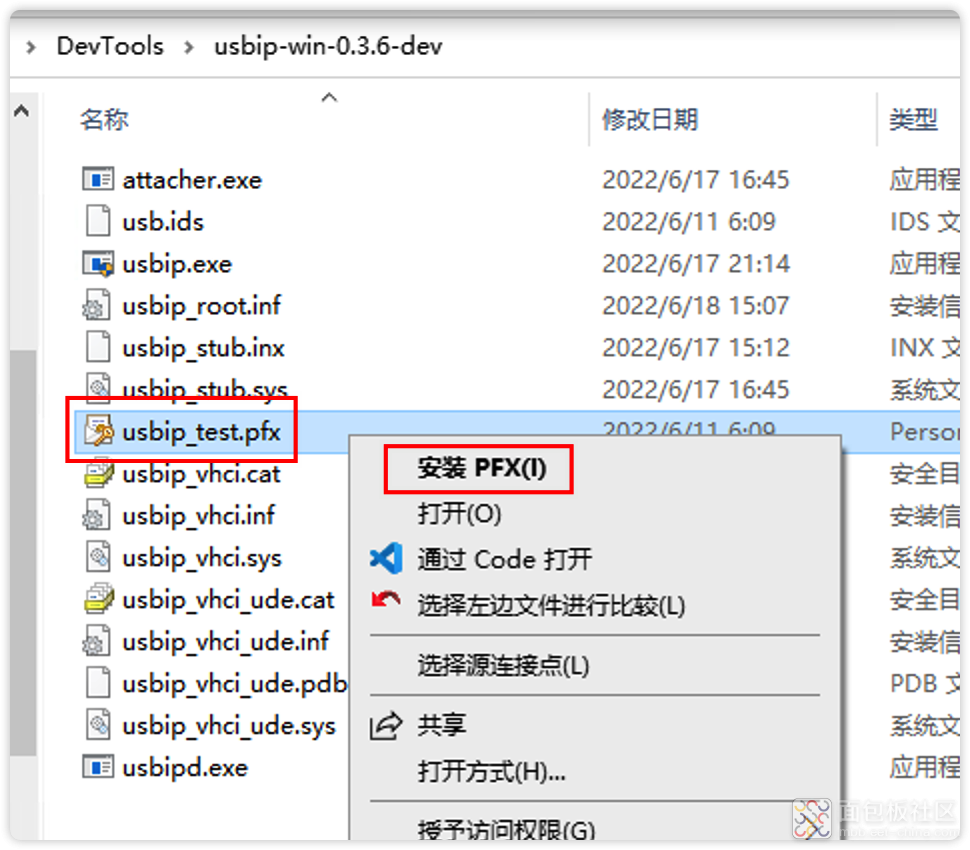
2. 安装证书:
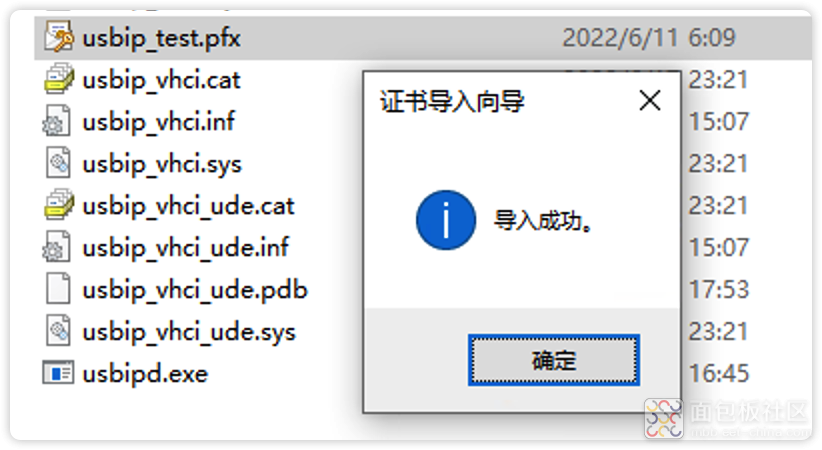
可以在usbip_test.pfx鼠标右键再选择安装,也可以直接点击进行安装:
![image.png image.png](https://static.assets-stash.eet-china.com/forum/202212/18/160618ggvahaf3agr3bmpg.png)
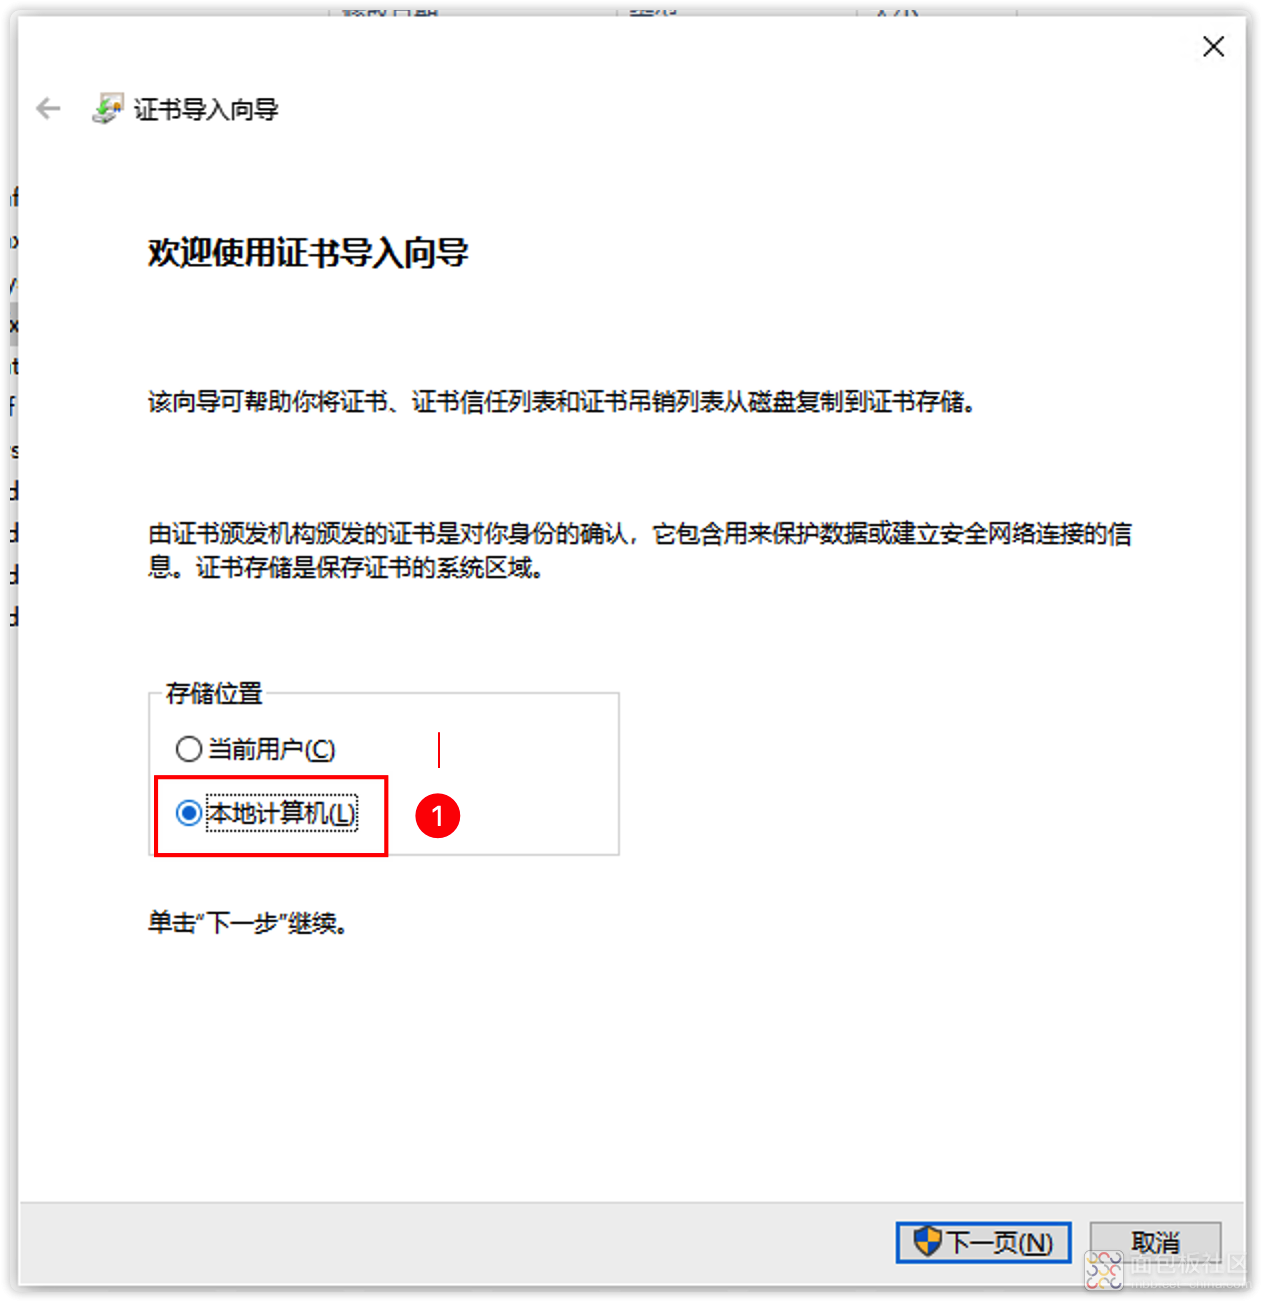
安装参数,务必严格按照下面的步骤:
(1) 证书安装位置:本地计算机
![image.png image.png](https://static.assets-stash.eet-china.com/forum/202212/18/160727ruo7o8fs2je9suc9.png)
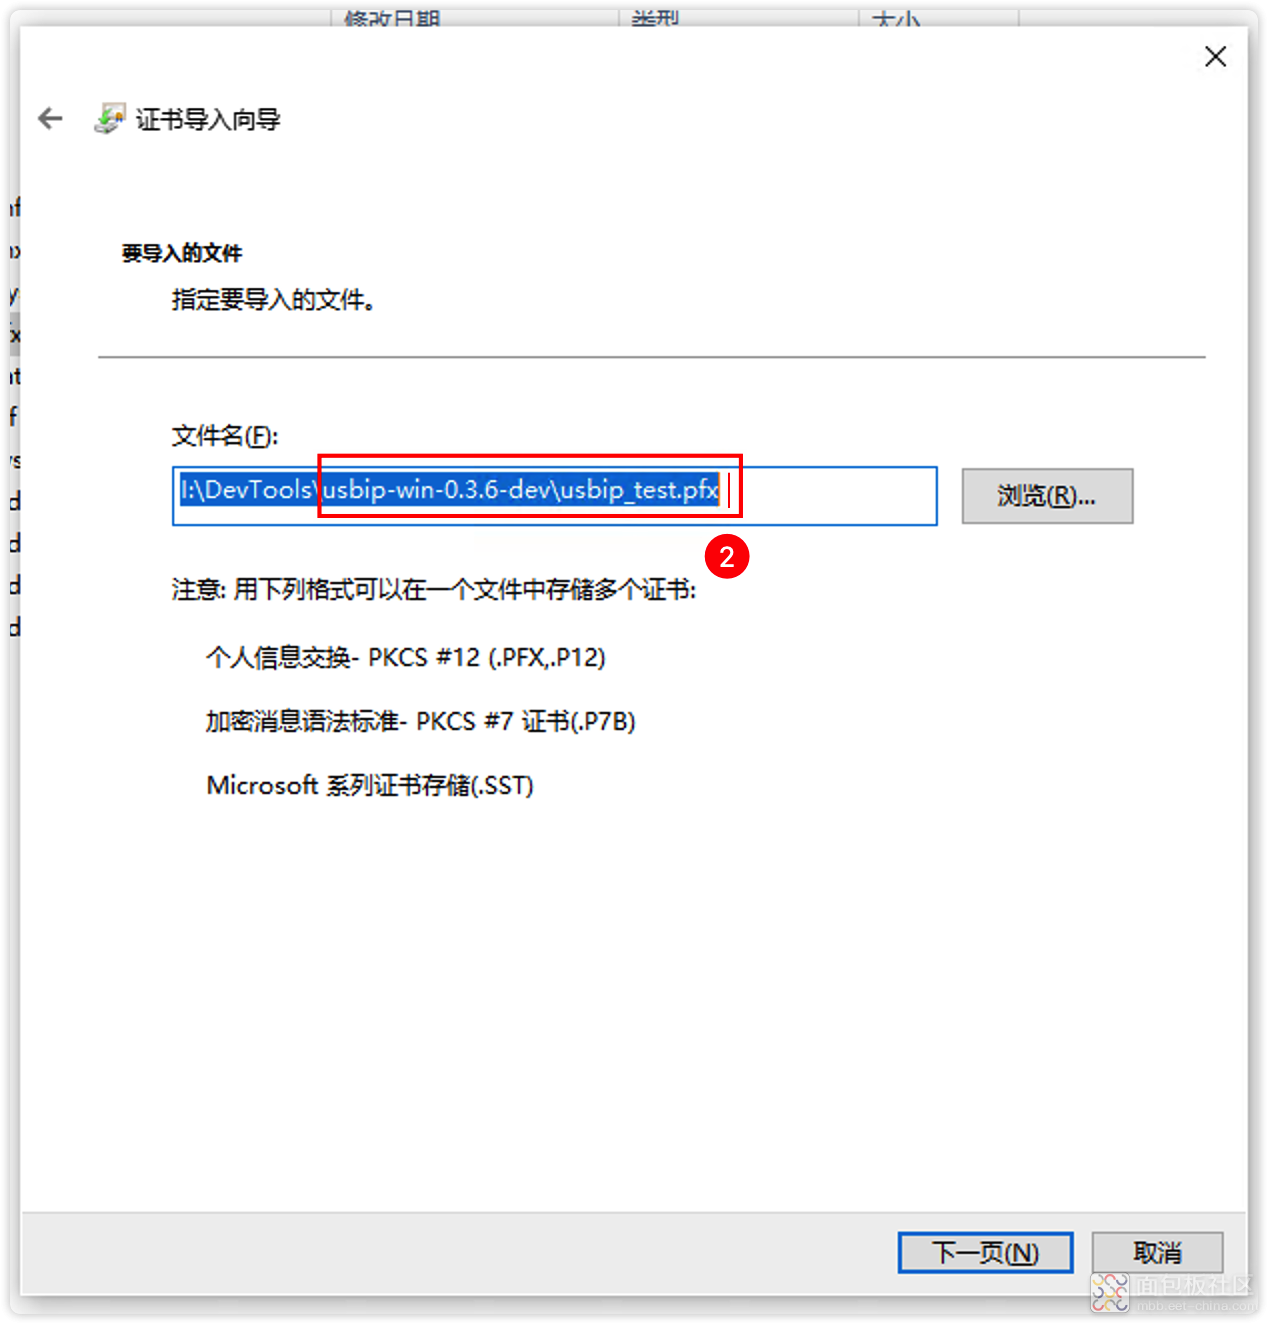
(2)证书文件:使用默认即可
![image.png image.png](https://static.assets-stash.eet-china.com/forum/202212/18/160800cueppuj36qmujmoj.png)
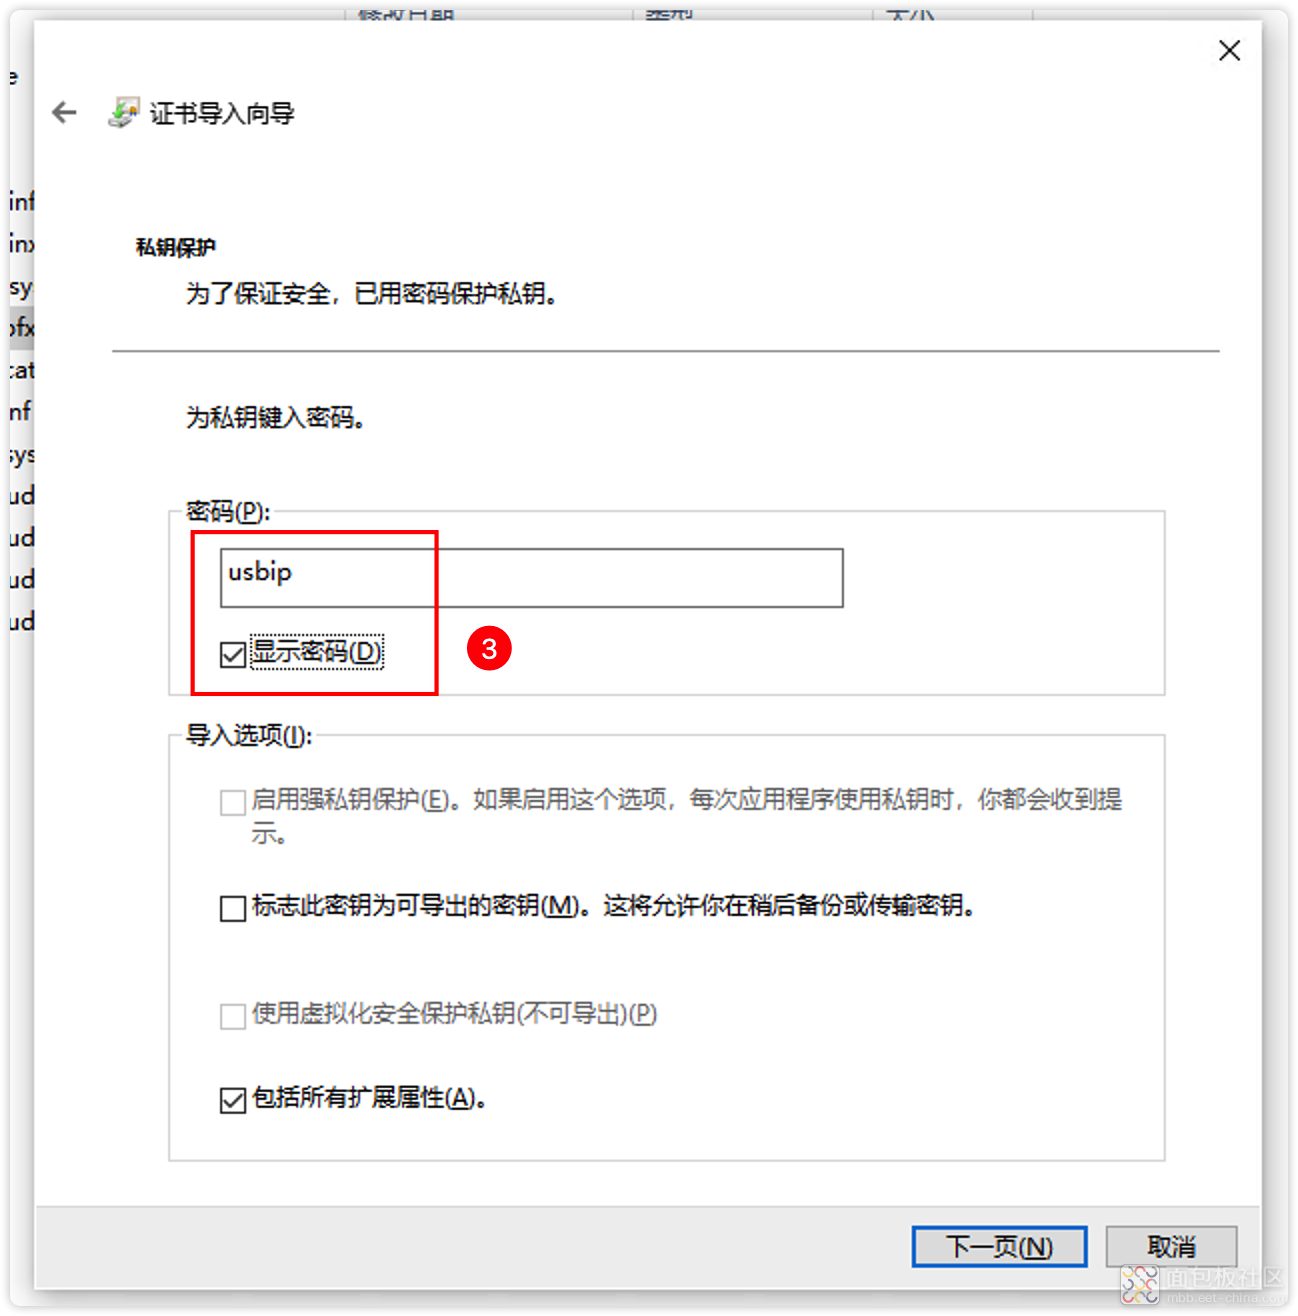
(3)证书密码:usbip
![image.png image.png](https://static.assets-stash.eet-china.com/forum/202212/18/160935mqdj87rg91d77a5w.png)
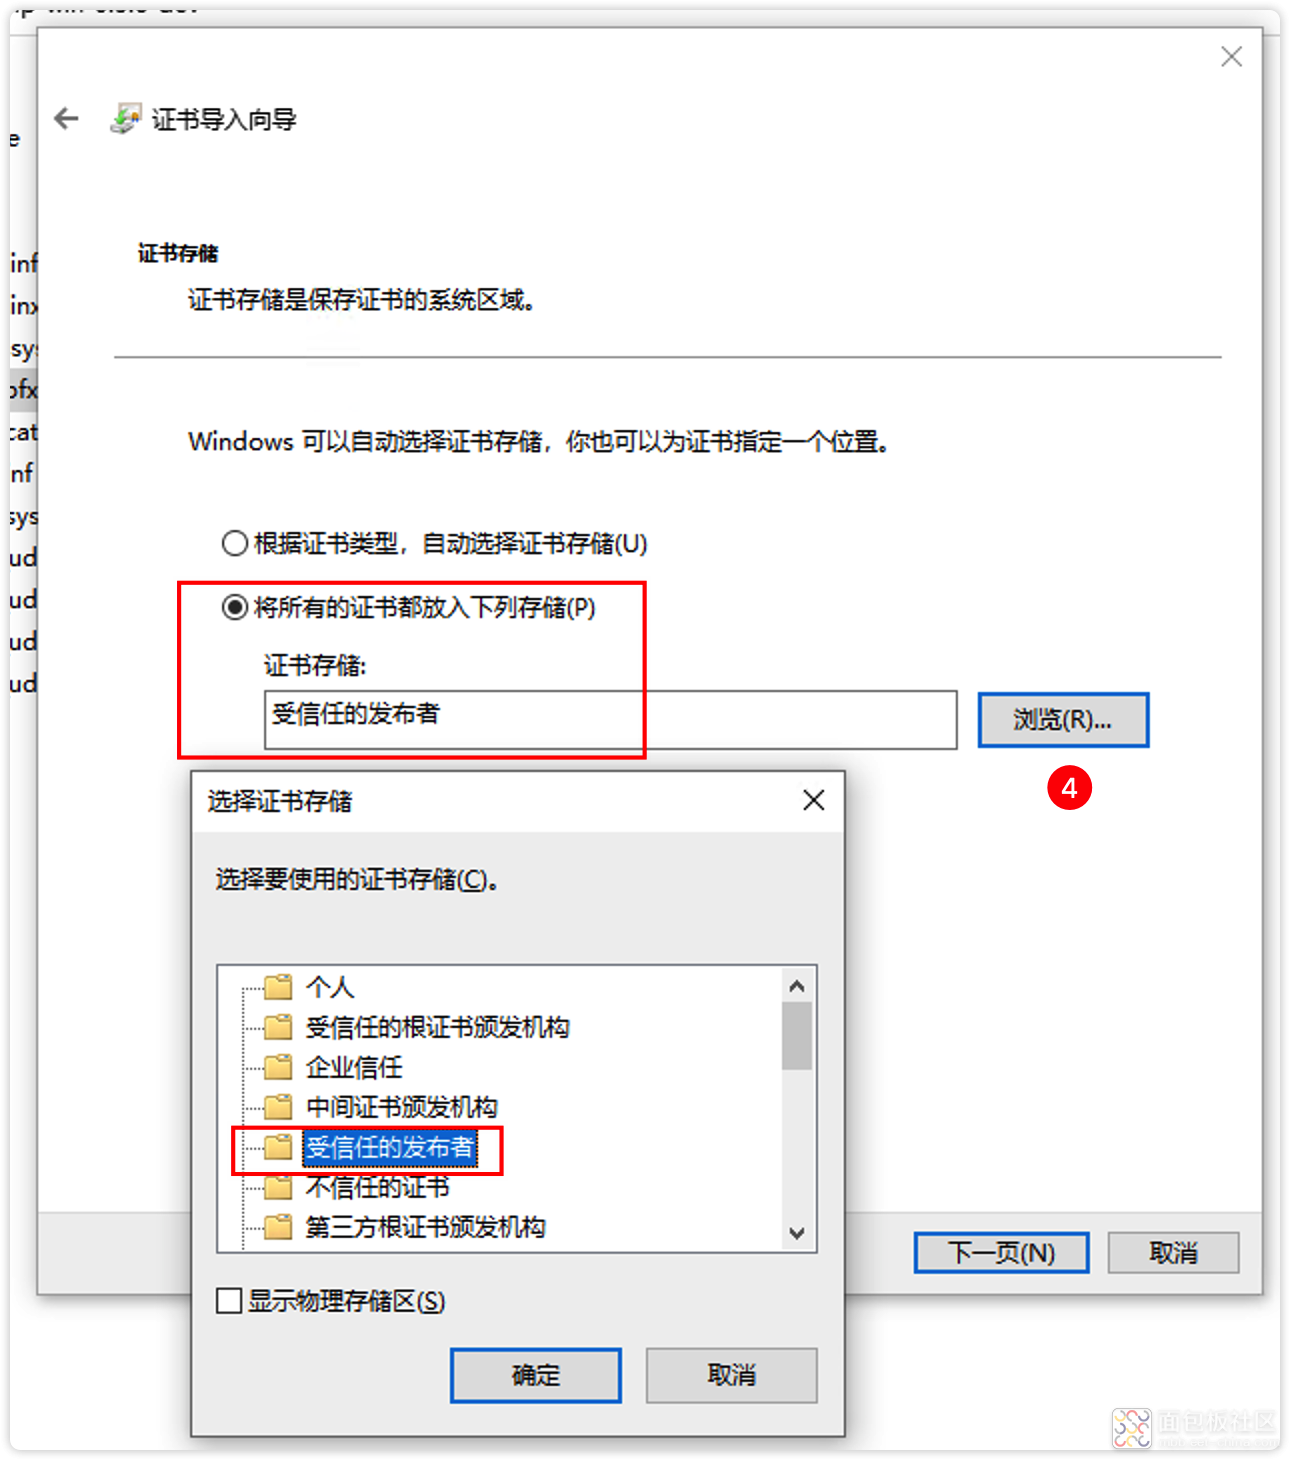
(4) 证书存储区域:
![image.png image.png](https://static.assets-stash.eet-china.com/forum/202212/18/161200ebjh4j1dgfzbq1z6.png)
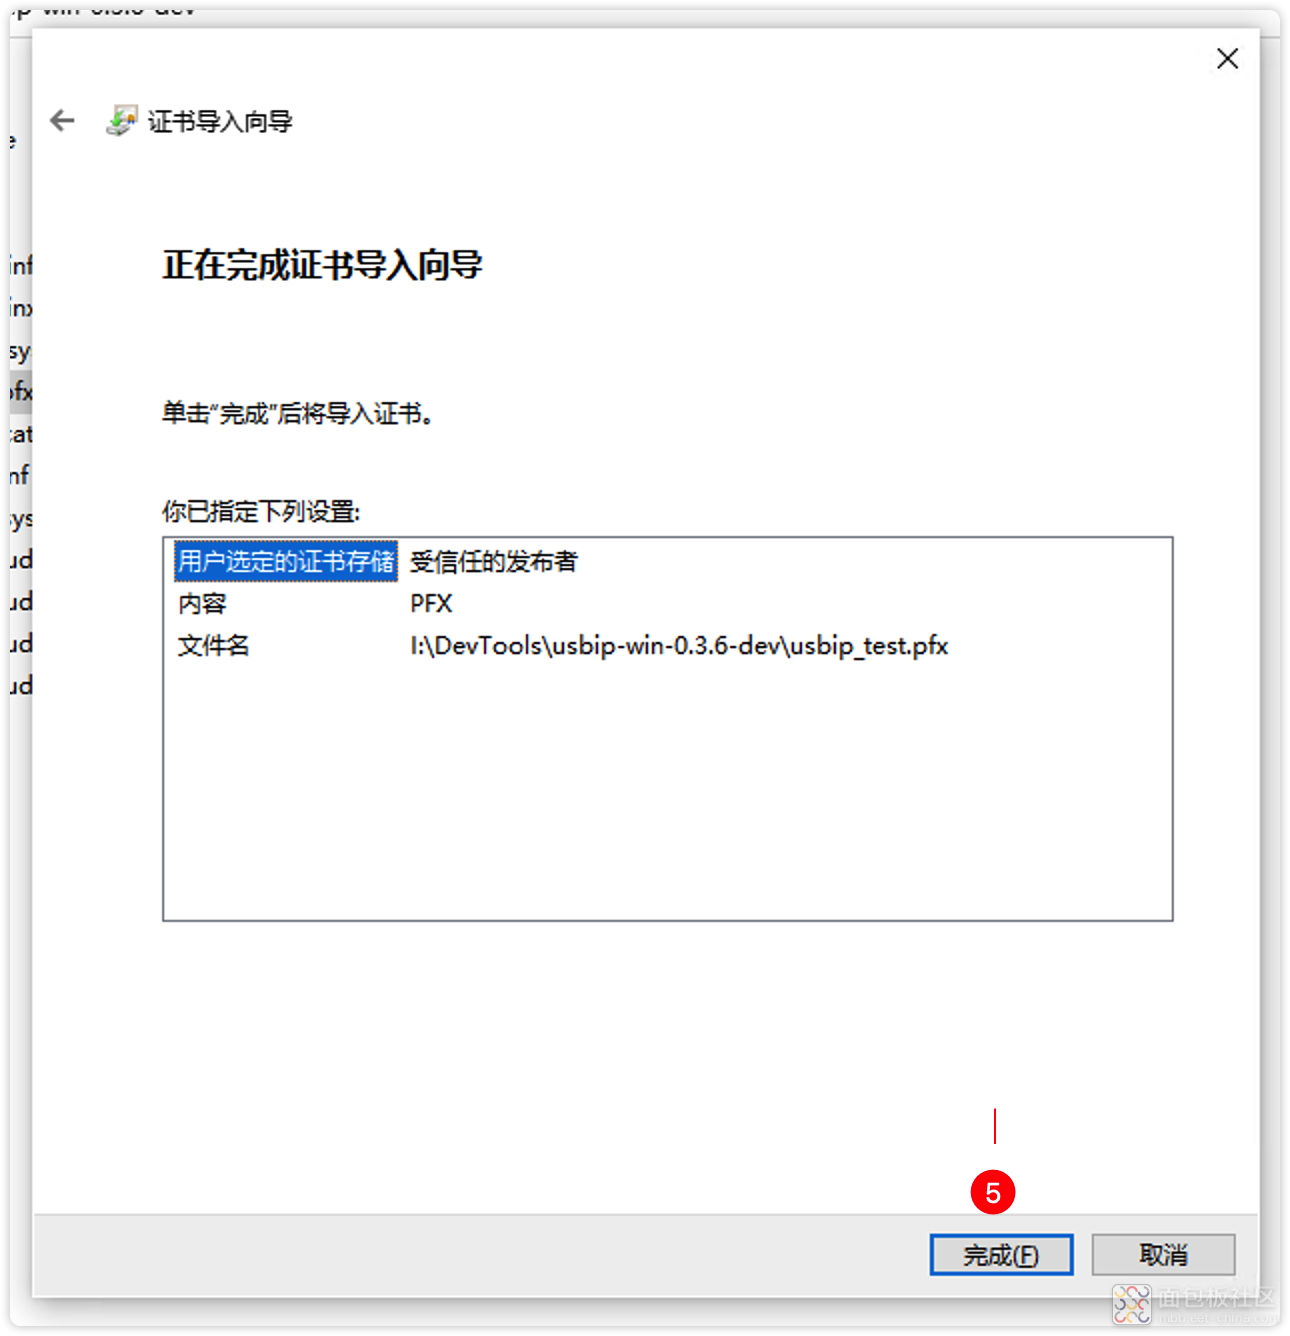
(5) 完成安装
![image.png image.png](https://static.assets-stash.eet-china.com/forum/202212/18/161237g50w6mvvd566z6om.png)
![image.png image.png](https://static.assets-stash.eet-china.com/forum/202212/18/161535w27488yzx4srrxsu.png)
3. 安装驱动:
(1) 安装驱动之前,先要启动系统的测试证书签名。
用管理员权限打开cmd.exe黑窗口,然后执行命令:
bcdedit.exe /set TESTSIGNING ON
复制代码![image.png image.png](https://static.assets-stash.eet-china.com/forum/202212/18/162002v69v5511eufr19f9.png)
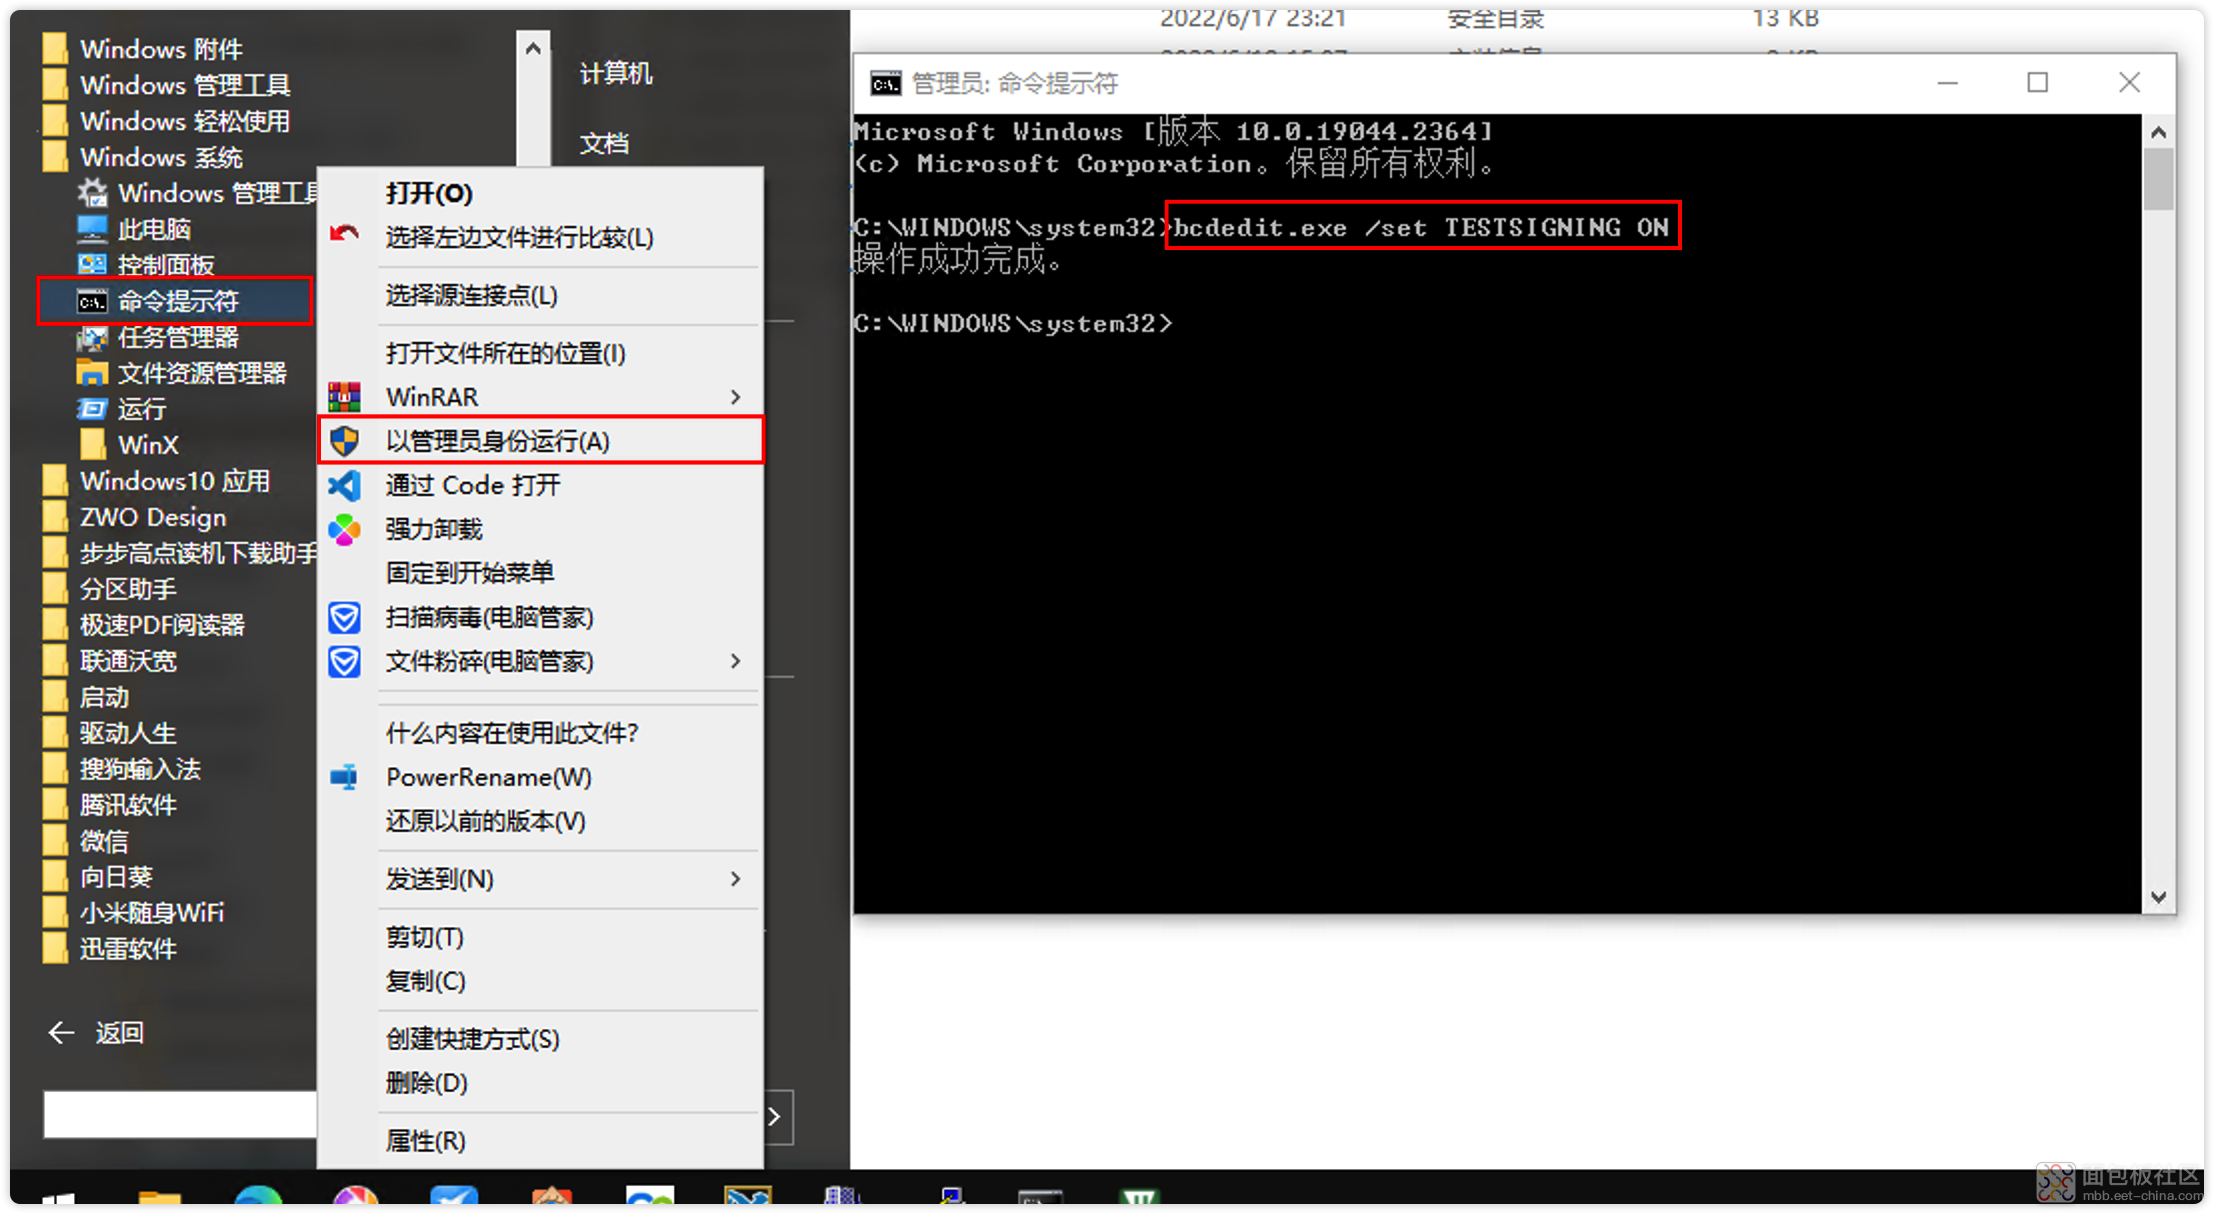
如果不以管理员权限运行,则会出现下面的错误:
![image.png image.png](https://static.assets-stash.eet-china.com/forum/202212/18/162055e0020026f0shr0ul.png)
4. 重启操作系统:
执行成功后,需要重启操作系统,才能进行后面的步骤。
5. 安装usbip驱动:
再次使用管理员权限打开cmd.exe黑窗口,并执行下面的命令:
usbip list -r 192.168.1.67usbip addtch -r 192.168.1.67 -b 1-1 usbip list -l
复制代码![image.png image.png](https://static.assets-stash.eet-china.com/forum/202212/18/163641qczx3f87f1c7ex11.png)
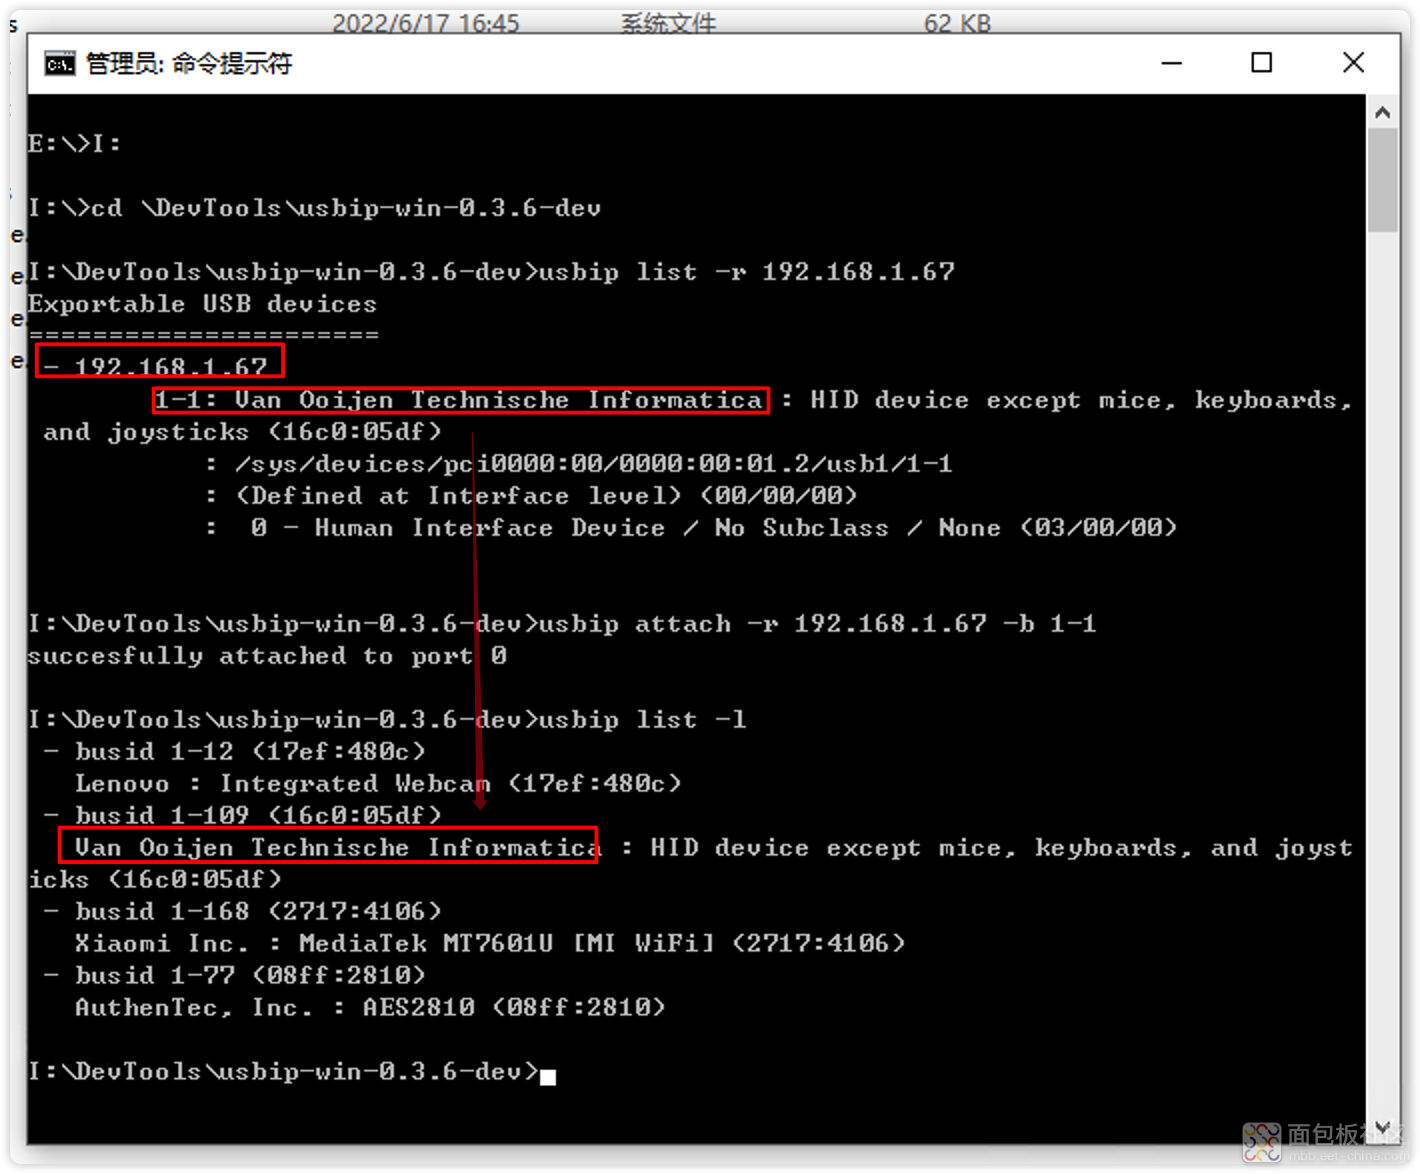
上述三条命令,作用如下:
- 查看ESP8266是否能够提供远程服务
- 将ESP8266的服务挂载到本地设备
- 查看本地的设备
同时,执行命令时,在Arduino IDE的串口调试器中,也会有对应的信息显示:
(1) 执行usbip list -r 192.168.1.67时:
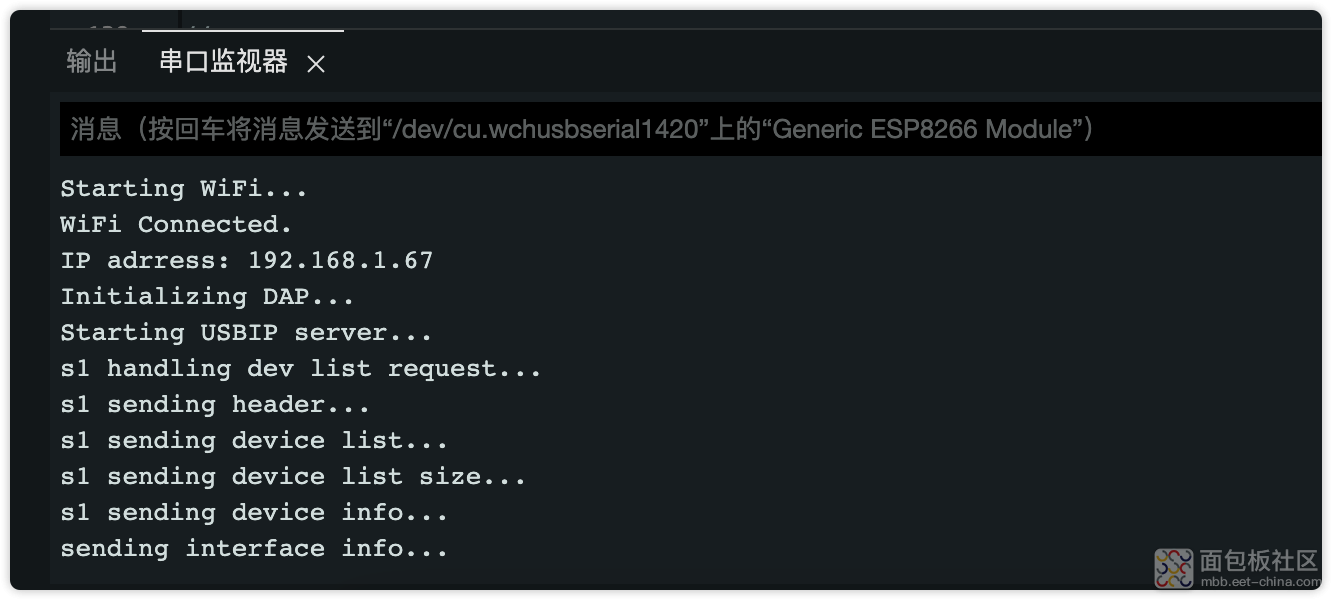
![image.png image.png](https://static.assets-stash.eet-china.com/forum/202212/18/164044nlla2g18ax1yxwaf.png)
(2).执行usbip addtch -r 192.168.1.67 -b 1-1时:
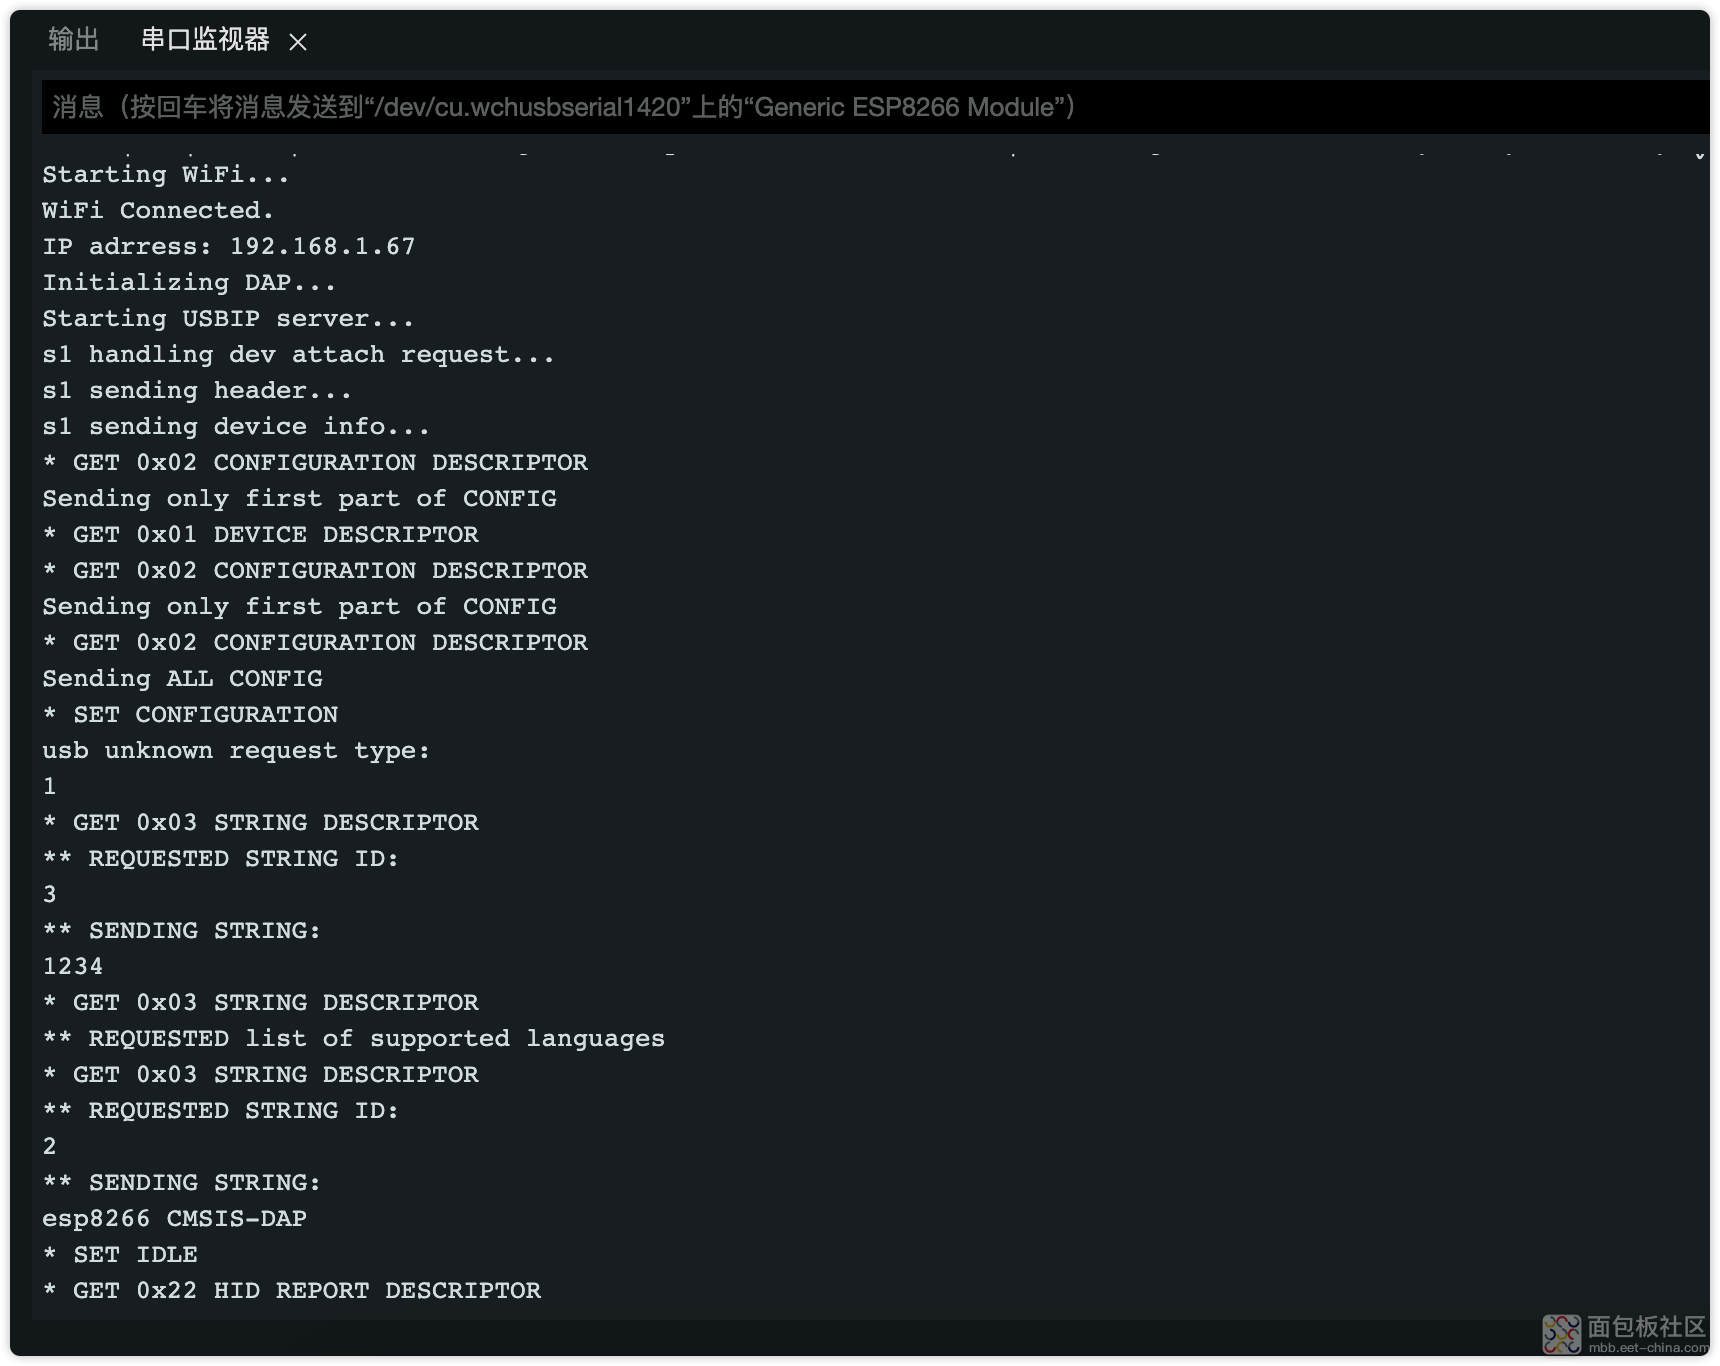
![image.png image.png](https://static.assets-stash.eet-china.com/forum/202212/18/164224vcs4uugtzx7xbttz.png)
上述三条命令成功执行后,就可以前往Keil中,进行配置了。
6. Keil中使用ESP8266提供的DapLink:
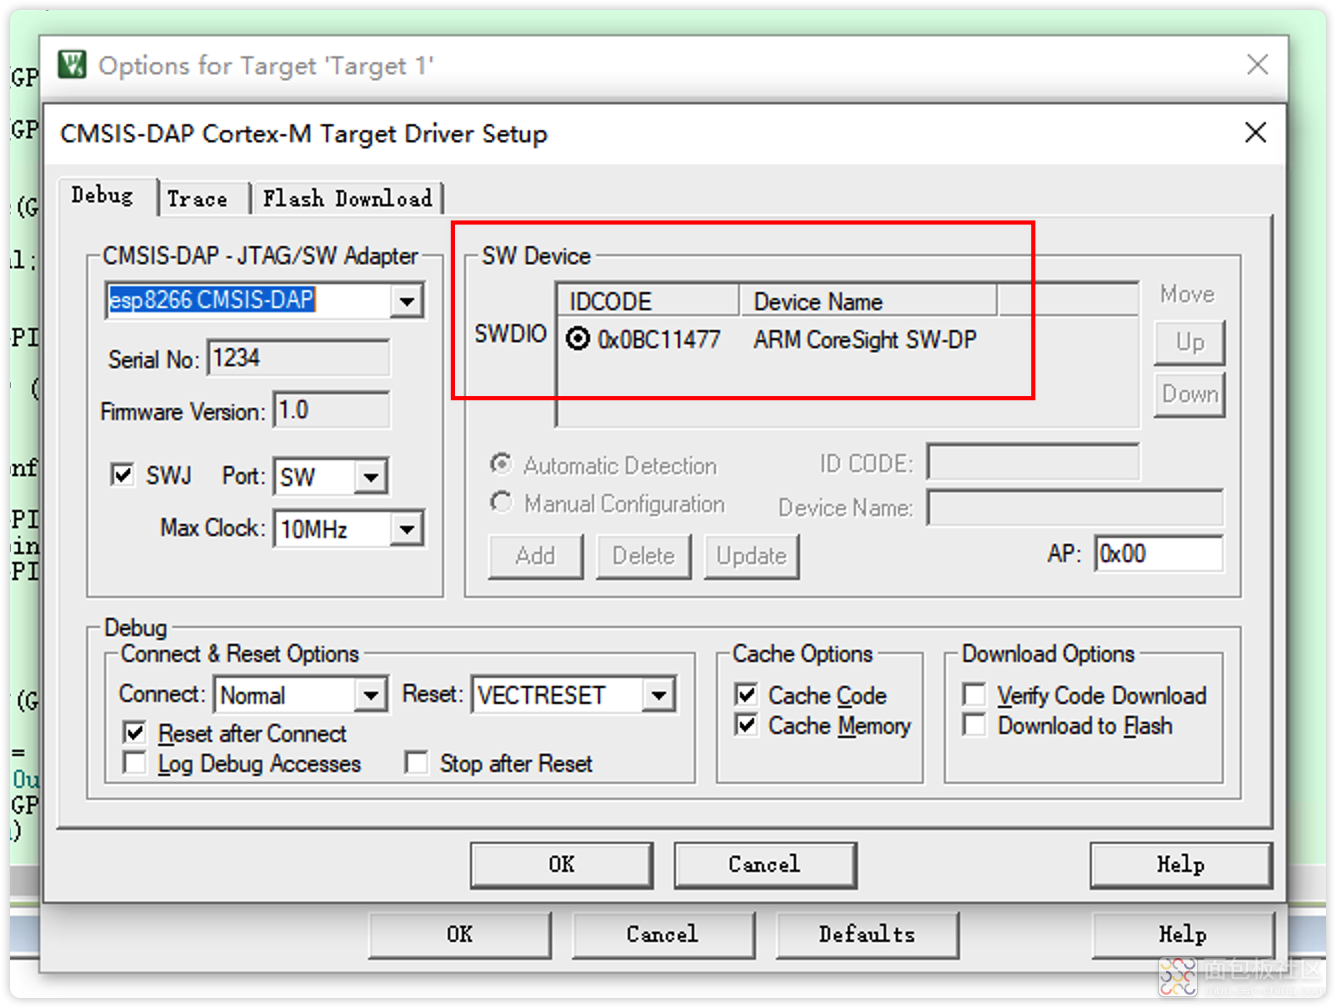
(1) 使用keil打开官方提供的gpio_basic例程,然后设置调试器:
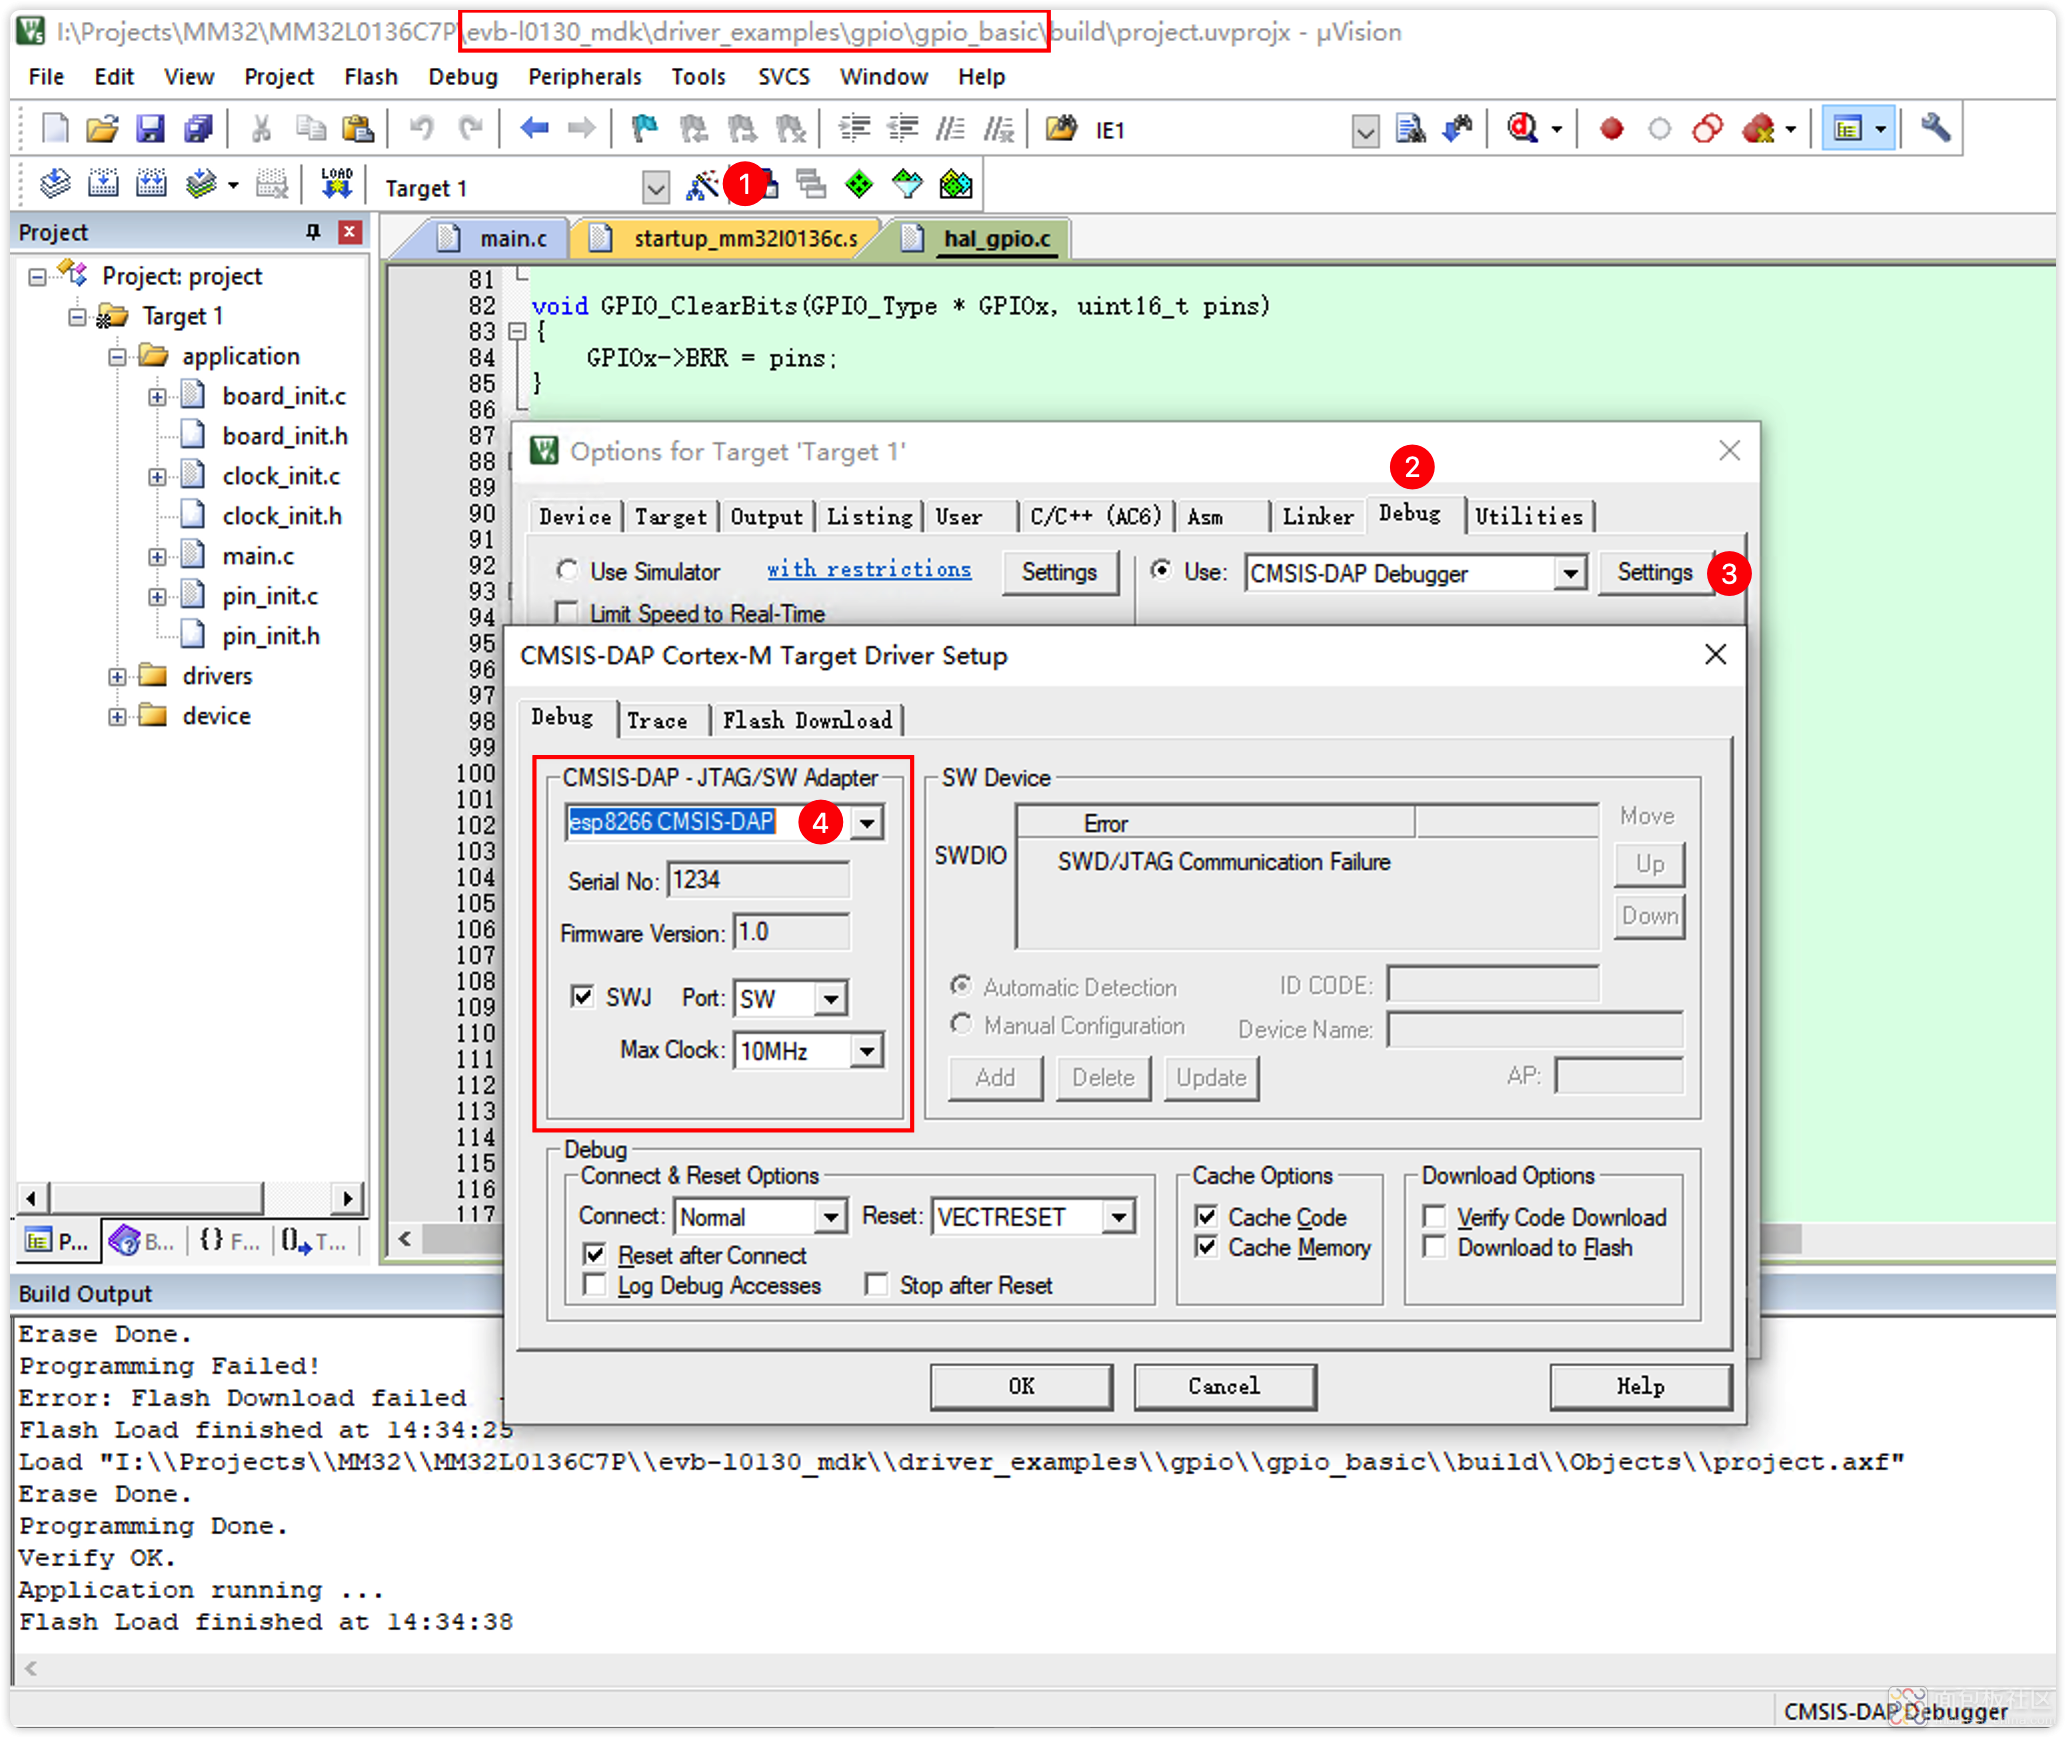
![image.png image.png](https://static.assets-stash.eet-china.com/forum/202212/18/164504bh1k9ihvqrfwq79r.png)
初次使用的时候,可能会出现Error信息,这说明调试器连接不正确。
请再次仔细检查连线,确保正确的连接:
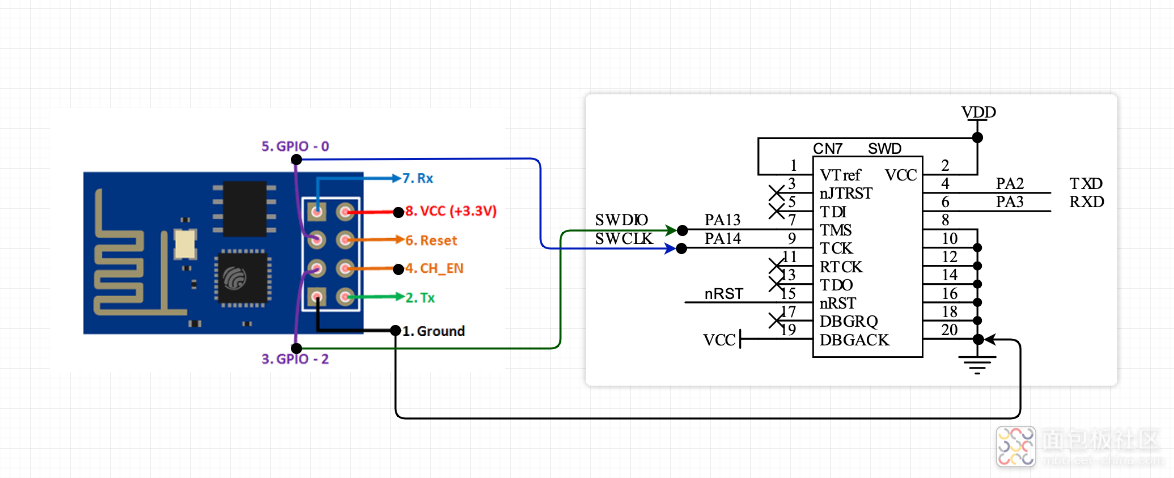
![ESP8266-DapLink-1.drawio.png ESP8266-DapLink-1.drawio.png](https://static.assets-stash.eet-china.com/forum/202212/18/164907uzriq0nkykqkjc0y.png)
最终,Keil调试器中,将出现如下的画面,表示大功告成:
![image.png image.png](https://static.assets-stash.eet-china.com/forum/202212/18/165655iw9opoyoewo7n788.png)
OK!!!
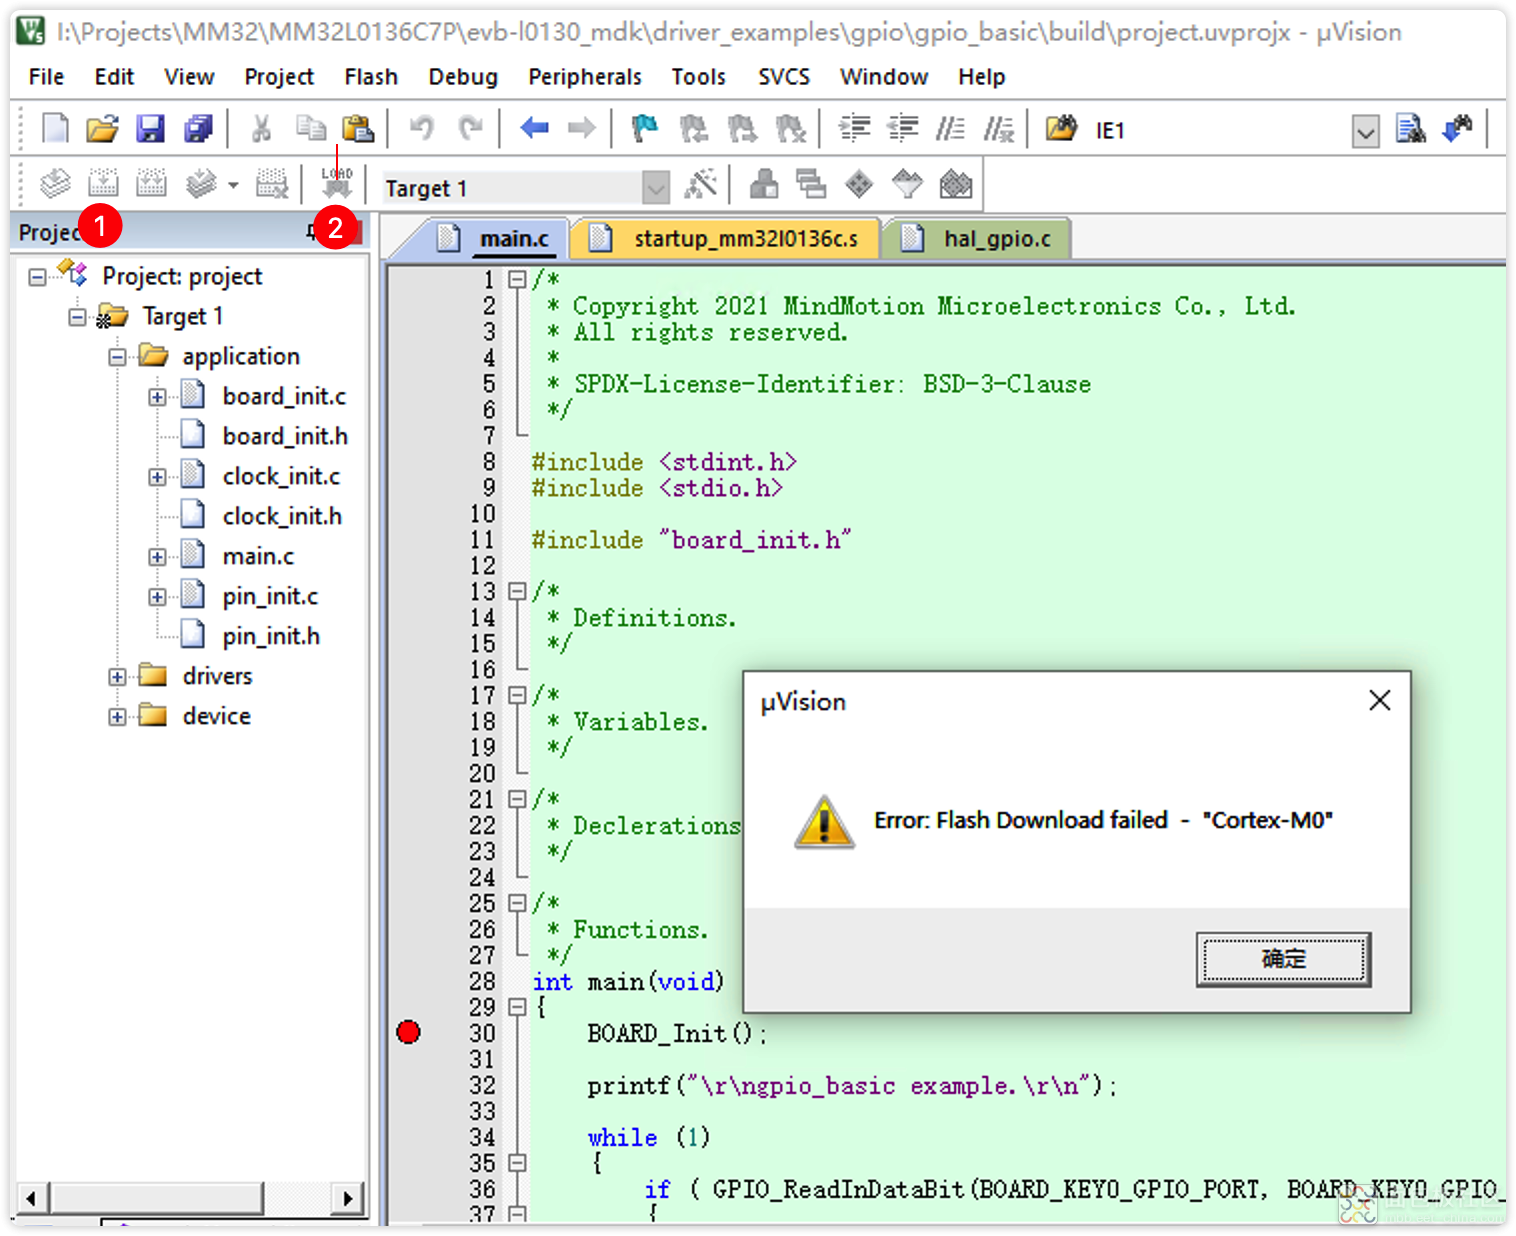
(2) 现在就可以编译,然后烧录试一下:
![image.png image.png](https://static.assets-stash.eet-china.com/forum/202212/18/165910q8c77janonaolmvr.png)
初次使用的时候,可能会出现上面的错误,此时,把板子上的RST按键按一下即可。
然后再次烧录:
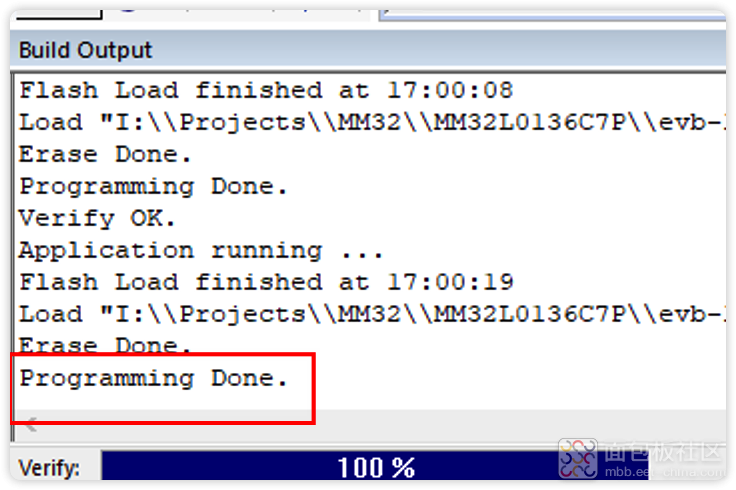
![image.png image.png](https://static.assets-stash.eet-china.com/forum/202212/18/170044nhft2cphhy2iptpo.png)
这样就表示成功了。
如果使用的是没有连接nRESET版本的调试器的话,那么下载成功后,需要手动按一下板子上的RST按键,就能正常运行新的固件了:
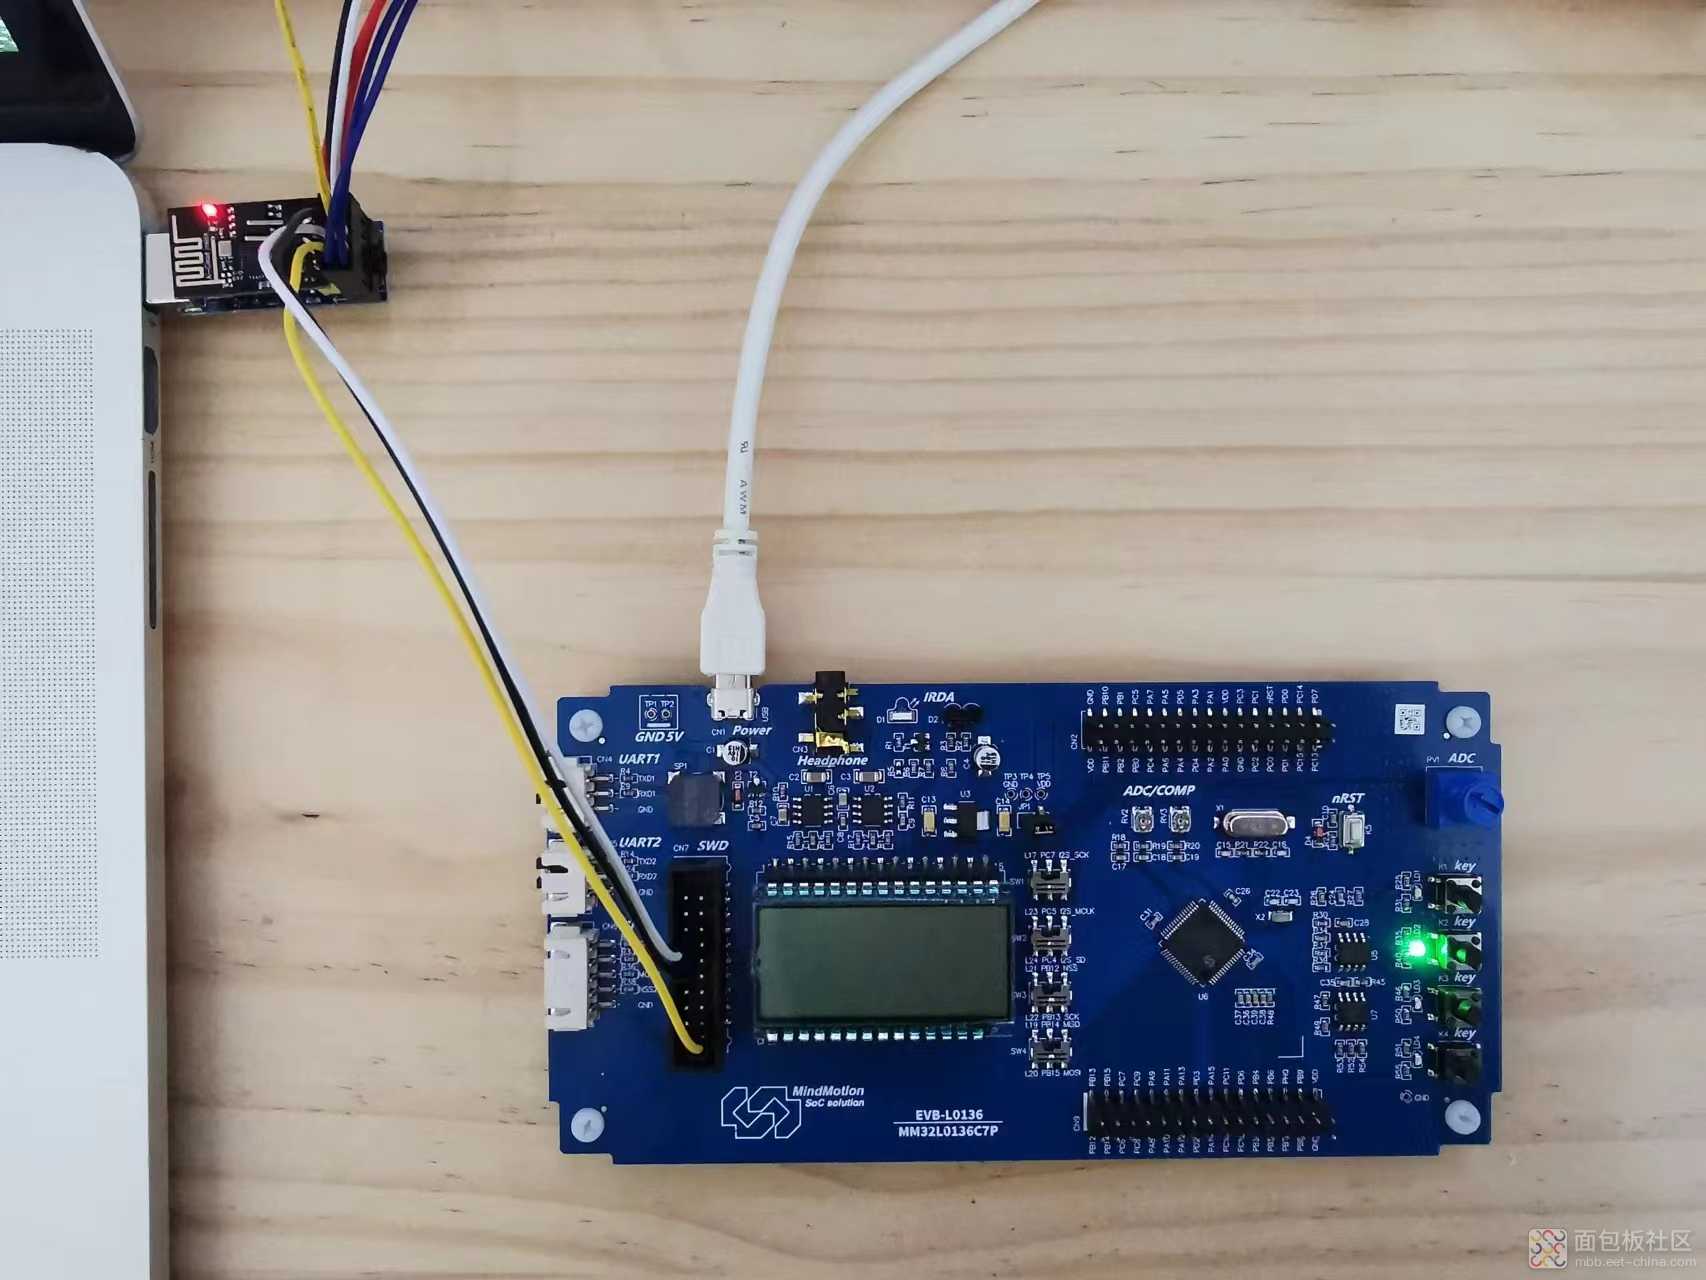
![image.png image.png](https://static.assets-stash.eet-china.com/forum/202212/18/170311hr3io0r3bl05xo55.png)
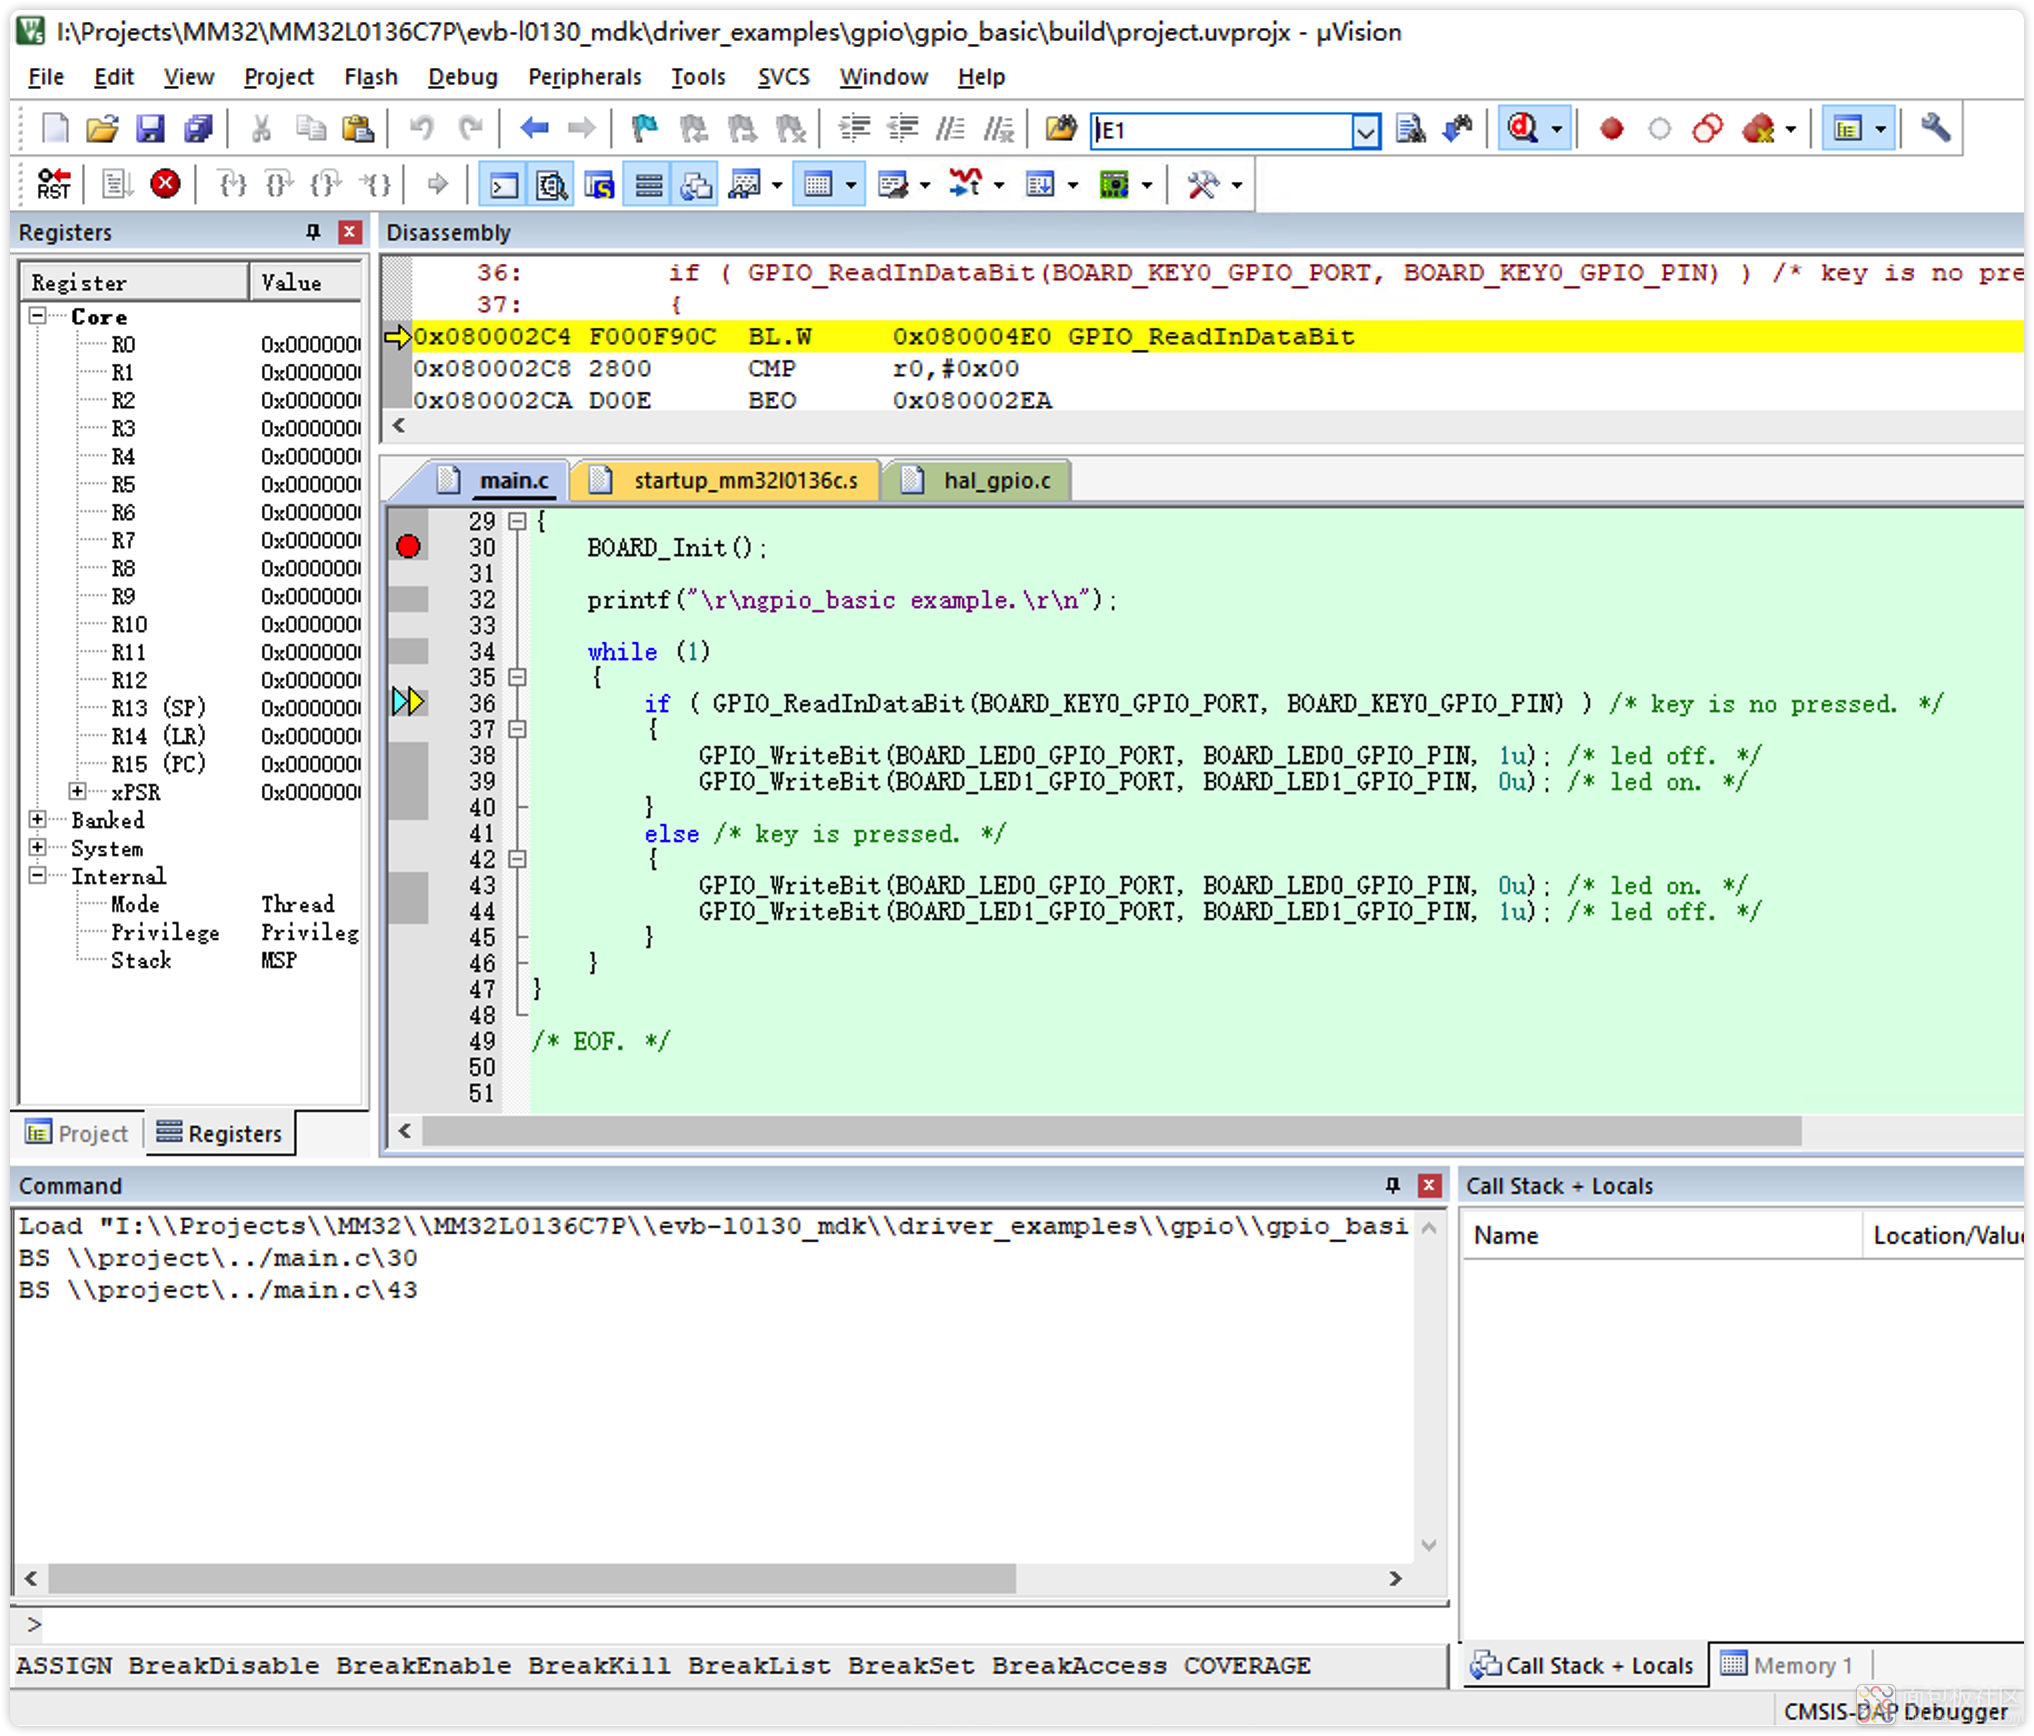
(3) 在keil中调试:
点击带(d)的图标,进入调试:
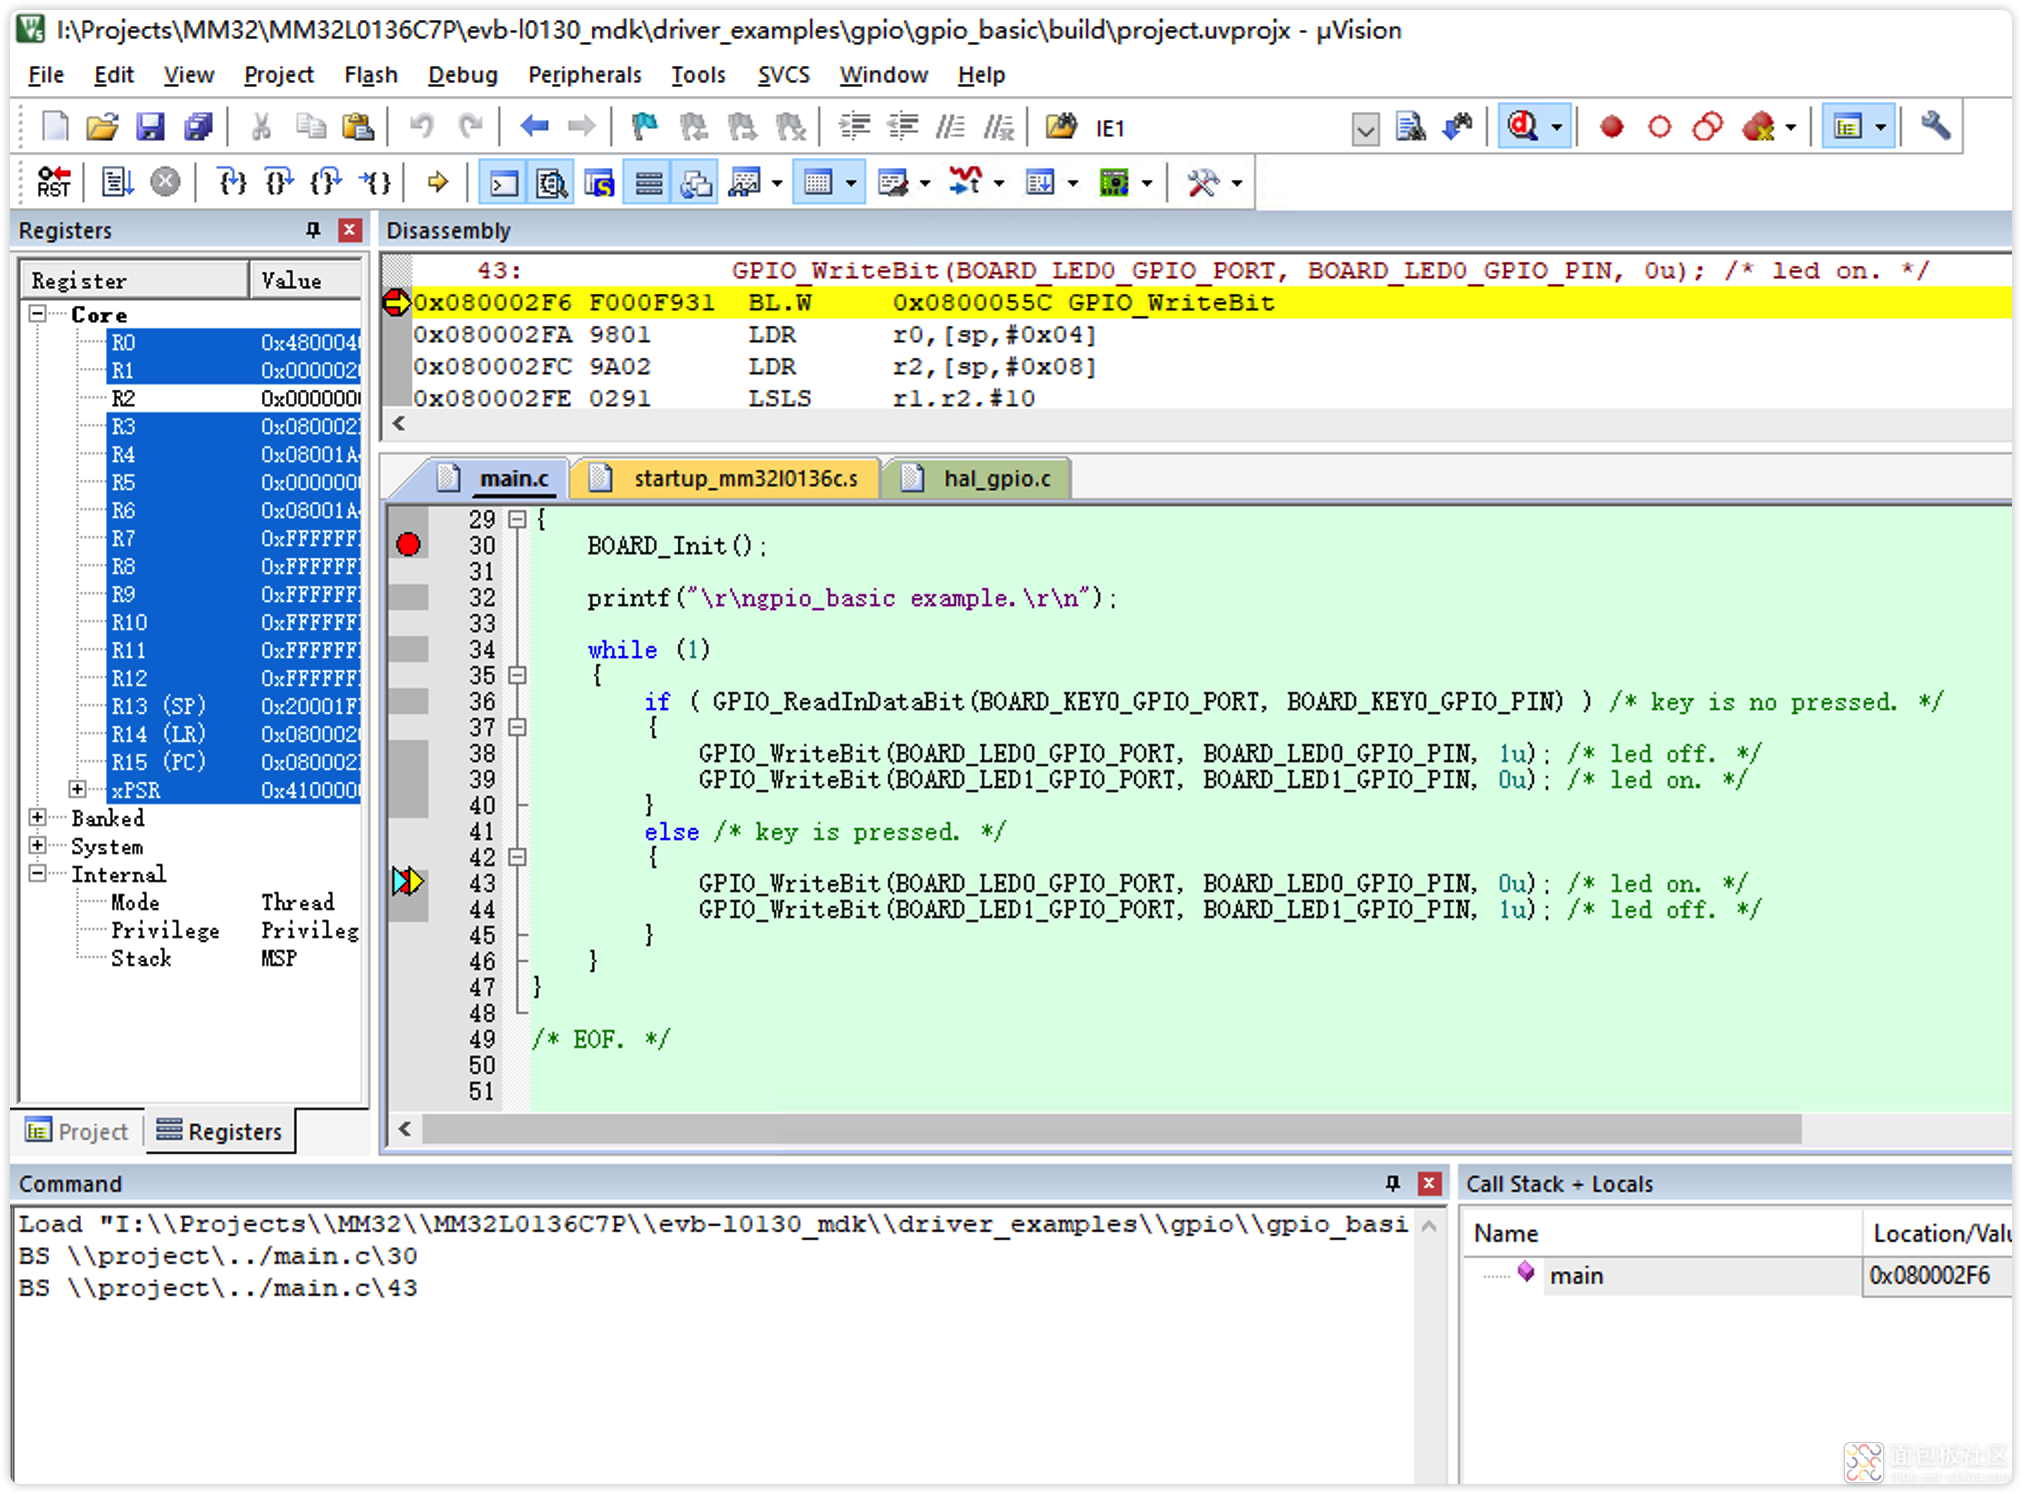
![image.png image.png](https://static.assets-stash.eet-china.com/forum/202212/18/170403hfsdc49oug8coofd.png)
如果是不带nRESET连接的调试器,此时需要再按一下RST按键,就会继续运行了:
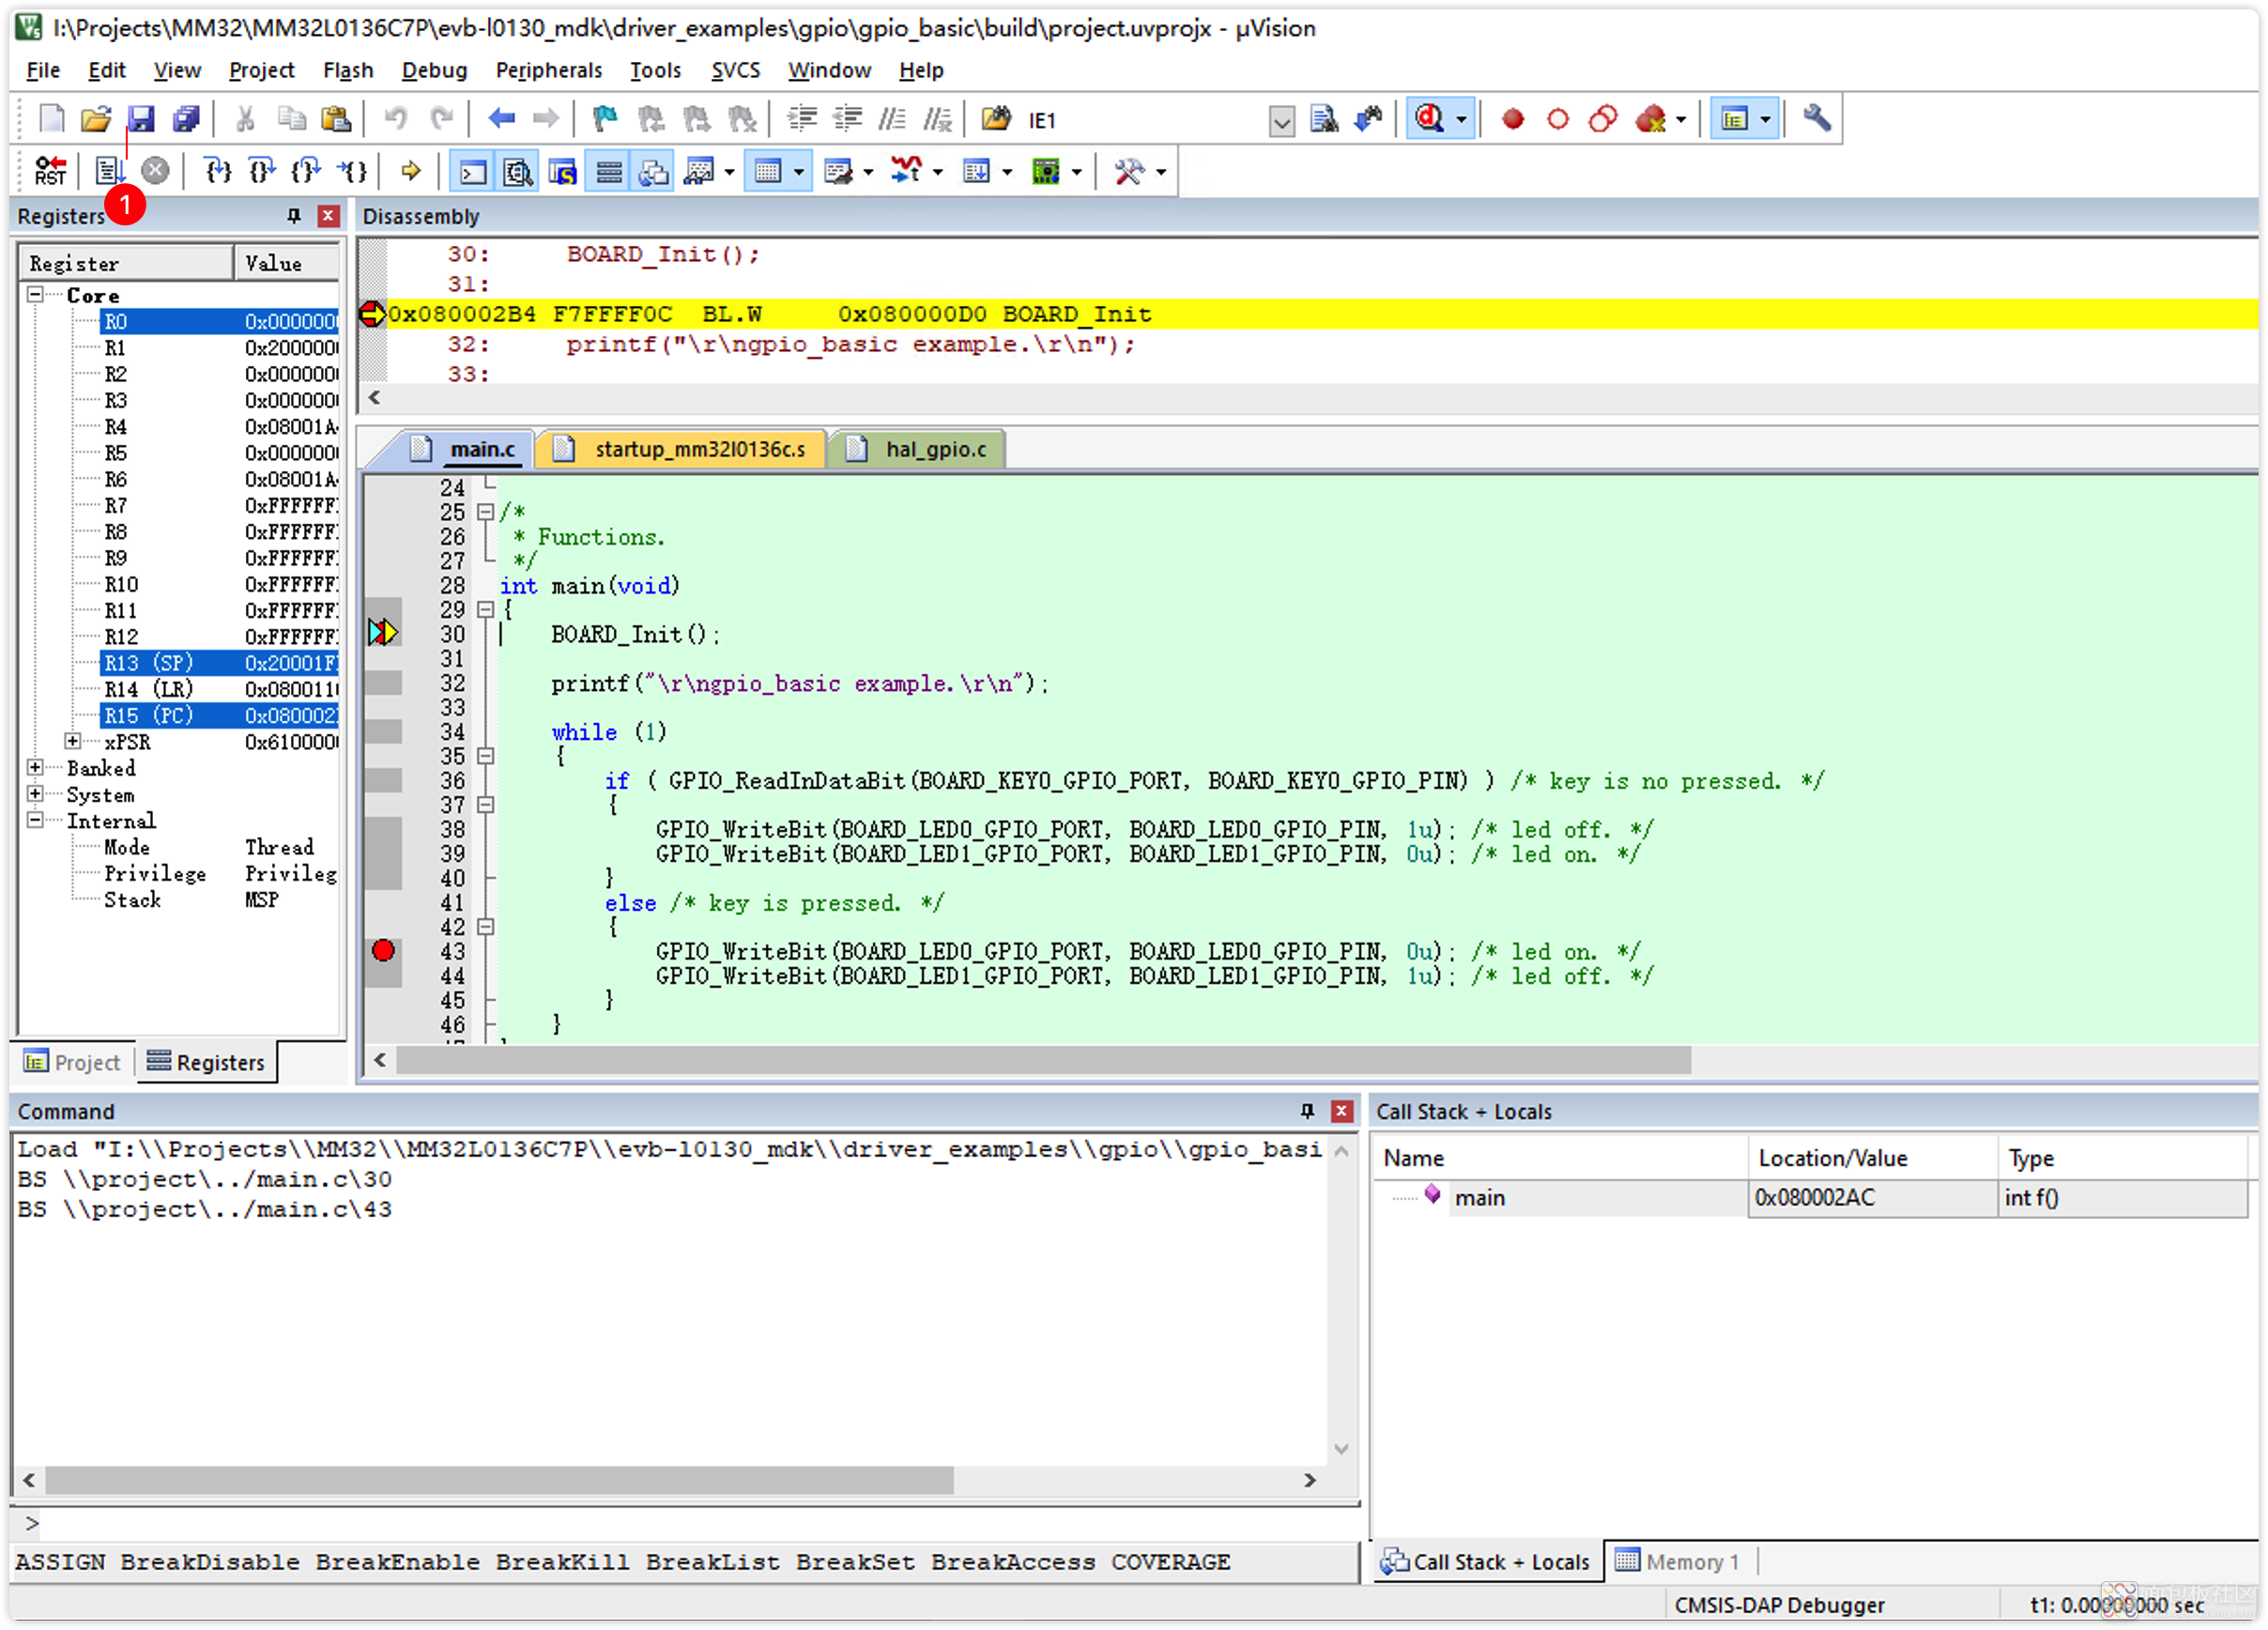
![image.png image.png](https://static.assets-stash.eet-china.com/forum/202212/18/170514sw95uvt3wqywv5w3.png)
在适当的位置打上断点,结合途中(1)所在位置的按钮,就能进行调试了。
三、把ESP8266 DapLink调试器变成板载调试器:
方法很简单,具体如下:
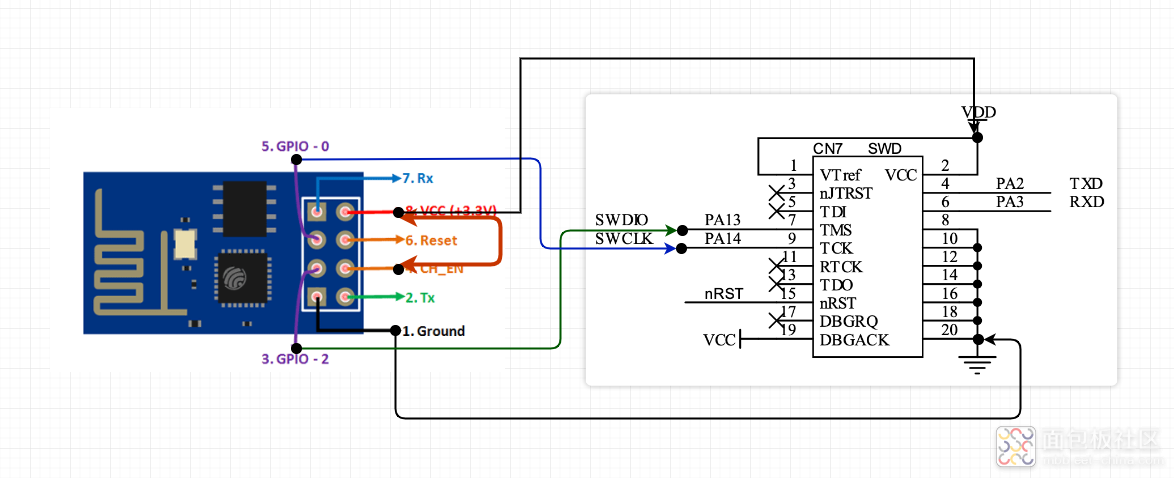
![ESP8266-DapLink-2.drawio.png ESP8266-DapLink-2.drawio.png](https://static.assets-stash.eet-china.com/forum/202212/18/171722qct3rzc7strydxps.png)
也就是用板载的调试器接口上的VDD,给ESP8266 进行供电即可。
然后把ESP8266粘到板子上:
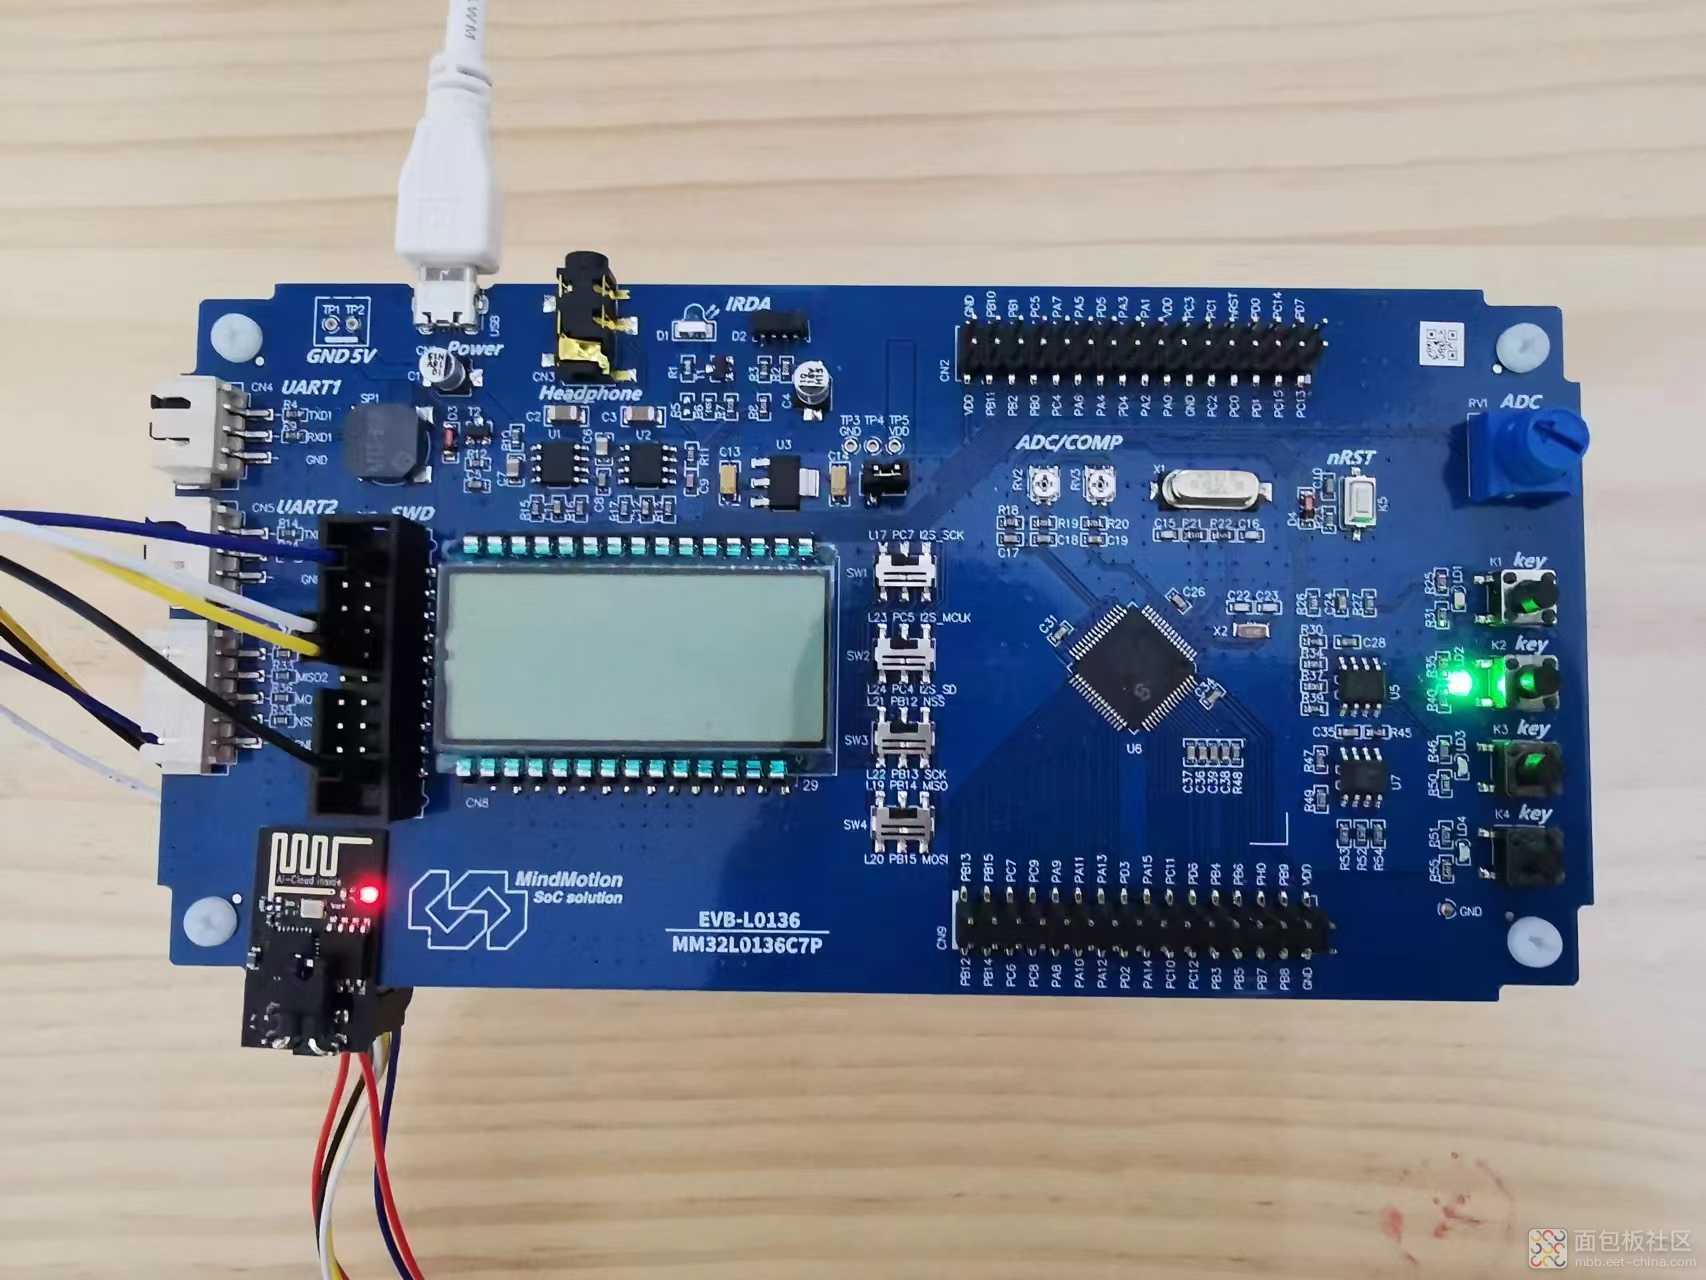
![image.png image.png](https://static.assets-stash.eet-china.com/forum/202212/18/171803h1agz949ryb39iyg.png)
就这样,不用额外的接线,只需要给板子供电,就能进行下载和调试了。
四、ESP-IDF版本的DapLink:
其官方地址为:https://github.com/windowsair/wireless-esp8266-dap
可直接下载附件包:
![](static/image/filetype/zip.gif)
2022-12-18 17:50 上传
点击文件名下载附件
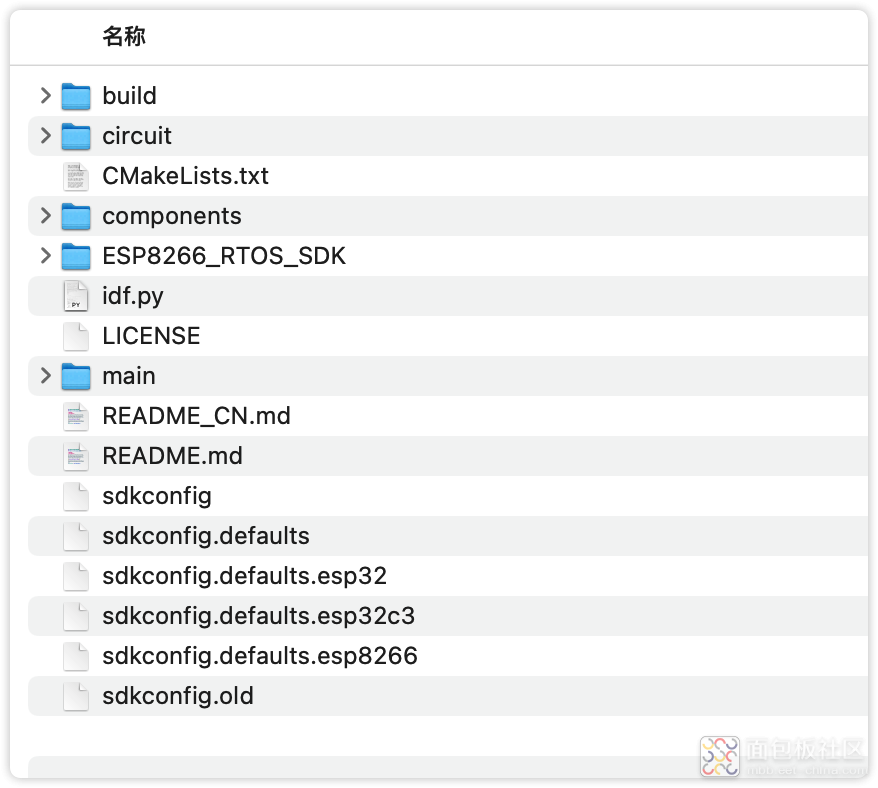
,然后解压![image.png image.png](https://static.assets-stash.eet-china.com/forum/202212/18/175237p00ed054qe50nq7q.png)
这个版本的,不仅支持ESP8266,还支持ESP32、ESP32-C3,除了固件的编译方法不同外,其他的使用方法一样,都需要靠usbip来进行挂载连接。
其使用的是乐鑫官方的ESP-IDF环境进行开发编译,建议在Linux、macOS、WSL2环境使用。
如果没有使用过,那么建议用Arduino IDE编译的方式吧。
下面为固件的具体构建步骤:
1. 安装ESP32-C3编译工具链:
因为这个方案,我使用的是ESP32-C3,所以需要安装对应的编译工具链:
cd ~/esp/esp-idf./install.sh esp32c3
复制代码![image.png image.png](https://static.assets-stash.eet-china.com/forum/202212/18/180113yf923o0zo3hvoopv.png)
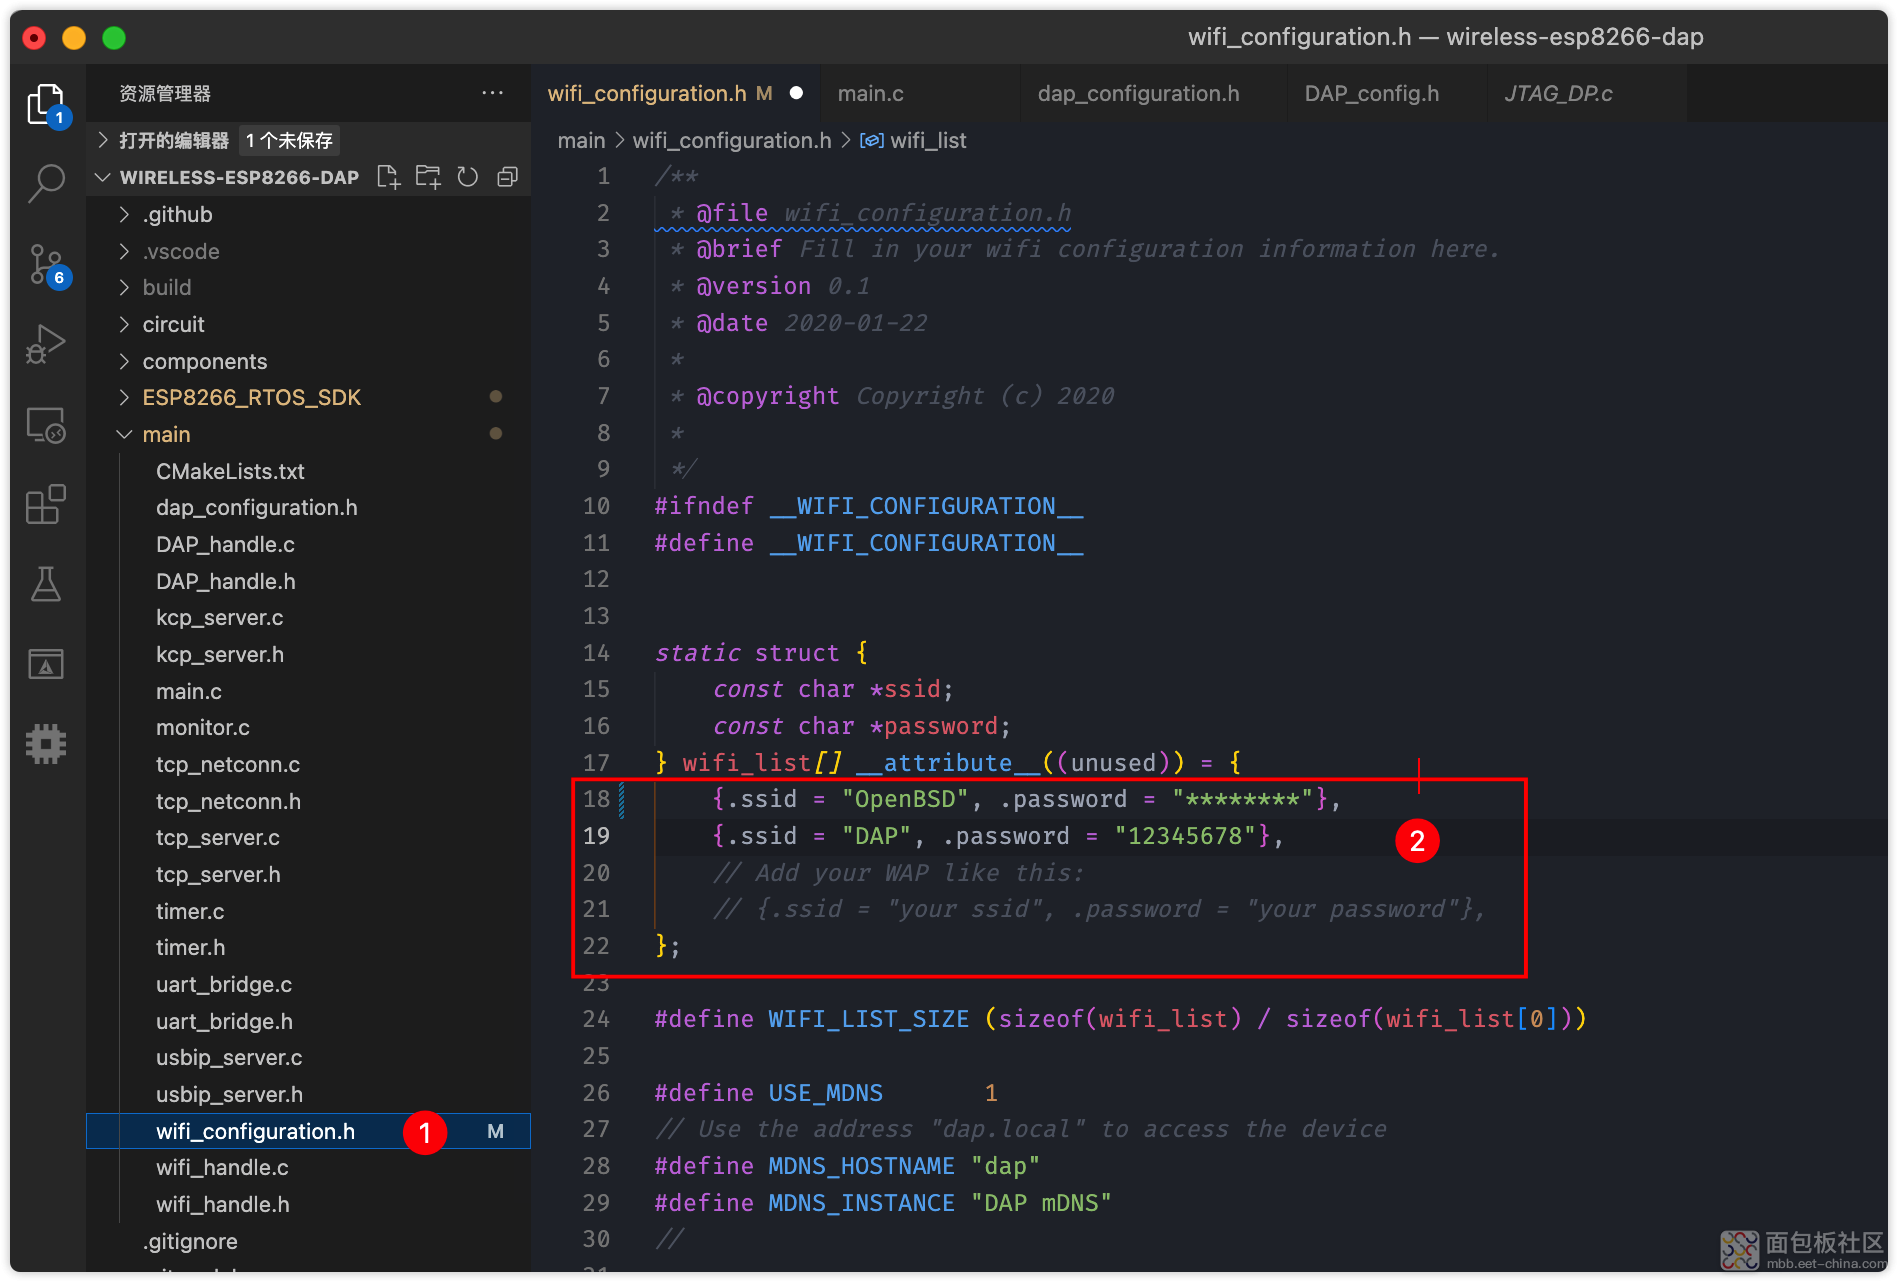
wireless-esp8266-dap有一点更优秀的是,能够配置多组WiFi连接信息,这样子方便你在不同的WiFi环境中使用。
3. 编译wireless-esp8266-dap并烧录运行:
cd wireless-esp8266-dap. ~/esp/env.sh idf.py set-target esp32c3 idf.py build idf.py flash idf.py monitor
复制代码最终,将出现如下的界面:
![image.png image.png](https://static.assets-stash.eet-china.com/forum/202212/18/175901ca85b3dm1jukkzal.png)
说明这个WiFi DapLink成功启动。
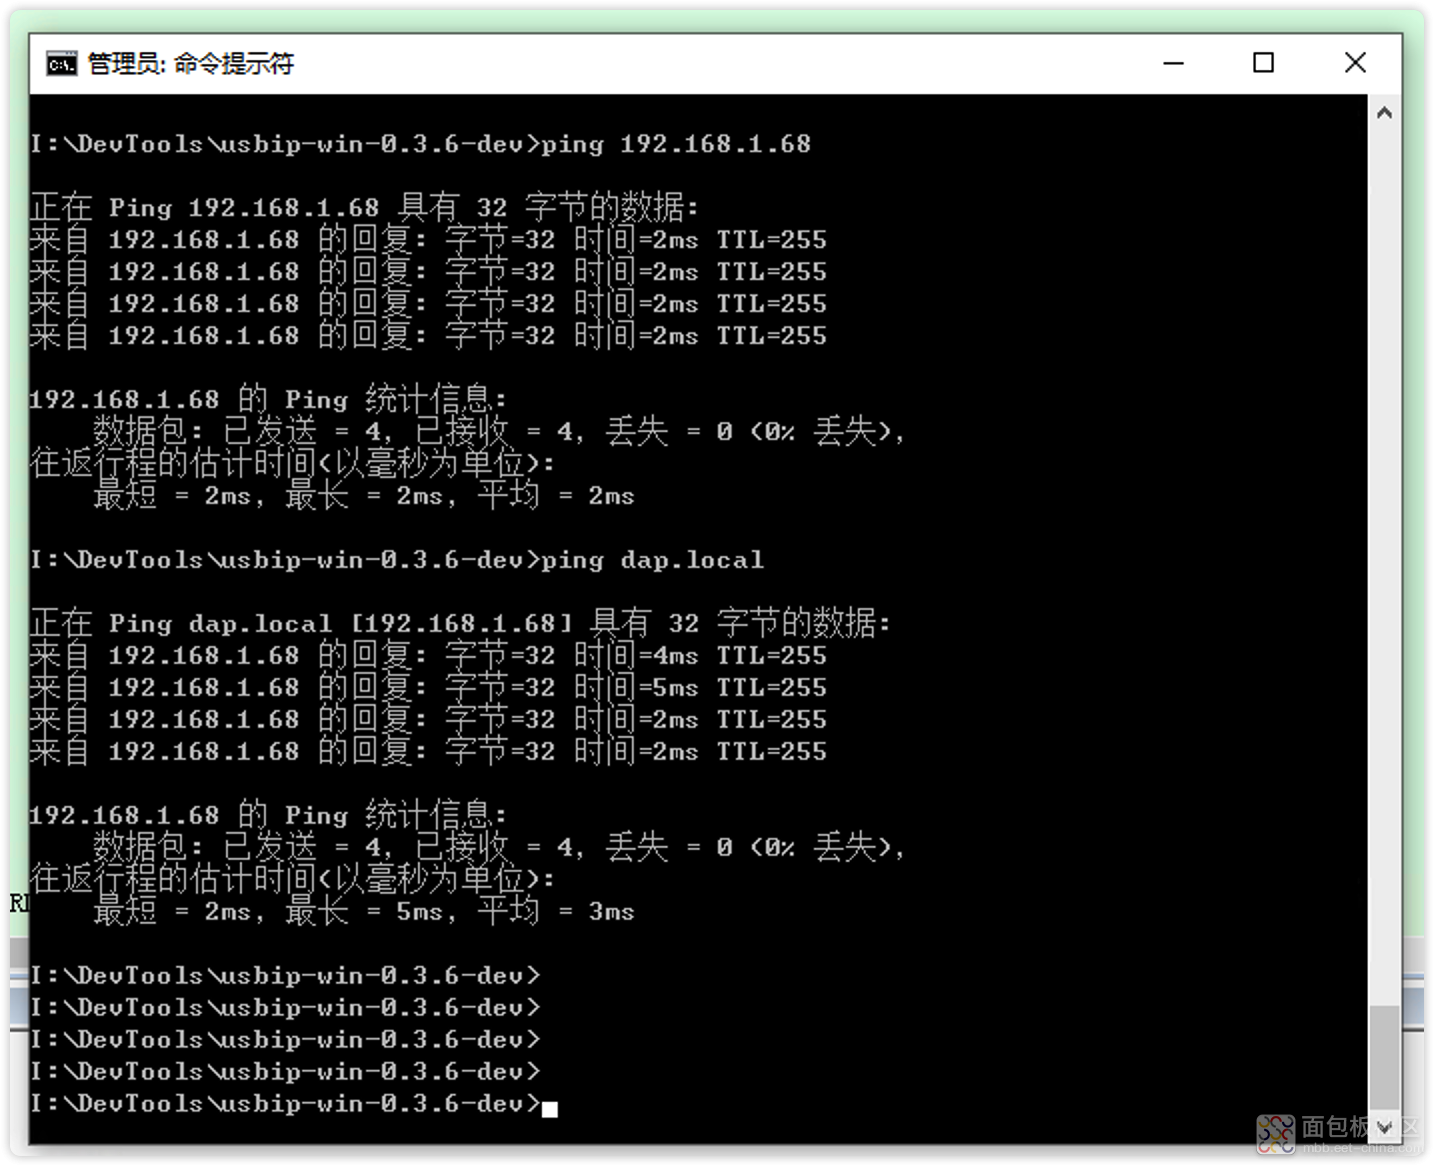
wireless-esp8266-dap还有一点更优秀的是,他能提供一个mDNS名称,直接使用dap.local就能访问,不用专门查看ip地址了。
可以用如下方式测试:
![image.png image.png](https://static.assets-stash.eet-china.com/forum/202212/18/181624ws6g0q6za0680wsg.png)
这样的话,ip地址再怎么变化,我们都不怕,记住dap.local就成。
4. 连接灵动微电子 EVB-L0136 开发板:
通过查看源码中的配置,可以了解使用的端口:
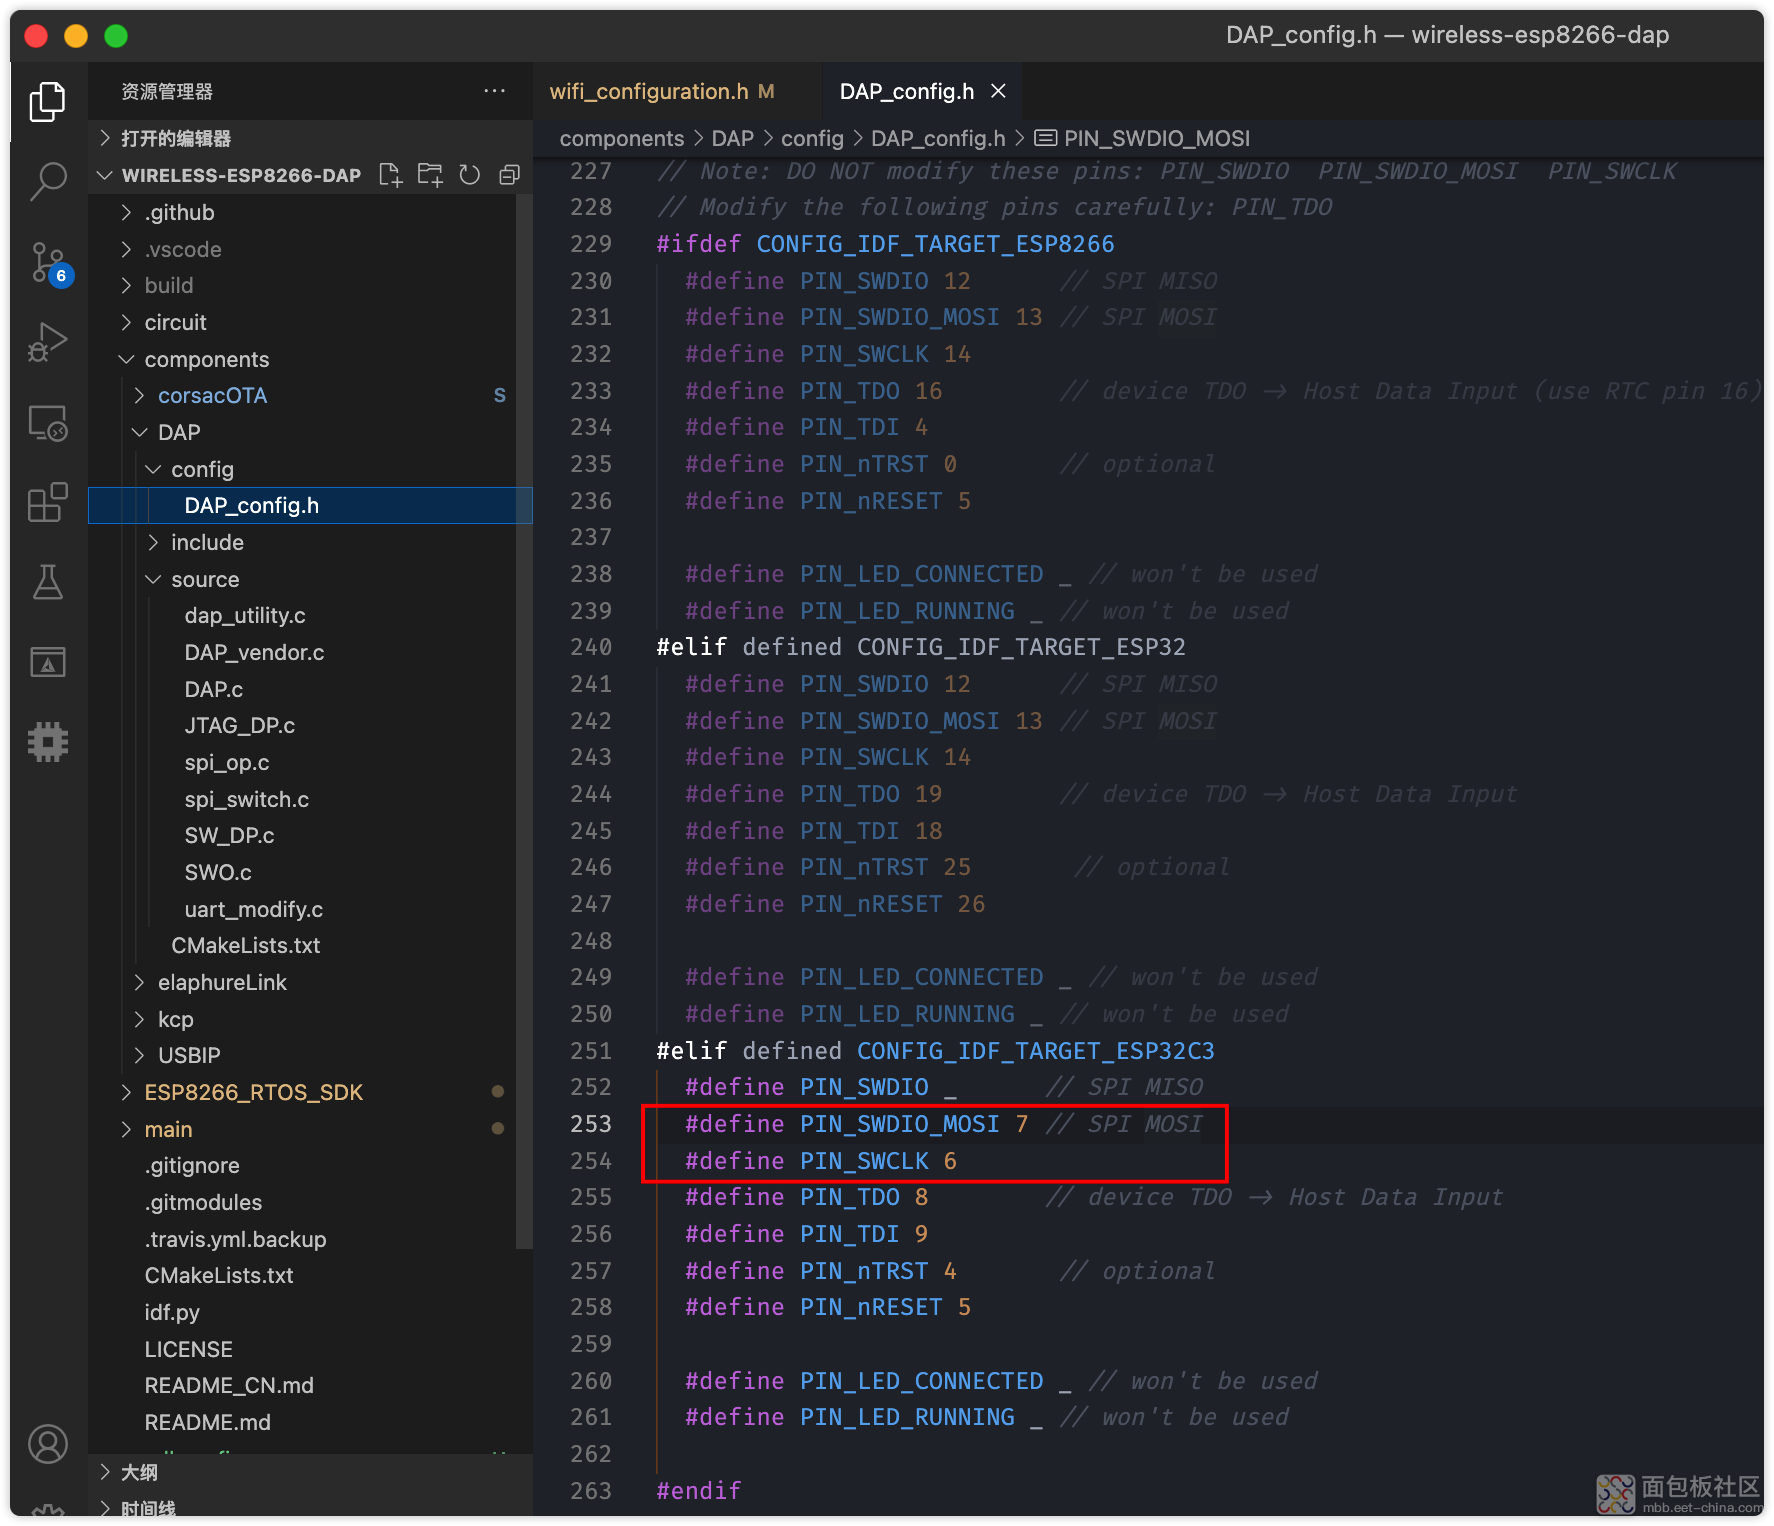
![image.png image.png](https://static.assets-stash.eet-china.com/forum/202212/18/180438ozdo45dy5d5r5rgp.png)
从上可以看出,其能支持ESP8266、ESP32、ESP32-C3,这是其又要优秀的一点了。
具体连线如下:
![ESP8266-DapLink-3.drawio.png ESP8266-DapLink-3.drawio.png](https://static.assets-stash.eet-china.com/forum/202212/18/181738wwq27qq7s4itbcbt.png)
5. uspip操作:
(1) 先查看是否提供了服务:
注意下面的命令同样要使用管理员权限运行:
usbip list -r dap.local
复制代码![image.png image.png](https://static.assets-stash.eet-china.com/forum/202212/18/181858whgg94dghh38968h.png)
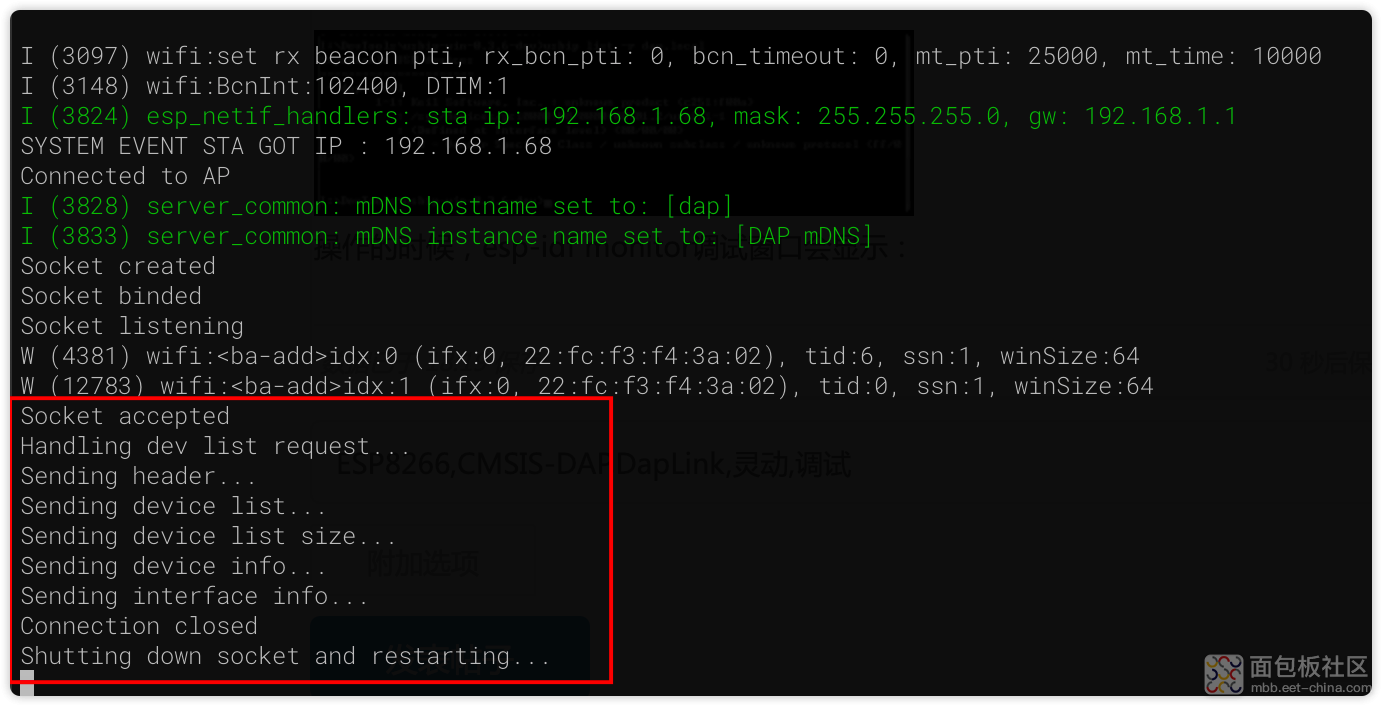
操作的时候,esp-idf monitor调试窗口会显示:
![image.png image.png](https://static.assets-stash.eet-china.com/forum/202212/18/182021jo9da9vo9wy9fa3v.png)
这说明能够成功连接。
(2) 加载服务:
usbip attach -r dap.local -b 1-1
复制代码![image.png image.png](https://static.assets-stash.eet-china.com/forum/202212/18/182109hty1fayucclgz1nm.png)
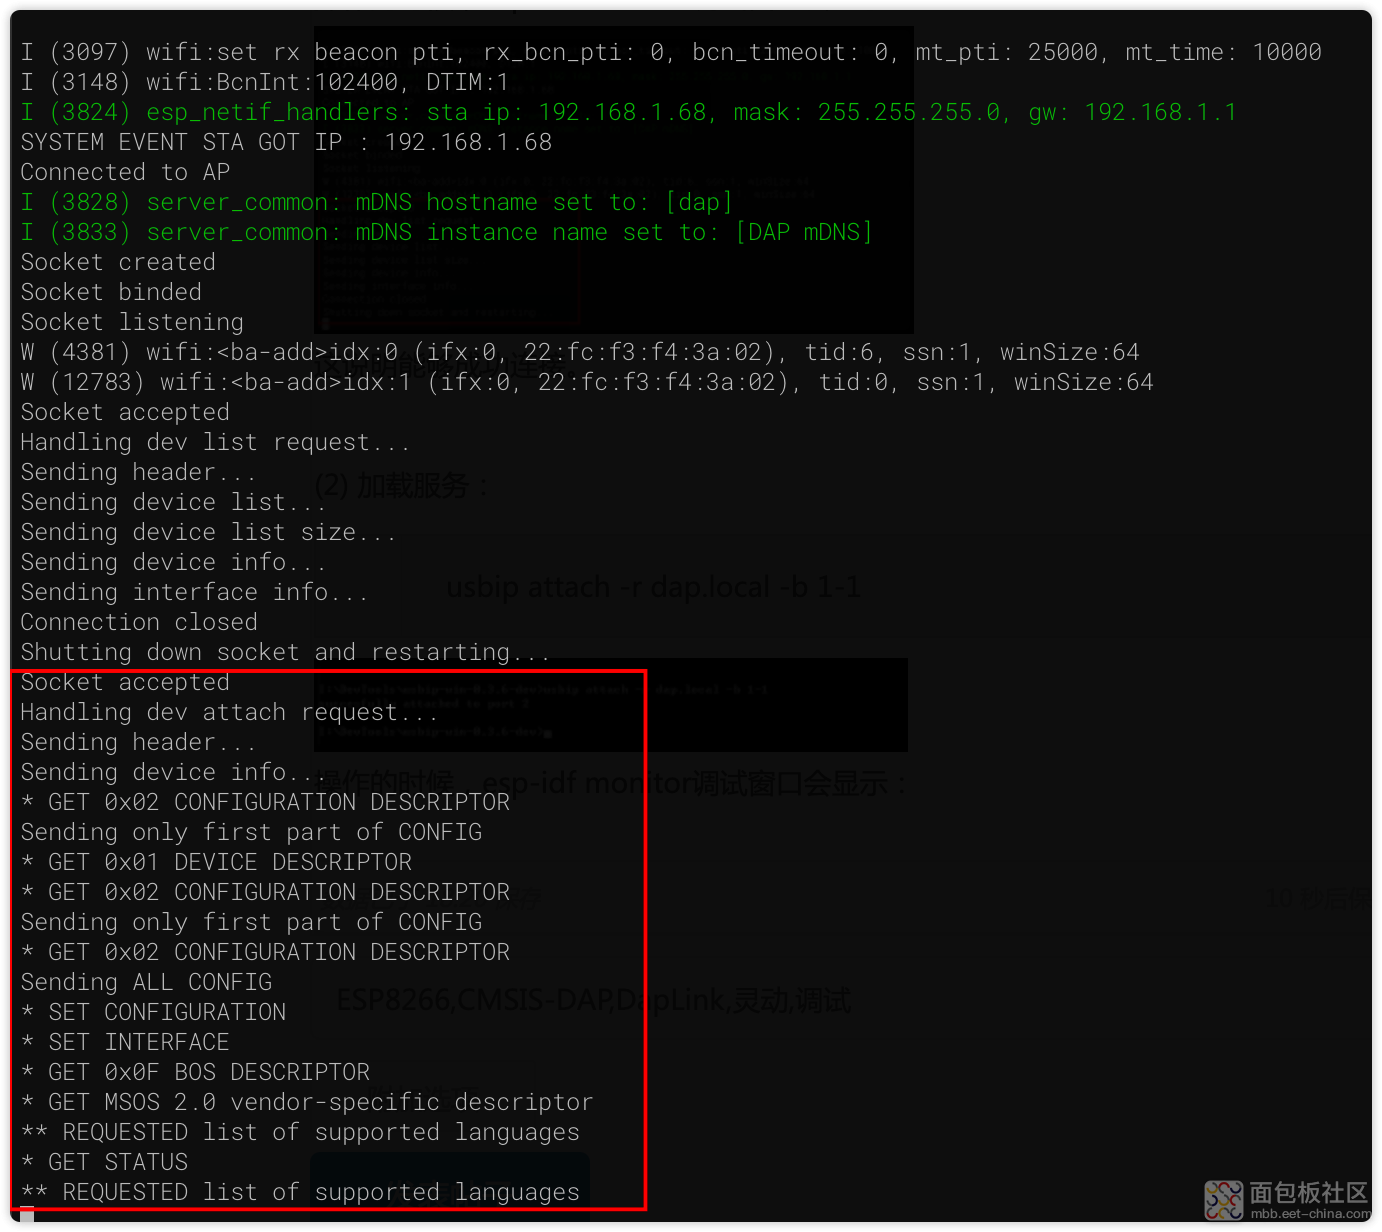
操作的时候,esp-idf monitor调试窗口会显示:
![image.png image.png](https://static.assets-stash.eet-china.com/forum/202212/18/182140ky0g4x0c1azhplpq.png)
6. Keil中设置使用:
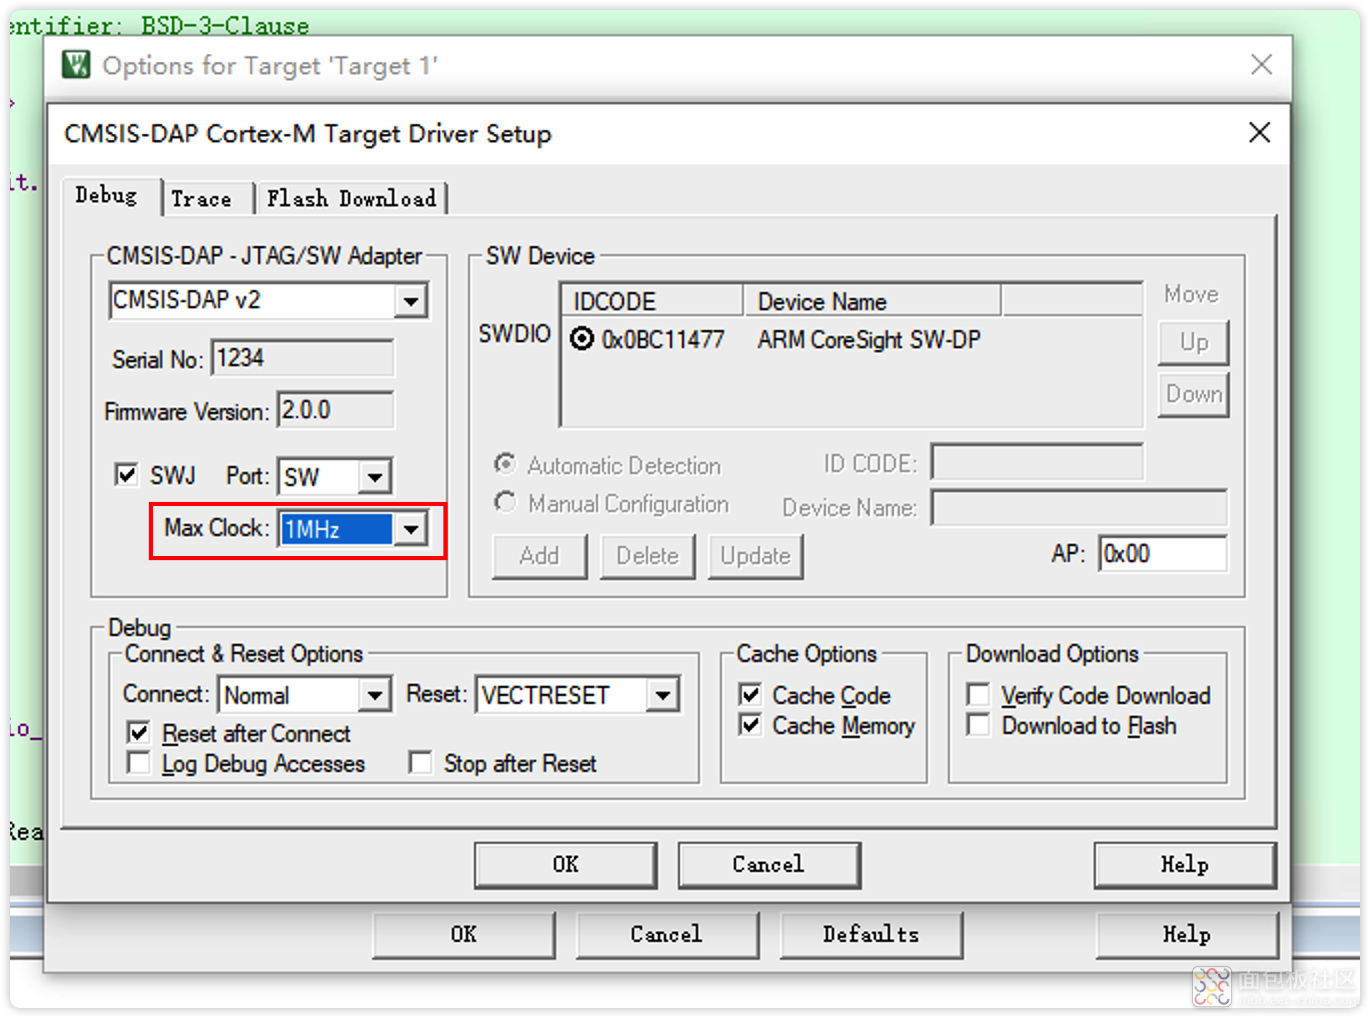
(1) 在调试器中选择CMSIS-DAP Debugger:
![image.png image.png](https://static.assets-stash.eet-china.com/forum/202212/18/192855xd7fo58lfln6zffl.png)
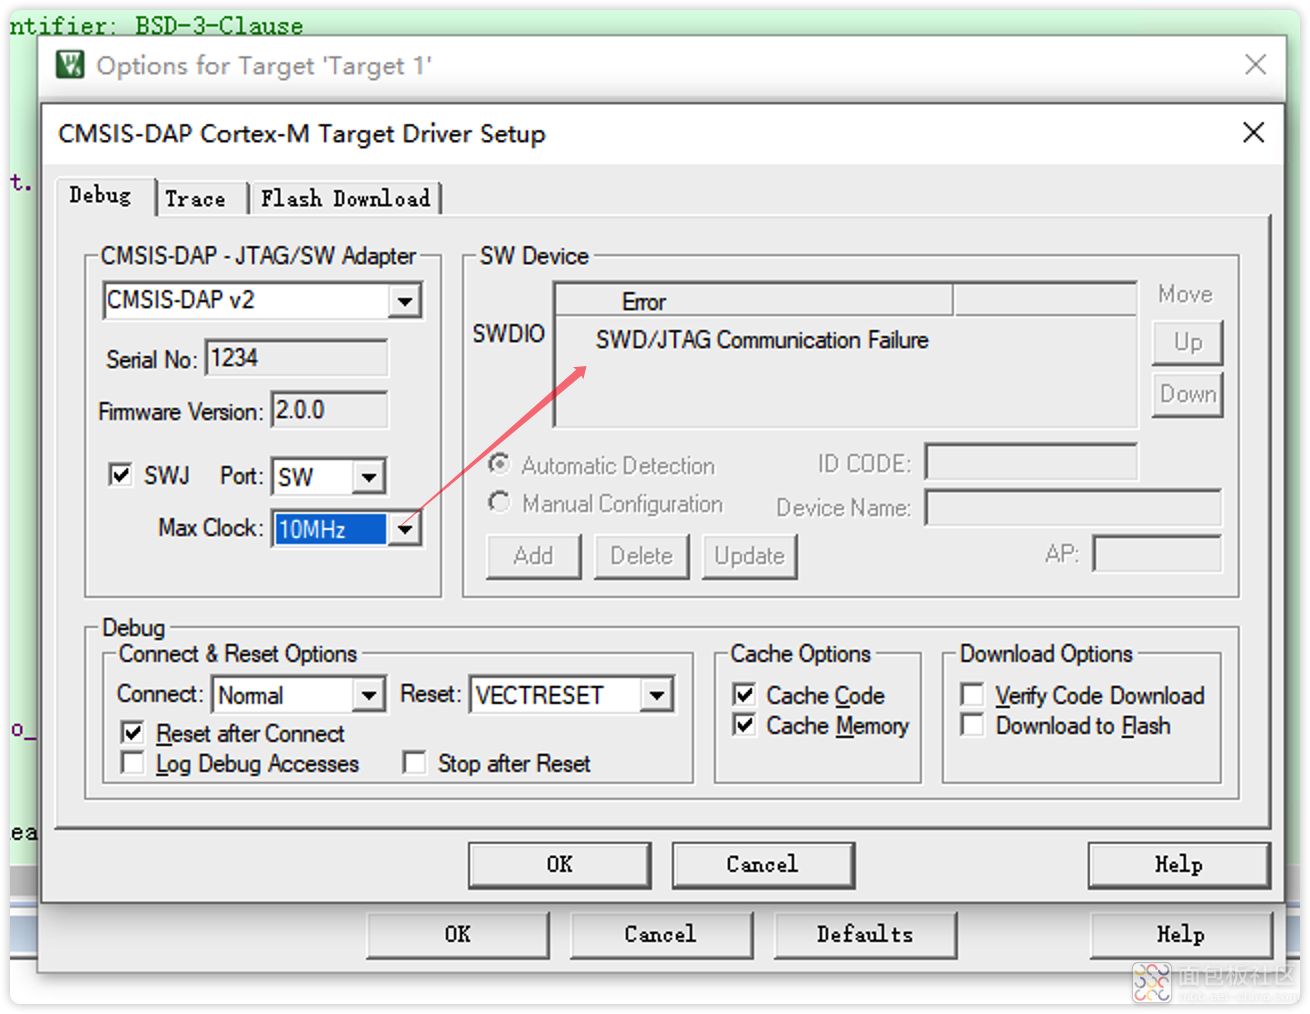
注意红框的位置,可以选择1MHz、2MHz、5MHz,如果选择10MHz,就会通信失败,具体如下:
![image.png image.png](https://static.assets-stash.eet-china.com/forum/202212/18/193001awqq8lzuu4lblrk4.png)
(2) 在Keil中烧录和调试:
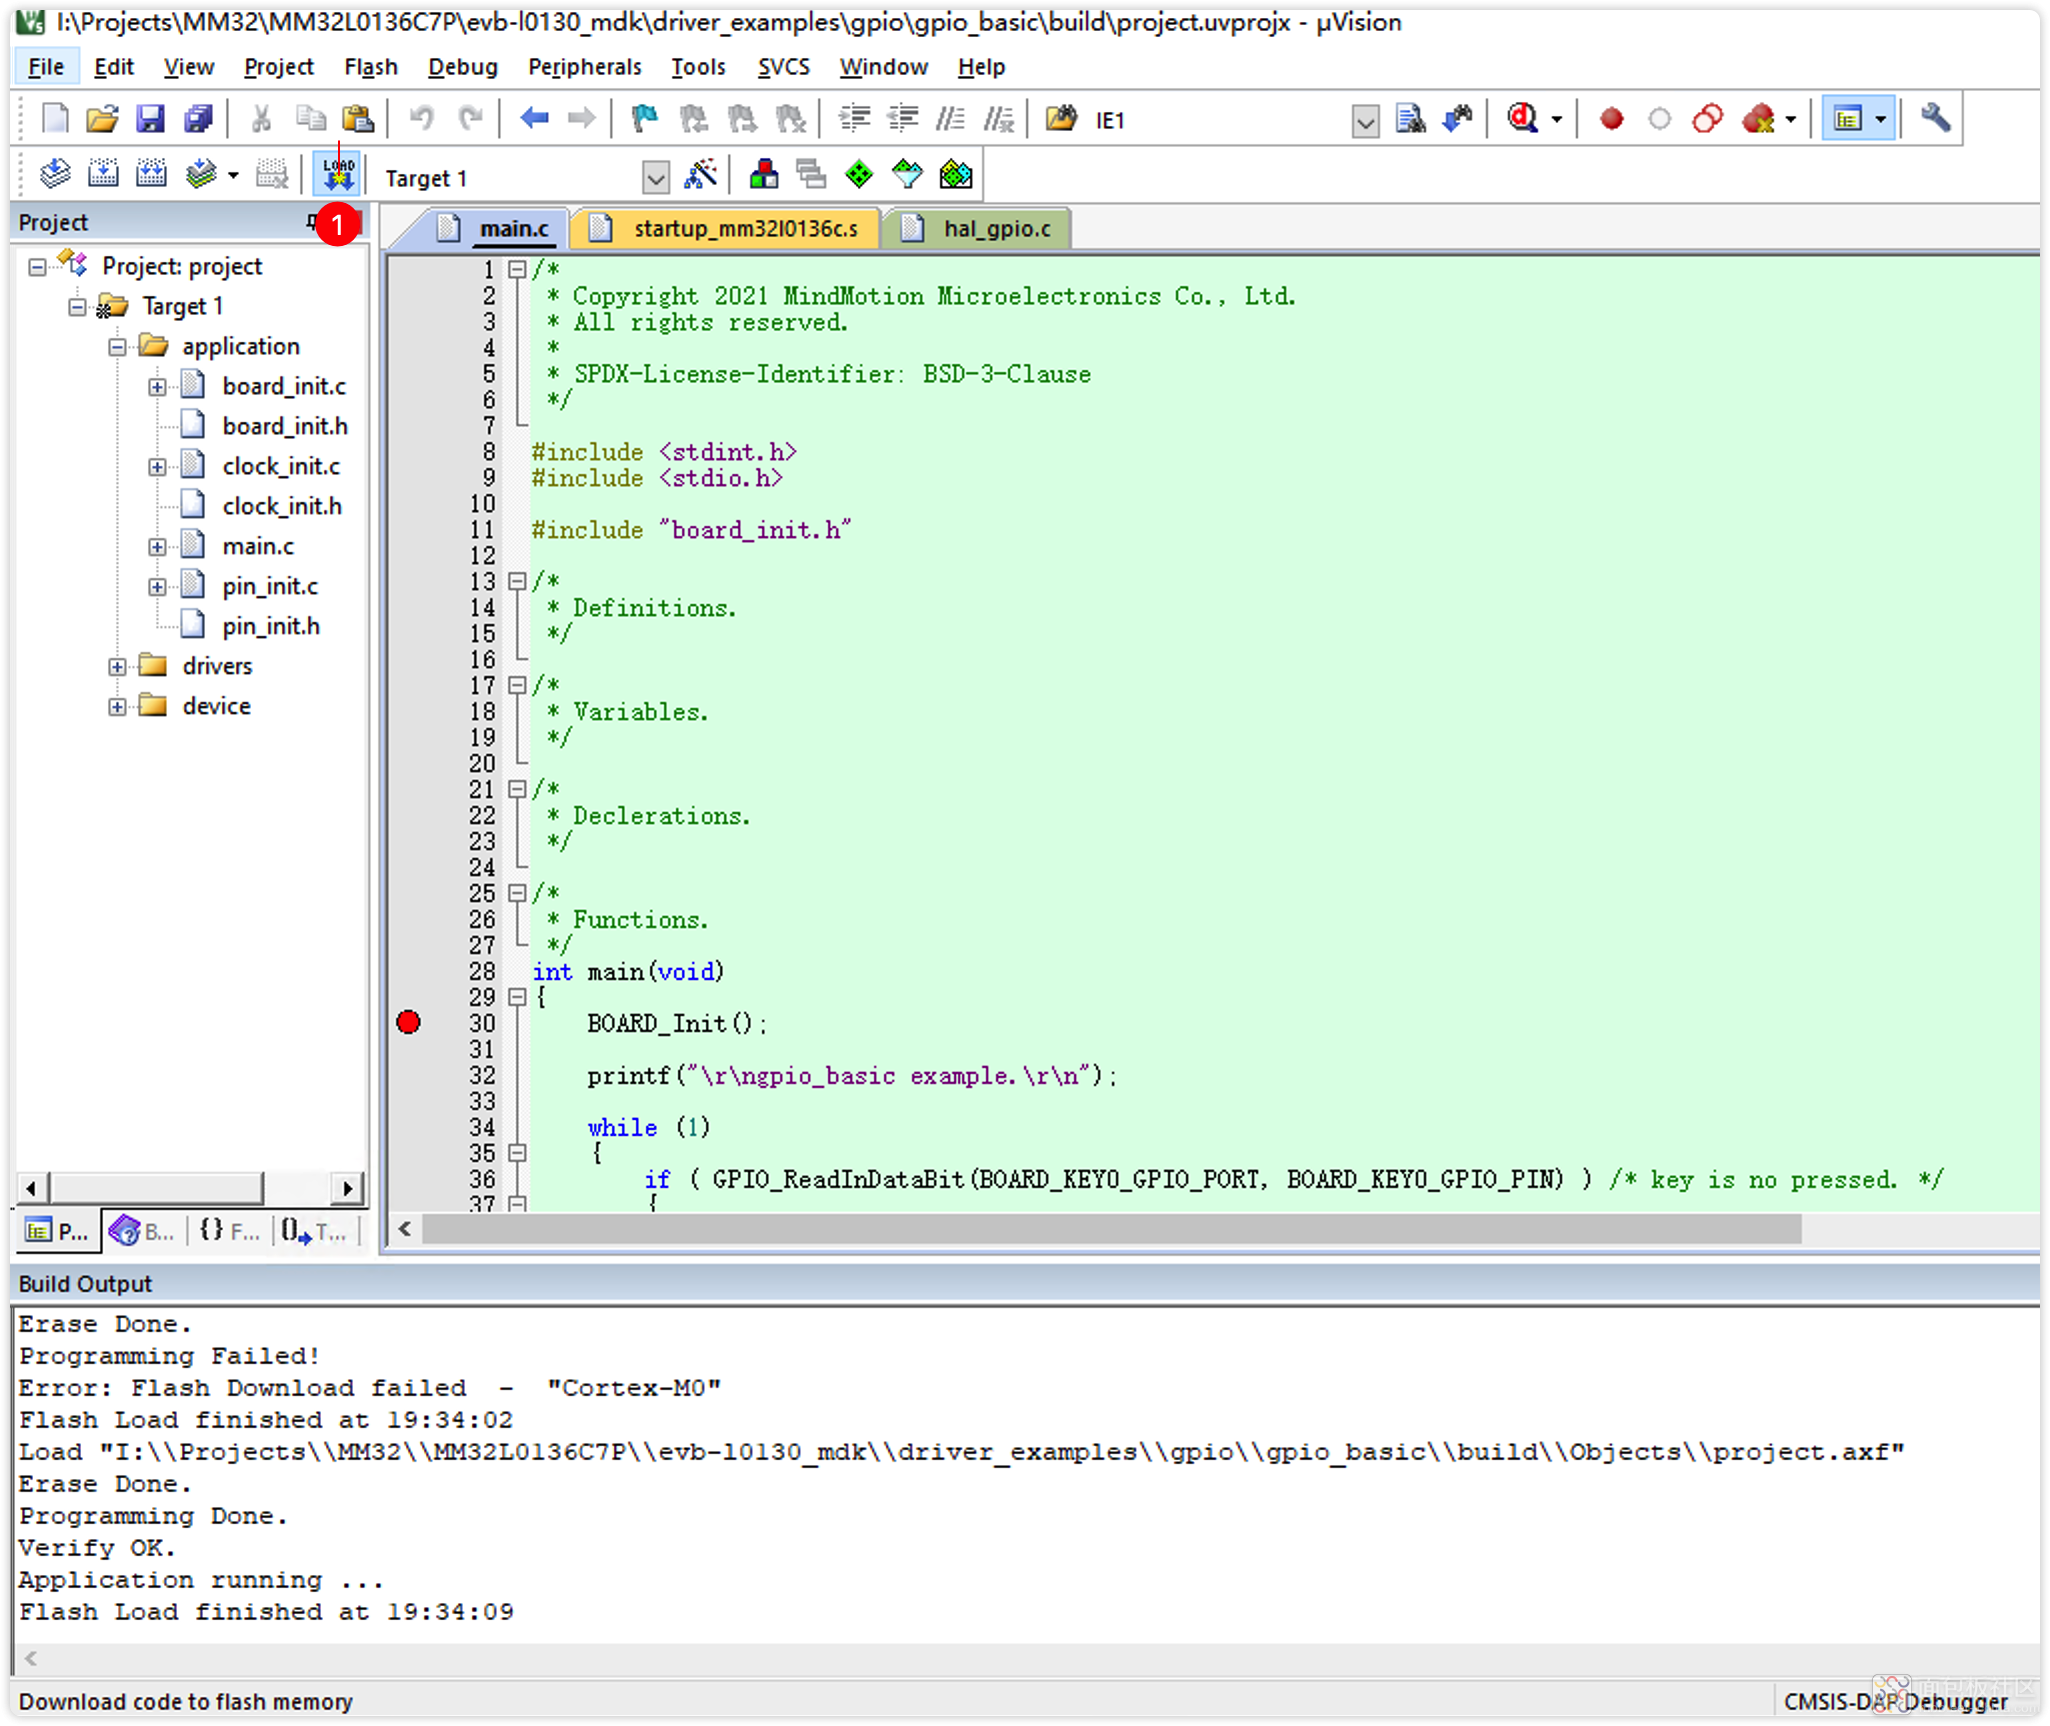
直接进行烧录:
![image.png image.png](https://static.assets-stash.eet-china.com/forum/202212/18/193429ixmze7v09akf47ch.png)
有时可能会出错:
![image.png image.png](https://static.assets-stash.eet-china.com/forum/202212/18/193359gqk1vkqekdy7vewd.png)
这时按一下板子上的RST,重新烧录即可。
点击调试按钮可以进行调试:
![image.png image.png](https://static.assets-stash.eet-china.com/forum/202212/18/193341yp4wkeaakbweaaff.png)
用样的如果调试不正常,先退出调试,按一下RST再来调试即可。
7. 使用图形界面的连接工具:
wireless-esp8266-dap还有一点更优秀的是,能够使用一个图形界面的连接工具,不需要usbip那样在命令行进行操作了。
这个工具,就是elaphureLink,其官网为:https://github.com/windowsair/elaphureLink
可直接下载附件包:
![](static/image/filetype/zip.gif)
2022-12-18 19:37 上传
点击文件名下载附件
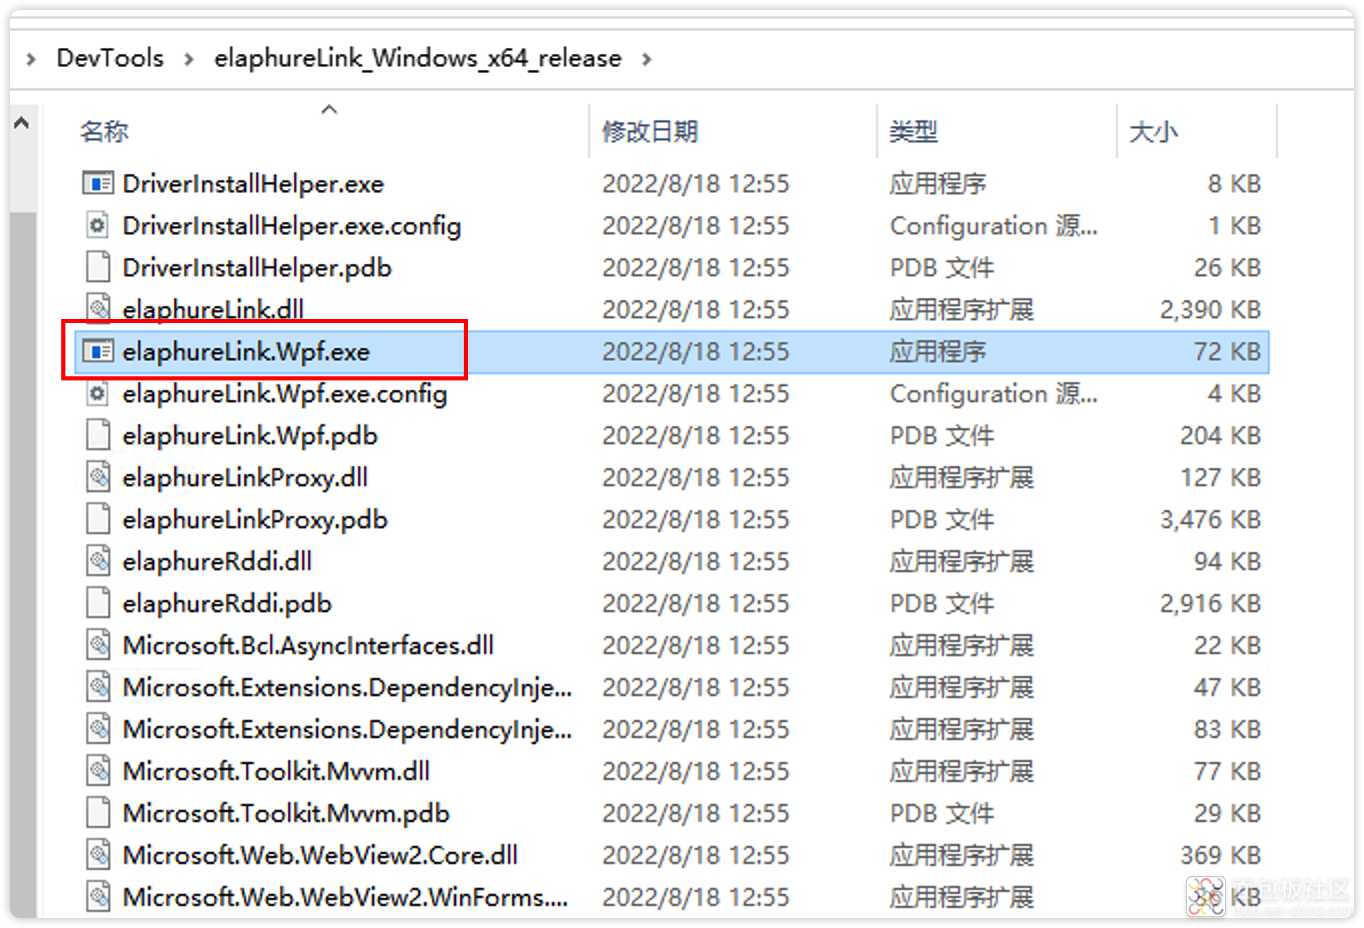
,下载后解压,然后按照如下操作使用。注意:elaphureLink和usbip不能同时使用,否则会出现问题。
(1) 启动:点击图中红框的文件启动
![image.png image.png](https://static.assets-stash.eet-china.com/forum/202212/18/193821dho6vjdlzddatf6d.png)
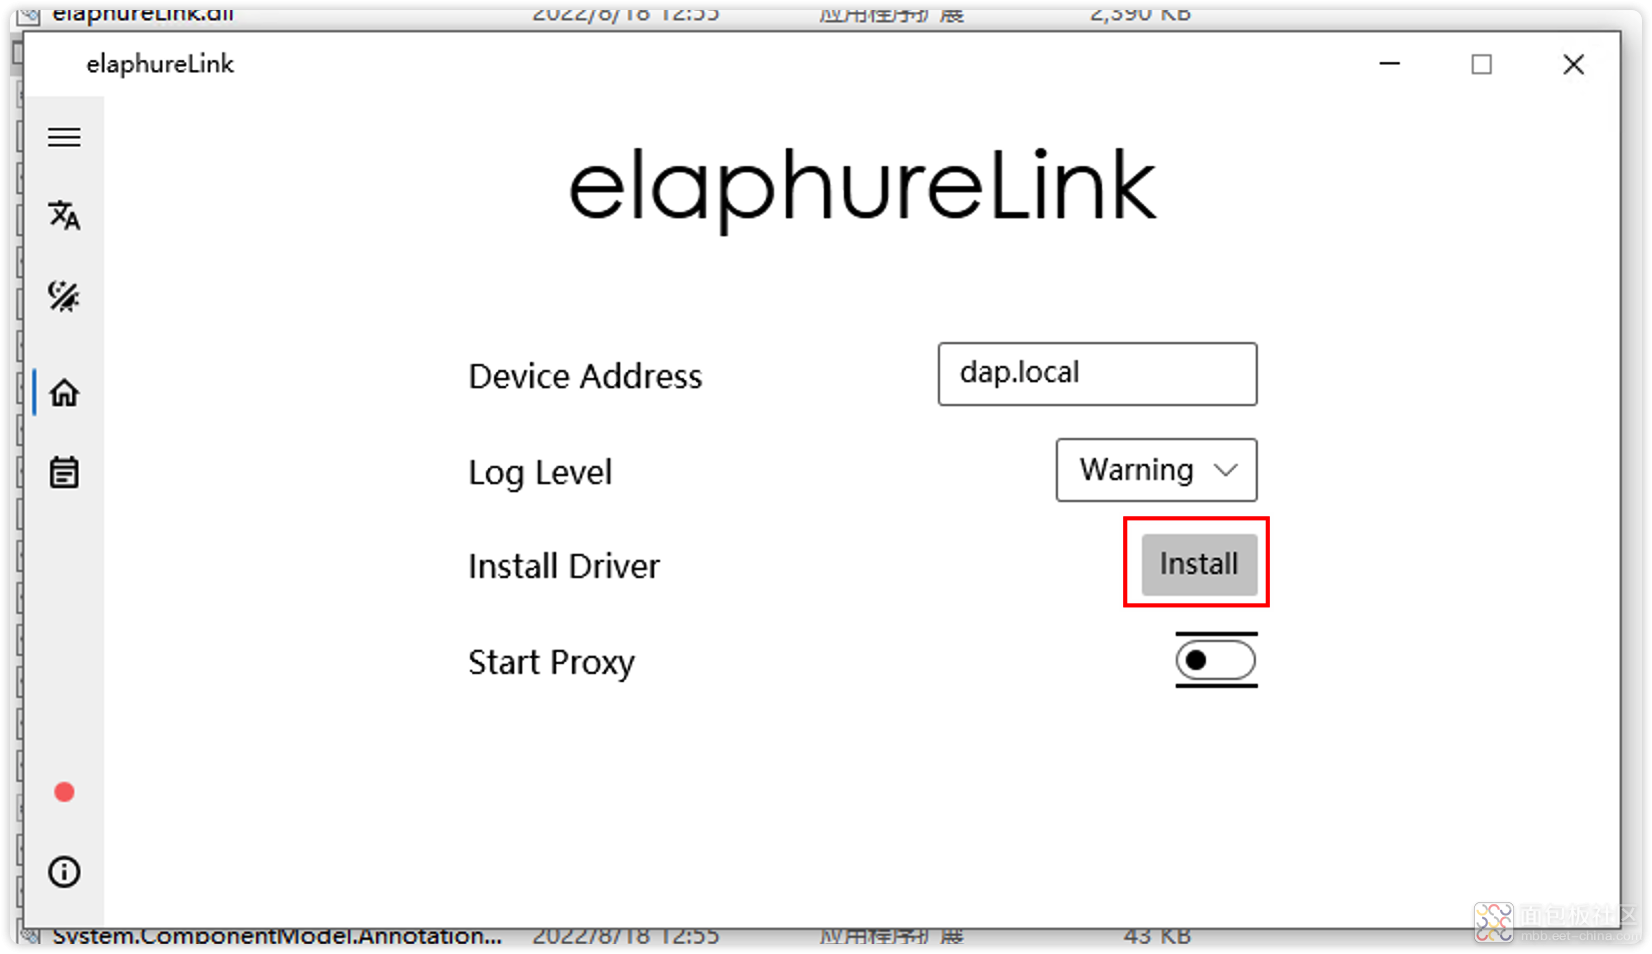
(2) 安装驱动:
![image.png image.png](https://static.assets-stash.eet-china.com/forum/202212/18/193946tczece4b6ic848i8.png)
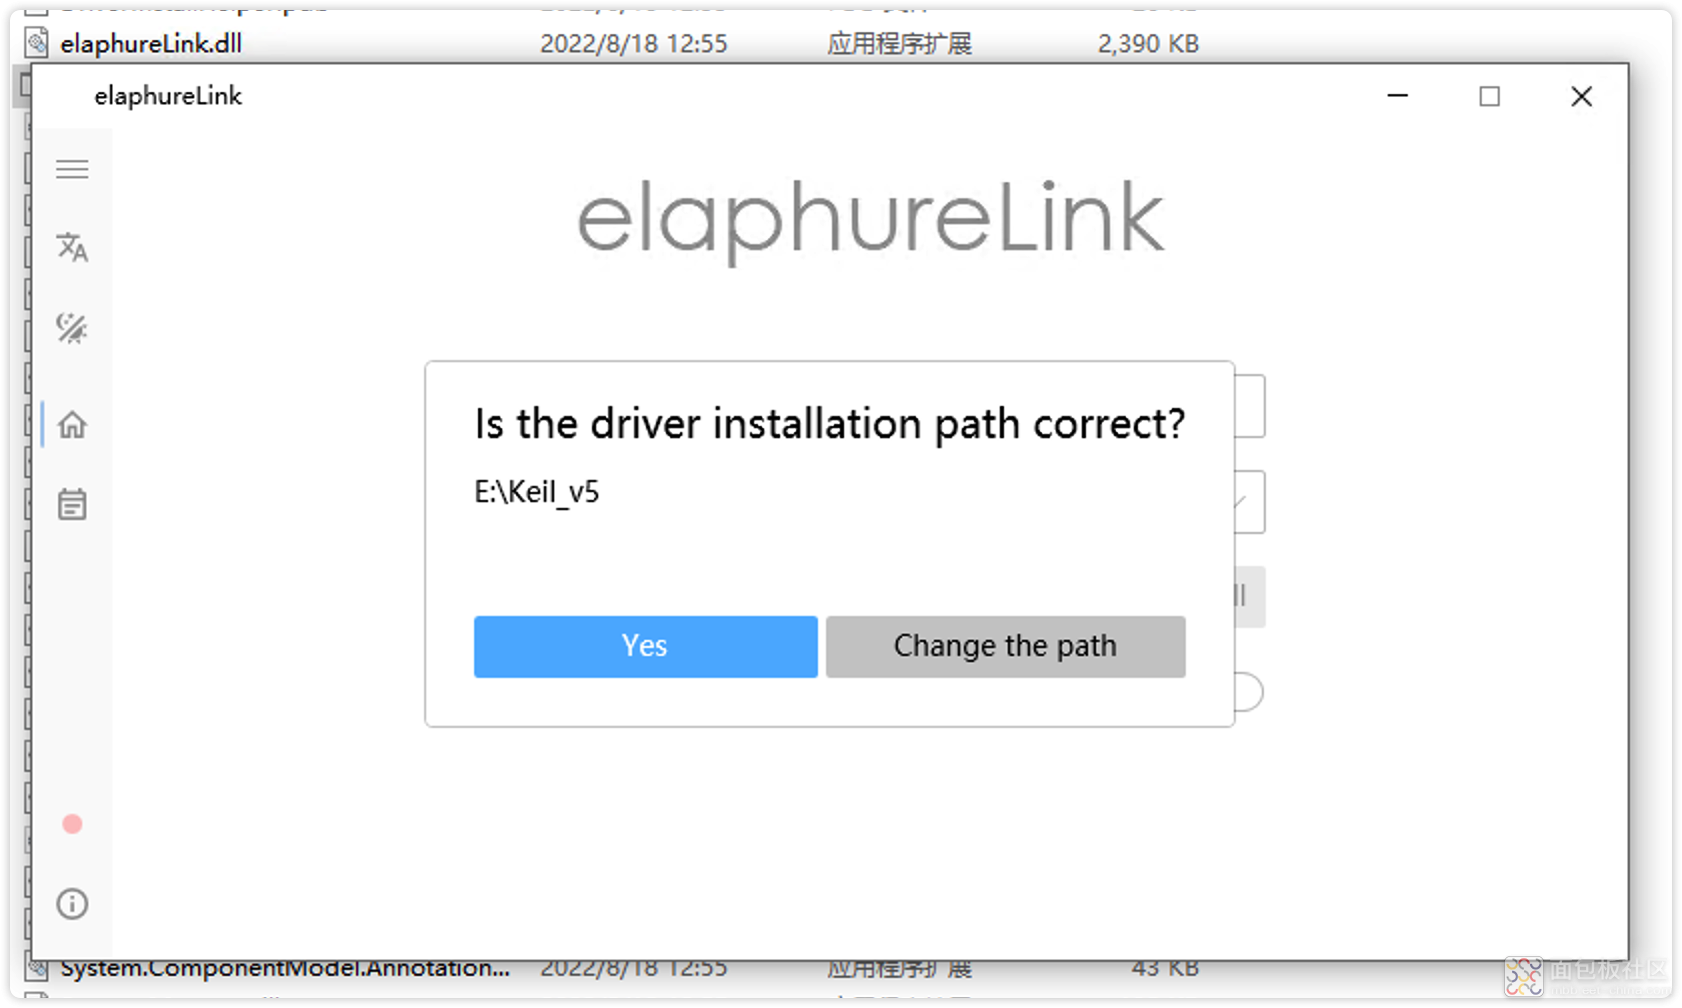
点击Install后,会提示找到的Keil地址,如果不对,可以修改:
![image.png image.png](https://static.assets-stash.eet-china.com/forum/202212/18/194042c2uvyg44zv4fz6kg.png)
然后允许安装:
![image.png image.png](https://static.assets-stash.eet-china.com/forum/202212/18/194101yrgtrzjjojs9oog0.png)
首次启动的时候进行安装,后续就不用再次安装了。
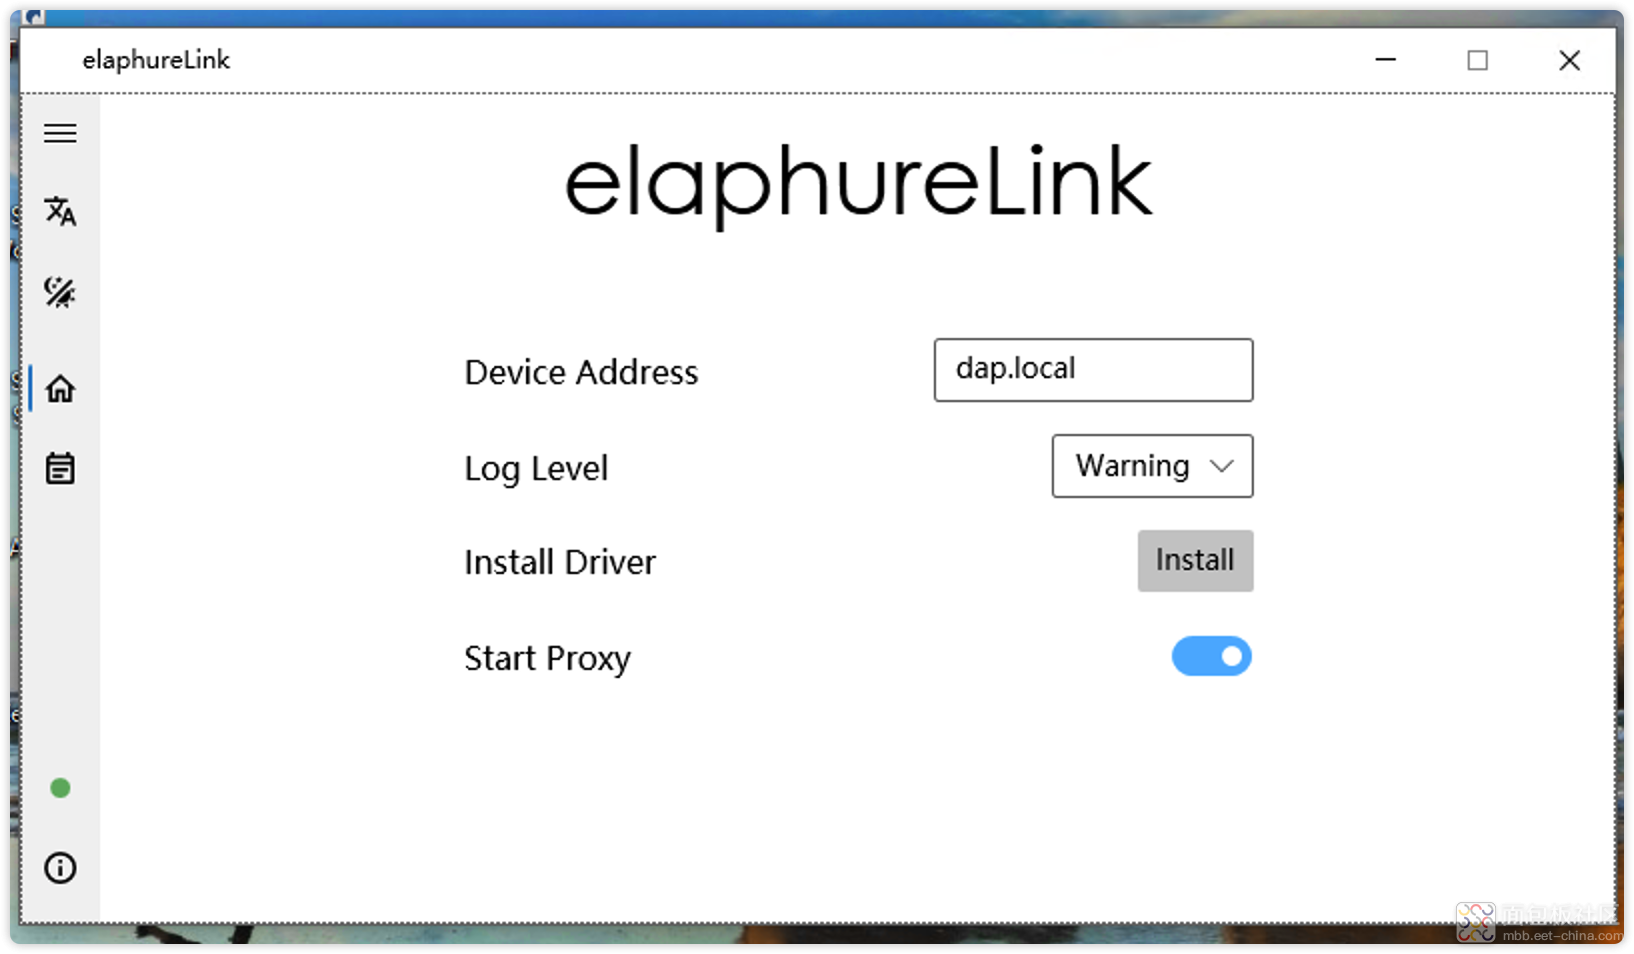
(3) 启动调试连接服务:
点击主界面中Start Proxy后的开关启动:
![image.png image.png](https://static.assets-stash.eet-china.com/forum/202212/18/194357ngrixtwm3cj9r43k.png)
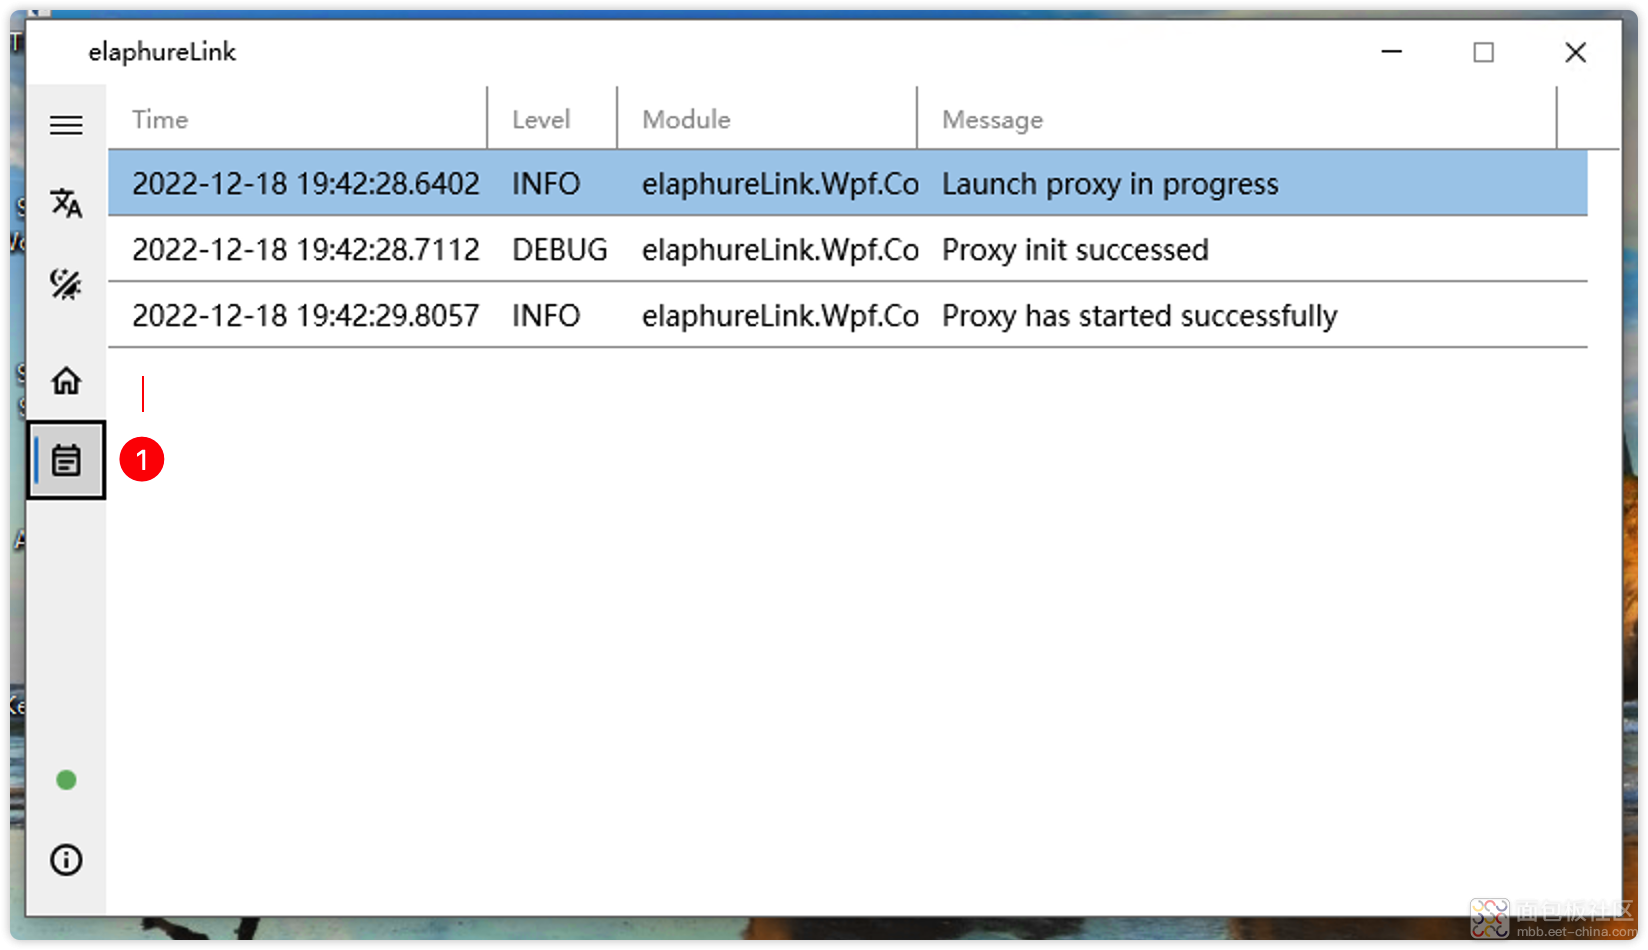
然后进入日志界面查看连接情况:
![image.png image.png](https://static.assets-stash.eet-china.com/forum/202212/18/194305cae94axrcr4999p9.png)
(4) 在Keil中设置使用:
安装驱动后,要重启Keil,一定要重启Keil,然后设置调试器:
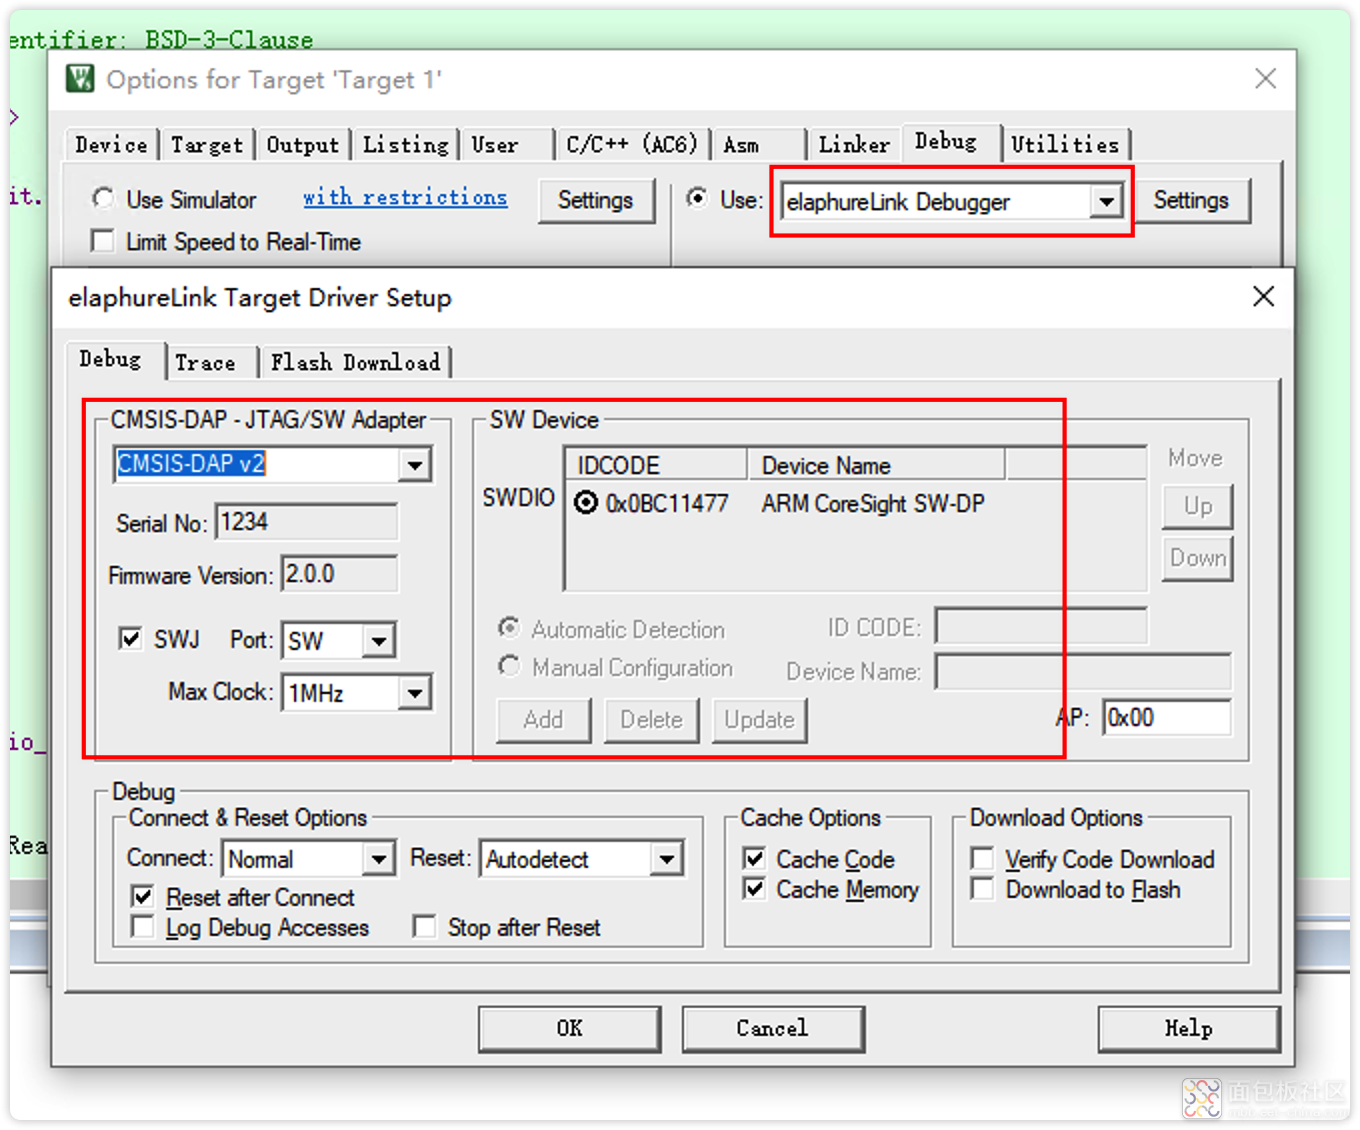
![image.png image.png](https://static.assets-stash.eet-china.com/forum/202212/18/194637jyf2fhom94roa4qn.png)
需要注意,应该选择elaphureLink Debugger。Max Clock也一样可选择1、2、5MHz,不能使用10MHz。
然后就可以进行调试和烧录了。
全部回复 0
![](/static/image/mianbaoban/2.0/ad.png)
评测文章
热帖
大家都在看的技术资料
举报
内容系网友发布,其中涉及到安全隐患的内容系网友个人行为,不代表面包板社区观点
关闭
站长推荐
/3
![上一条 上一条](static/image/common/pic_nv_prev.gif)
![下一条 下一条](static/image/common/pic_nv_next.gif)
-
返回顶部
-
工具栏