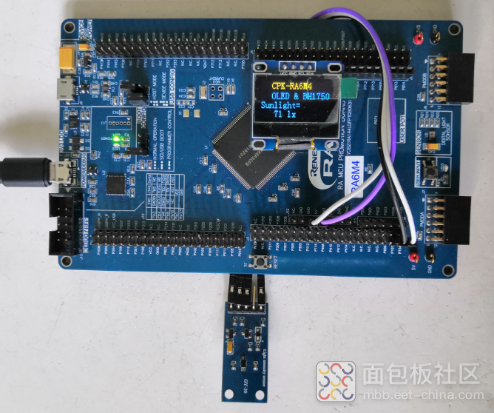
在前面的测评中,介绍了GPIO口的使用,并通过输出模式的使用完成了I2C接口OLED屏的显示驱动。这次再通过输入模式的使用来完成I2C接口传感器的使用。
该传感器为光照强度检测传感器BH1750,在使用时它与开发板的连接关系为:
SCL----P104
SDA----P107
所用引脚输出高低电平的定义为:
#defineSCL_Set() rt_pin_write(BSP_IO_PORT_01_PIN_04, PIN_HIGH)
#defineSCL_Clr() rt_pin_write(BSP_IO_PORT_01_PIN_04, PIN_LOW)
#defineSDA_Set() rt_pin_write(BSP_IO_PORT_01_PIN_07, PIN_HIGH)
#defineSDA_Clr() rt_pin_write(BSP_IO_PORT_01_PIN_07, PIN_LOW)
为读取数据所作的相应定义为:
#define IIC_SDA_IN rt_pin_read(BSP_IO_PORT_01_PIN_07)
在使用过程中,由于要进行输入与输出模式的切换,所定义的输入与输出函数为:
voidIIC_INPUT_MODE_SET(){ rt_pin_mode(BSP_IO_PORT_01_PIN_07, PIN_MODE_OUTPUT); } voidIIC_OUTPUT_MODE_SET() { rt_pin_mode(BSP_IO_PORT_01_PIN_07, PIN_MODE_INPUT_PULLUP ); }
复制代码在以GPIO口模拟I2C发送字节数据时,其函数内容为:
voidBH1750_SendByte(char data){ chari; IIC_OUTPUT_MODE_SET(); SCL_Clr(); for (i=0;i<8;i++) { if(data&0x80) SDA_Set(); elseSDA_Clr(); data <<= 1; SCL_Set(); SCL_Clr(); } }
复制代码对寄存器写入控制字的函数为:
voidSingle_Write_BH1750(charREG_Address){ BH1750_Start(); BH1750_SendByte(SlaveAddress); BH1750_RecvACK(); BH1750_SendByte(REG_Address); BH1750_RecvACK(); BH1750_Stop(); }
复制代码进行多字节读取的函数为:
voidMultiple_Read_BH1750(){ BH1750_Start(); BH1750_SendByte(SlaveAddress+1); BH1750_RecvACK(); BUF[0] = BH1750_RecvByte(); BH1750_SendACK(0); BUF[1] = BH1750_RecvByte(); BH1750_SendACK(1); BH1750_Stop(); rt_thread_mdelay(5); }
复制代码实现光照强度检测与显示的函数为:
voidGet_Sunlight_Value(){ intdis_data=0; float temp; chari=0; unsignedintsd; Single_Write_BH1750(0x01); Single_Write_BH1750(0x10); rt_thread_mdelay(180); Multiple_Read_BH1750(); for(i=0;i<3;i++) dis_data=BUF[0]; dis_data=(dis_data<<8)+BUF[1]; temp=(float) dis_data/1.2; sd=temp; if(sd<54612) OLED_ShowNum(0,6,sd,5,16); }
复制代码实现图示效果的程序为:
voidhal_entry(void){ rt_kprintf("\nHello RT-Thread!\n"); OLED_Init(); OLED_Clear(); OLED_ShowString(20,0,"CPK-RA6M4",16); OLED_ShowString(20,2,"OLED & BH1750",16); OLED_ShowString(0,4,"Sunlight=",16); OLED_ShowString(48,6,"lx",16); while (1) { Get_Sunlight_Value(); rt_thread_mdelay(500); } }
复制代码
检测与显示效果图


 /5
/5 


