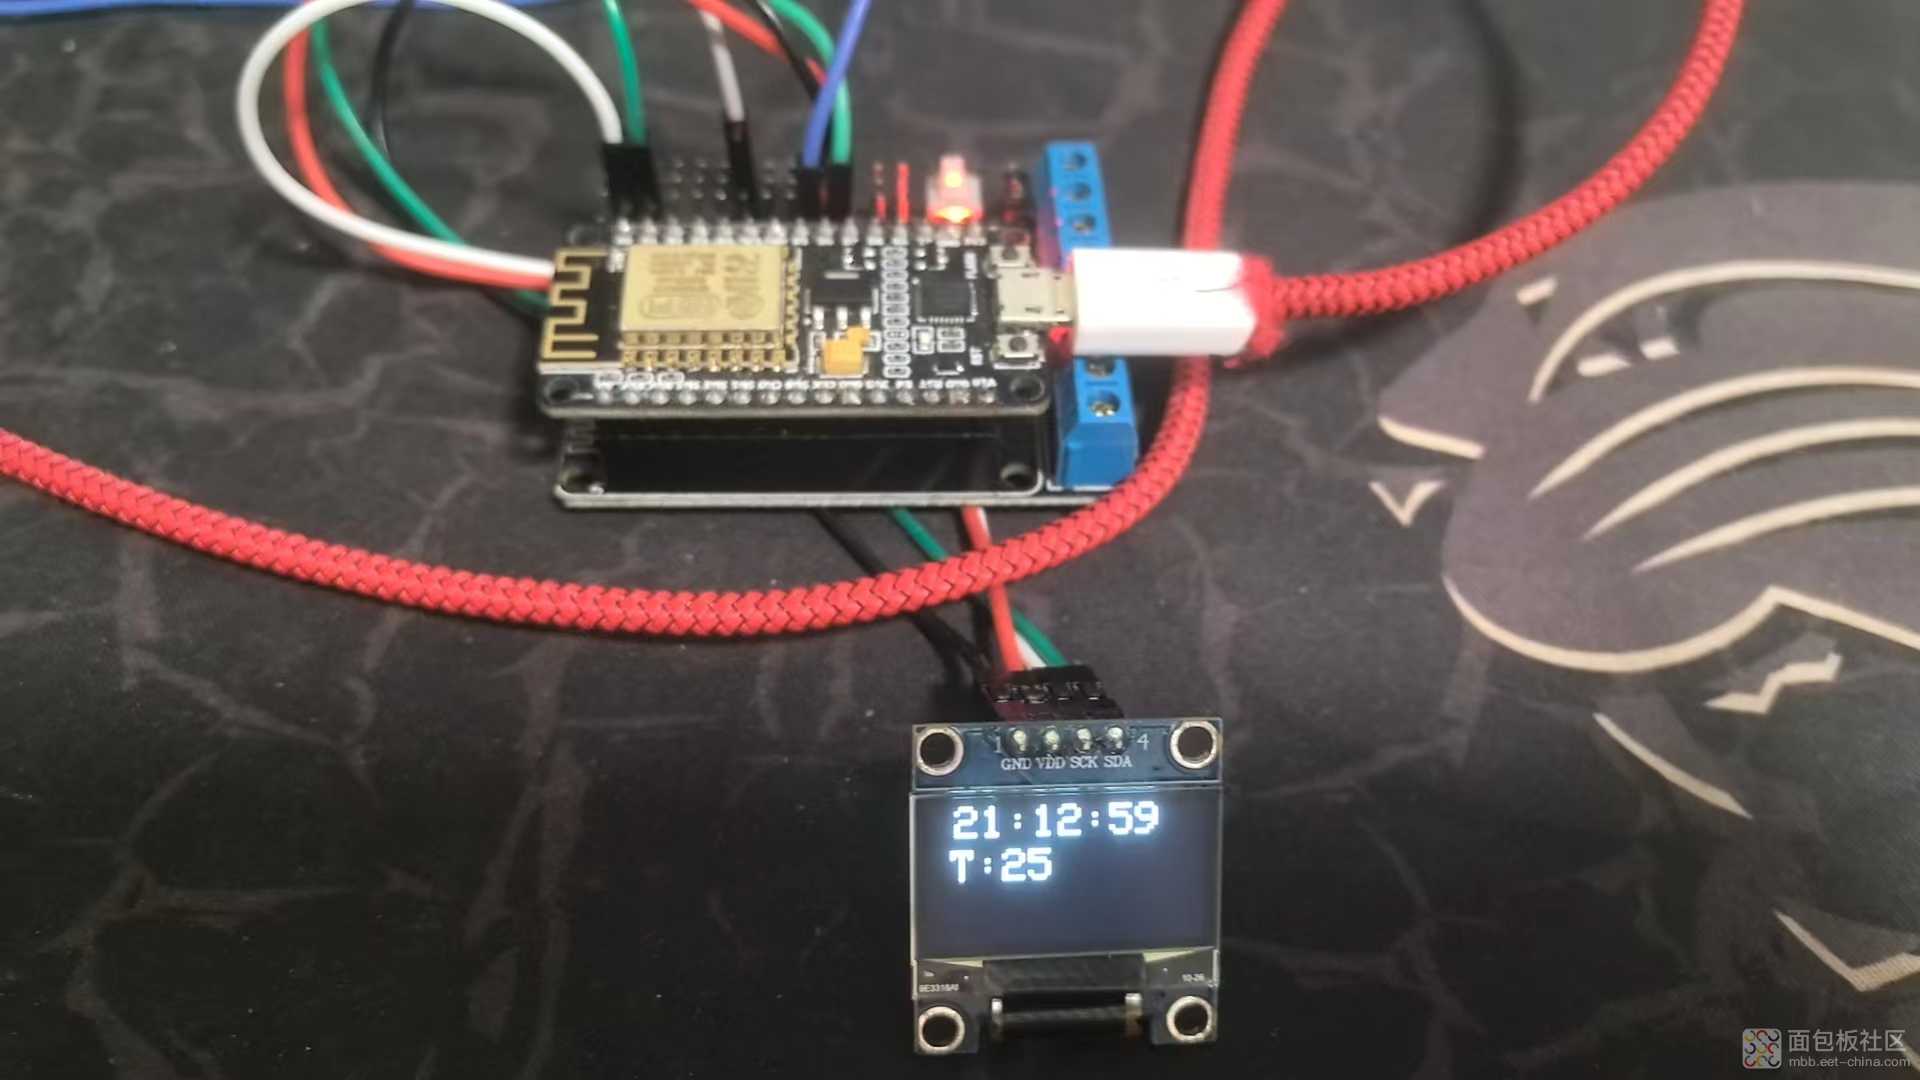
之前在测试开发板附带的wifi板的时候,出了状况。迫不得已,改用ESP8266这个已经过时的模块来获得网络时间和所在地的天气状况,虽然失去学习使用CYW43012得机会。使用ESP8266的优点也是显而易见的,使用Arduino开发环境,很多复杂的处理,通过Arduino的支持库,可以更容易方便实现,而且稳定可靠。使用ESP8266的话,和PSoC 6 的通讯,我考虑使用串口实现。在这之前,先弄好ESP8266那边的处理。就是获取网络时间和天气预报信息。网络时间,是通过阿里云服务获取的。而天气情报,是通过心知天气获取的。两者都是通过Web API调用实现的。心知天气,可以自己注册一个账户,获取免费机会。ESP8266端的程序如下:
/**
* 上位机通过串口发送指令给本机,根据指令,本机恢复对应的信息
* 串口使用RX/TX引脚
* 指令:qw+0x0d0a 回复qw=今日的平均气温 + 0x0d0a,形如:tm=21:45:10 + 0x0d0a
* tm+0x0d0a 回复tm=当时的时间 + 0x0d0a,形如:qw=25 + 0x0d0a
*/
#include <SPI.h>
#include <Wire.h>
#include <Adafruit_GFX.h>
#include <Adafruit_SSD1306.h>
#include <NTPClient.h>
#include <ESP8266WiFi.h>
#include "WiFiUdp.h"
#include "ESP8266TimerInterrupt.h"
#include <ArduinoJson.h>
#define LOGO_HEIGHT 16
#define LOGO_WIDTH 16
#define BUILTIN_LED 16 // D0 - GPIO16,输出信号
// 接线备注:SCL(GPIO5---D1), SDA(GPIO4---D2)
// OLED分辨率
#define SCREEN_WIDTH 128 // OLED display width, in pixels
#define SCREEN_HEIGHT 64 // OLED display height, in pixels
#define OLED_RESET -1 // Reset pin # (or -1 if sharing Arduino reset pin)
// OLED IIC访问地址
#define SCREEN_ADDRESS 0x3C ///< See datasheet for Address; 0x3D for 128x64, 0x3C for 128x32
const char *ssid = "***";
const char *password = "***";
const char *host = "ip-api.com"; // 访问的域名
String comRecvStr = ""; // 串口收到的数据
bool comRecvCrLfFlag = false; // 串口收到换行符
WiFiUDP ntpUDP;
NTPClient timeClient(ntpUDP,"ntp1.aliyun.com",60*60*8,30*60*1000);
WiFiClient client; //创建一个网络对象
// 定时中断时间常数
#define TIMER_INTERVAL_MS 1000
volatile bool statusLed = false;
volatile uint32_t lastMillis = 0;
// Init ESP8266 timer 1
ESP8266Timer ITimer;
Adafruit_SSD1306 display(SCREEN_WIDTH, SCREEN_HEIGHT, &Wire, OLED_RESET);
// 温度信息串
String tempinfo="25";
/*
每当新数据进入硬件串行接收时,就会发生SerialEvent。这
例程在每次loop()运行之间运行,因此在循环内使用delay可以
延迟响应。可能有多个字节的数据可用。
*/
void serialEvent() {
}
// 定时器中断
void IRAM_ATTR TimerHandler() {
}
// 初始化OLED驱动
void init_oled(void) {
Serial.println("<<<init_oled begin");
// SSD1306_SWITCHCAPVCC = generate display voltage from 3.3V internally
// 初始化IIC OLED12864设备
if(!display.begin(SSD1306_SWITCHCAPVCC, SCREEN_ADDRESS)) {
Serial.println(F("SSD1306 allocation failed"));
for(;;); // Don't proceed, loop forever
}
// 设置字体
display.setTextSize(2); // 2倍大小
display.setTextColor(SSD1306_WHITE); // Draw white text
display.cp437(true); // Use full 256 char 'Code Page 437' font
Serial.println(">>>init_oled end");
}
// 定时器中断
void init_interrupt(void) {
if (ITimer.attachInterruptInterval(TIMER_INTERVAL_MS * 1000, TimerHandler)) {
lastMillis = millis();
Serial.print(F("Starting ITimer OK, millis() = ")); Serial.println(lastMillis);
} else {
Serial.println(F("Can't set ITimer correctly. Select another freq. or interval"));
}
}
/**************************************************
* 函数名称:GET_Weather
* 函数功能:http访问获取天气数据
* 参数说明:无
**************************************************/
unsigned long getTime = 0; //获取网络天气和时间
bool getWeather(void) {
String json = ""; //接收到的数据
String url = "https://api.seniverse.com/v3/weather/now.json?key=*****&location=*****&language=zh-Hans&unit=c";
String urlDat = "&start=0&days=3";
if (!client.connect("116.62.81.138", 80)) {
Serial.println("天气服务器连接失败");
return false;
}
// 发送请求报文
client.print(String("GET ") + url + " HTTP/1.1\r\n" + //请求行 请求方法 + 请求地址 + 协议版本
"Host: " + host + "\r\n" + //请求头部
"Connection: close\r\n" + //处理完成后断开连接
"\r\n" + //空行
urlDat); //请求数据
delay(100);
//接收数据
while(client.available()) {
String line = client.readStringUntil('\r');
json += line;
}
client.stop(); //断开与服务器连接以节约资源
// 解析JSON,获取气温信息
StaticJsonDocument<200> doc;
DeserializationError error = deserializeJson(doc, json);
if (error) {
Serial.print(F("deserializeJson() failed: "));
Serial.println(error.f_str());
return false;
} else {
Serial.println(json);
Serial.println(doc["results"].as<String>());
Serial.println(doc["results"][0].as<String>());
JsonObject results_0 = doc["results"][0];
JsonObject results_0_location = results_0["location"];
String name = results_0_location["name"].as<String>();
Serial.println(name);
Serial.println(results_0["last_update"].as<String>());
JsonObject results_0_now = results_0["now"];
Serial.println("天气" + results_0_now["text"].as<String>()); // 晴
Serial.println("温度" + results_0_now["temperature"].as<String>() + "度"); // 晴
tempinfo = results_0_now["temperature"].as<String>();
}
// 正常获取天气信息
return true;
}
// 每天接收天气情报的标志,每天6点时重新获取,0点清除
bool weatherFlag = false;
void setup(){
//DeserializationError error;
//StaticJsonDocument<200> doc;
String json = "{"results":[{"location":{"id":"*****","name":"*****","country":"CN","path":"*******","timezone":"Asia/Shanghai","timezone_offset":"+08:00"},"now":{"text":"晴","code":"1","temperature":"26"},"last_update":"2024-07-15T23:07:40+08:00"}]}";
Serial.begin(115200);
WiFi.begin(ssid, password);
while ( WiFi.status() != WL_CONNECTED ) {
delay ( 500 );
Serial.print ( "." );
}
timeClient.begin();
// 初始化OLED驱动
init_oled();
// 清除屏幕
display.clearDisplay();
}
char chr=0;
void loop() {
int old_sec=-1;
int cur_sec=0;
// 刷新时间
timeClient.update();
//Serial.println(timeClient.getFormattedTime());
cur_sec=timeClient.getSeconds();
if (cur_sec != old_sec) {
display.clearDisplay();
// 为了使时间居中显示
display.setTextSize(2);
display.setCursor(0, 0); // 起始坐标
display.write(' ');
display.write(timeClient.getFormattedTime().c_str());
display.display();
old_sec=cur_sec;
}
// 每天6:00:00 ~ 6:00:10之间,获取天气信息
if (weatherFlag==false && timeClient.getHours() == 6 && timeClient.getMinutes() == 0 && timeClient.getSeconds()<10) {
if (getWeather() == true) {
// 成功获得天气信息,设置标志
weatherFlag = true;
}
} else if (timeClient.getHours() == 0 && timeClient.getMinutes() == 0) {
weatherFlag = false;
}
// 检查串口集令,如果收到所要天气情报的指令,将获得的天气信息发出去,晴朗与否,气温
while (Serial.available() > 0) {
chr = char(Serial.read());
if (chr==0x0d) {
Serial.println(comRecvStr);
if (comRecvStr.equalsIgnoreCase("qw")) {
// 上位机索要气温信息
// display.println("\ntq");
// display.display();
// 发送气温信息
Serial.print("qw=");
Serial.print(tempinfo);
Serial.print("\n");
} else if (comRecvStr.equalsIgnoreCase("tm")) {
// 上位机索要时间信息
Serial.print("tm=");
Serial.print(timeClient.getFormattedTime().c_str());
Serial.print("\n");
}
comRecvStr="";
} else {
comRecvStr += chr;
}
}
}复制代码代码中涉及Key等私人信息的地方用*****代替,要换成天气预报网站给你的Key。具体设置可以参阅网站提供的使用样例。
ESP8266的调试在ArduinoIDE上就可以很方便地实现。按照设想,当PSoC 6 开发板这一侧需要获取时间的时候,向ESP8266模块由串口发出请求指令(tm+回车换行字符),ESP8266端发送Web-API调用,获取时间后,再回传给PSoC 6 开发板。需要获取天气预报信息的时候,PSoC 6 开发板向ESP8266模块由串口发出请求指令(qw+回车换行字符),ESP8266端发送Web-API调用,获取天气后,再回传给PSoC 6 开发板。这个很过程很简单。

在PSoC 6 开发板这一端,为了保证时间的准确性,考虑每隔一分钟发送一个查询当前时间的请求。这个这个请求周期由定时器产生。
// 声明一个全局定时器变量
static rt_timer_ttimer1;
/* 创建定时器 1 周期定时器, 参数3为毫秒单位 */
// 建立一个以分钟为单位的定时
timer1 = rt_timer_create("timer1", timeout1,
RT_NULL, 60000,
RT_TIMER_FLAG_PERIODIC);
/* 启动定时器 1 */
if(timer1 != RT_NULL) rt_timer_start(timer1);
接下来在学习RTT下的串口接收处理。一旦调通了,就可以配合ESP8266一起进行测试了。


 /5
/5 


