N32G401 的板子是提供了DAP的串口的,可以轻松的视线板载的串口调试功能,我们几天就用来使用板载的串口实现printf打印的功能,我们首先看看硬件的连接关系。
通过上面的图片我们可以看到DAP的串口是通过跳线,连接到板子的PA9和PA10的,我们可以查看数据手册,两个引脚对应的是串口1 USART1 的,那么我们就按照例程对串口1 进行初始化,
这里就直接上代码。
#include "DRV_UART.h"
void UART_IO_Init(void)
{
GPIO_InitType GPIO_InitStructure;
RCC_AHB_Peripheral_Clock_Enable(RCC_AHB_PERIPH_GPIOA);
/* Initialize GPIO_InitStructure */
GPIO_Structure_Initialize(&GPIO_InitStructure);
/* Configure USARTx Tx as alternate function push-pull */
GPIO_InitStructure.Pin = GPIO_PIN_9;
GPIO_InitStructure.GPIO_Mode = GPIO_MODE_AF_PP;
GPIO_InitStructure.GPIO_Alternate = GPIO_AF5_USART1;
GPIO_Peripheral_Initialize(GPIOA, &GPIO_InitStructure);
/* Configure USARTx Rx as alternate function push-pull */
GPIO_InitStructure.Pin = GPIO_PIN_10;
GPIO_InitStructure.GPIO_Alternate = GPIO_AF5_USART1;
GPIO_Peripheral_Initialize(GPIOA, &GPIO_InitStructure);
}
void UART_Init(void)
{
USART_InitType USART_InitStructure;
UART_IO_Init();
RCC_APB2_Peripheral_Clock_Enable(RCC_APB2_PERIPH_USART1);
USART_InitStructure.BaudRate = 115200;
USART_InitStructure.WordLength = USART_WL_8B;
USART_InitStructure.StopBits = USART_STPB_1;
USART_InitStructure.Parity = USART_PE_NO;
USART_InitStructure.HardwareFlowControl = USART_HFCTRL_NONE;
USART_InitStructure.Mode = USART_MODE_RX | USART_MODE_TX;
/* Configure USARTx */
USART_Initializes(USART1, &USART_InitStructure);
/* Enable the USARTx */
USART_Enable(USART1);
}
int fputc(int ch, FILE* f)
{
USART_Data_Send(USART1, (uint8_t)ch);
while (USART_Flag_Status_Get(USART1, USART_FLAG_TXDE) == RESET)
;
return (ch);
}
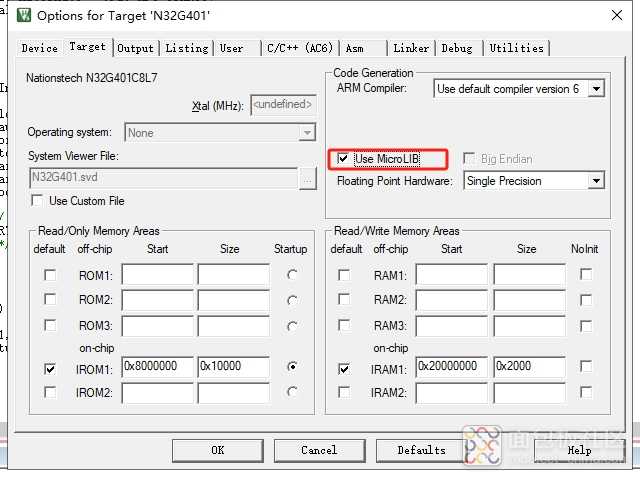
复制代码我们在使用的时候一定记得在Keil 里面设置选择“USE micro LIB "这个选项,否则会导致串口无法正常打印的现象。
我们在main.c中实现闪烁一次打印一下的策略,
int main(void)
{
LED_Init();
UART_Init();
while(1)
{
LED_Test();
printf("LED_Blink!\r\n");
}
}
复制代码
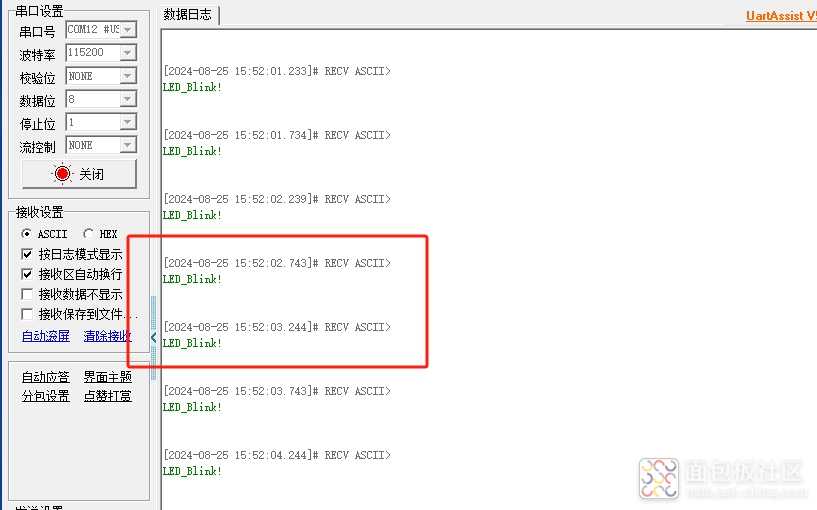
我们可以看到串口已经可以正常打印了,但是细心的朋友会发现,我们的LED3常量了,这个就是我们就要注意硬件的连接了,我们很快会知道PA9是串口的发送脚,串口的闲置状态电平为高,所以LED才会是常亮的状态,那么其实,我们也可以通过串口发送的数据来实现LED的亮暗程度,大家可以试试看,去掉延时。效果还是很明显的。


 /5
/5 


