【电子DIY】DIY行车记录仪为游戏机之主控软件开发(4)移植标准输入输出和SHELL
一. 前言
前面我们已经实现了串口的收发接口,为了方便后续调试和交互我们就来移植标准输入输出实现以及简单的SHELL。
代码见:https://github.com/qinyunti/py32f403-nes.git
添加以下文件

二. Xprintf移植
参考公众号文章
https://mp.weixin.qq.com/s/y4MHV3cd4T0b51L5M4J5Xg?token=1631959641&lang=zh_CN
适配输入输出接口
<pre>static void xprintf_out_port(int ch)
{
uint8_t val = ch;
uart_send(0,&val,1);
}
static int xprintf_in_port(void)
{
uint32_t len;
uint8_t val;
do
{
len = uart_read(0,&val,1);
}while(len == 0);
return val;
}</pre>
复制代码初始化时,设置接口即可
xdev_out(xprintf_out_port);
xdev_in(xprintf_in_port);
Xprintf.h中一些宏控制是否支持浮点等。
三. Shell移植
参考公众号文章
https://mp.weixin.qq.com/s/XLmbJn0SKoDT1aLdxHDrbg?token=1631959641&lang=zh_CN
实现底层收发接口
<pre>uint32_t shell_read(uint8_t *buff, uint32_t len)
{
return uart_read(0,buff,len);
}
void shell_write(uint8_t *buff, uint32_t len)
{
uart_send(0,buff,len);
}</pre>
复制代码设置接口
<pre>shell_set_itf(shell_read, shell_write, (shell_cmd_cfg*)g_shell_cmd_list_ast, 1);</pre>
复制代码任务中循环调用s h e l l _ e x e c ( );即可
<pre>static void shell_task(void *arg)
{
(void)arg;
xprintf("shell task start.\r\n");
while(1)
{
shell_e x e c();
vTaskDelay((1*1000/configTICK_RATE_HZ));
}
}
</pre>
复制代码四. 测试
<pre>#include <string.h>
#include "py32f4xx_hal.h"
#include "py32f403_hal_rcc.h"
#include "uart.h"
#include "FreeRTOS.h"
#include "task.h"
#include "xprintf.h"
#include "shell.h"
#include "shell_func.h"
static void clk_out(void)
{
/* PA8 AF0 MCO*/
GPIO_InitTypeDef GPIO_InitStruct;
__HAL_RCC_GPIOA_CLK_ENABLE();
GPIO_InitStruct.Pin = GPIO_PIN_8;
GPIO_InitStruct.Mode = GPIO_MODE_AF_PP;
GPIO_InitStruct.Pull = GPIO_PULLUP;
GPIO_InitStruct.Speed = GPIO_SPEED_FREQ_VERY_HIGH;
GPIO_InitStruct.Alternate = GPIO_AF0_MCO;
HAL_GPIO_Init(GPIOA, &GPIO_InitStruct);
HAL_RCC_MCOConfig(RCC_MCO1, RCC_MCO1SOURCE_SYSCLK, RCC_MCODIV_1);
}
static void clk_init(void)
{
RCC_OscInitTypeDef RCC_OscInitStruct;
RCC_OscInitStruct.HSEFreq = RCC_HSE_16_32MHz;
RCC_OscInitStruct.HSEState = RCC_HSE_ON;
RCC_OscInitStruct.HSI48MState = RCC_HSI48M_ON;
RCC_OscInitStruct.HSIState = RCC_HSI_ON;
RCC_OscInitStruct.LSEDriver = RCC_LSEDRIVE_HIGH;
RCC_OscInitStruct.LSEState = RCC_LSE_ON;
RCC_OscInitStruct.LSIState = RCC_LSI_ON;
RCC_OscInitStruct.OscillatorType = RCC_OSCILLATORTYPE_HSE;
RCC_OscInitStruct.PLL.PLLState = RCC_PLL_ON;
RCC_OscInitStruct.PLL.PLLSource = RCC_PLLSOURCE_HSE;
RCC_OscInitStruct.PLL.PLLMUL = RCC_PLL_MUL9;
HAL_RCC_OscConfig(&RCC_OscInitStruct);
RCC_ClkInitTypeDef RCC_ClkInitStruct;
RCC_ClkInitStruct.AHBCLKDivider = RCC_SYSCLK_DIV1;
RCC_ClkInitStruct.APB1CLKDivider = RCC_HCLK_DIV2;
RCC_ClkInitStruct.APB2CLKDivider = RCC_HCLK_DIV2;
RCC_ClkInitStruct.ClockType = RCC_CLOCKTYPE_SYSCLK;
RCC_ClkInitStruct.SYSCLKSource = RCC_SYSCLKSOURCE_PLLCLK;
HAL_RCC_ClockConfig(&RCC_ClkInitStruct, 5);
SystemCoreClockUpdate();
}
static void xprintf_out_port(int ch)
{
uint8_t val = ch;
uart_send(0,&val,1);
}
static int xprintf_in_port(void)
{
uint32_t len;
uint8_t val;
do
{
len = uart_read(0,&val,1);
}while(len == 0);
return val;
}
static void shell_task(void *arg)
{
(void)arg;
xprintf("shell task start.\r\n");
while(1)
{
shell_e x e c();
vTaskDelay((1*1000/configTICK_RATE_HZ));
}
}
uint32_t shell_read(uint8_t *buff, uint32_t len)
{
return uart_read(0,buff,len);
}
void shell_write(uint8_t *buff, uint32_t len)
{
uart_send(0,buff,len);
}
static void shell_task_init(void)
{
TaskHandle_t xHandle;
xdev_out(xprintf_out_port);
xdev_in(xprintf_in_port);
shell_set_itf(shell_read, shell_write, (shell_cmd_cfg*)g_shell_cmd_list_ast, 1);
/* 创建任务,执行shell */
xTaskCreate( shell_task, "shell", 512, NULL, 1, &xHandle );
}
int main(void)
{
HAL_Init();
clk_init();
clk_out();
uart_init(0,115200);
uart_init(1,115200);
shell_task_init();
vTaskStartScheduler();
}
</pre>
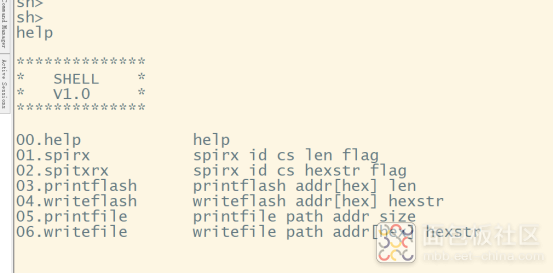
复制代码输入help可以看到支持的命令

五. 总结
以上我们移植了标准输入输出实现xprintf,以及简单的shell,可以方便的进行打印调试,命令行交互。


 /5
/5 


