对先楫早有耳闻,据说做的挺不错的。这次有机会拿到HPM6750EVKMINI开发板的试用,刚好借此机会好好了解一下。
这次的开发板是HPM6750EVK MINI,相对于以前看到别人玩的,确实挺Mini的:
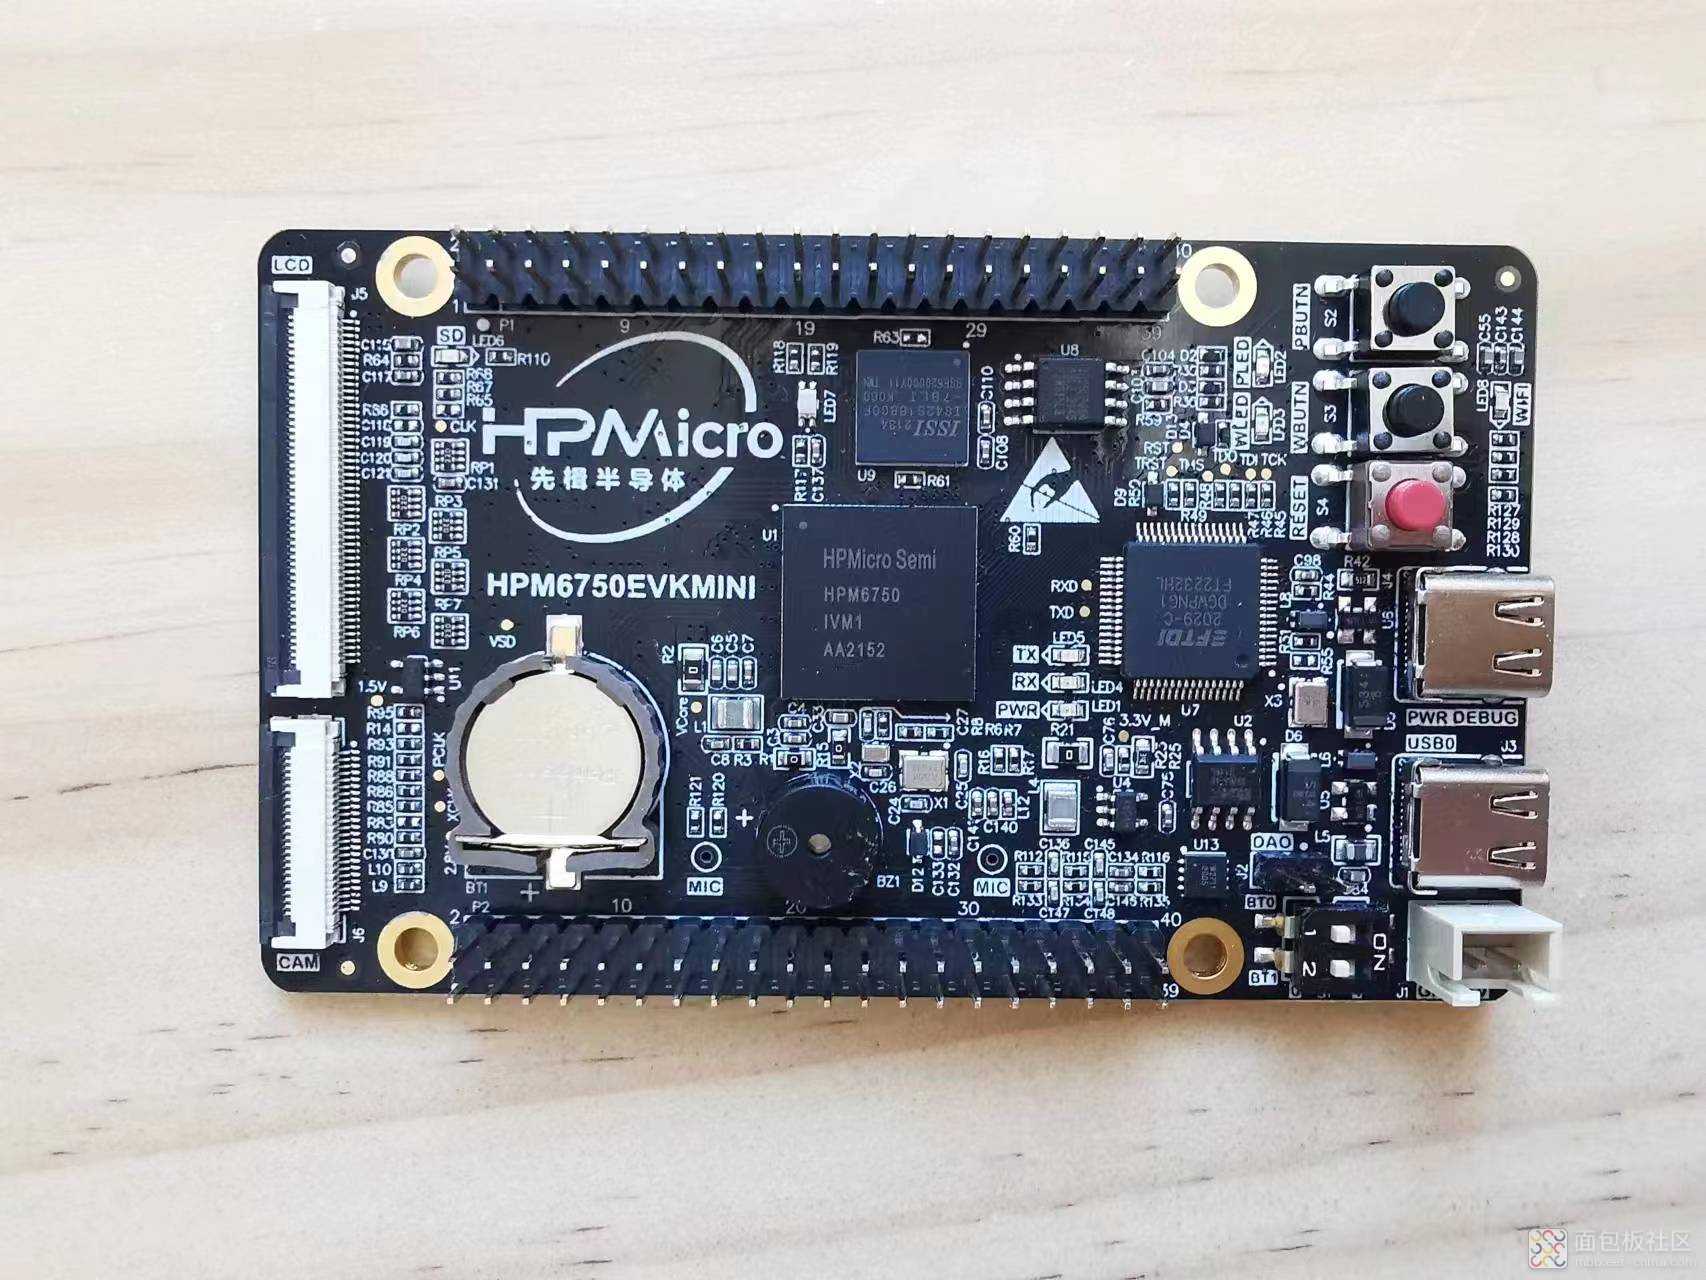
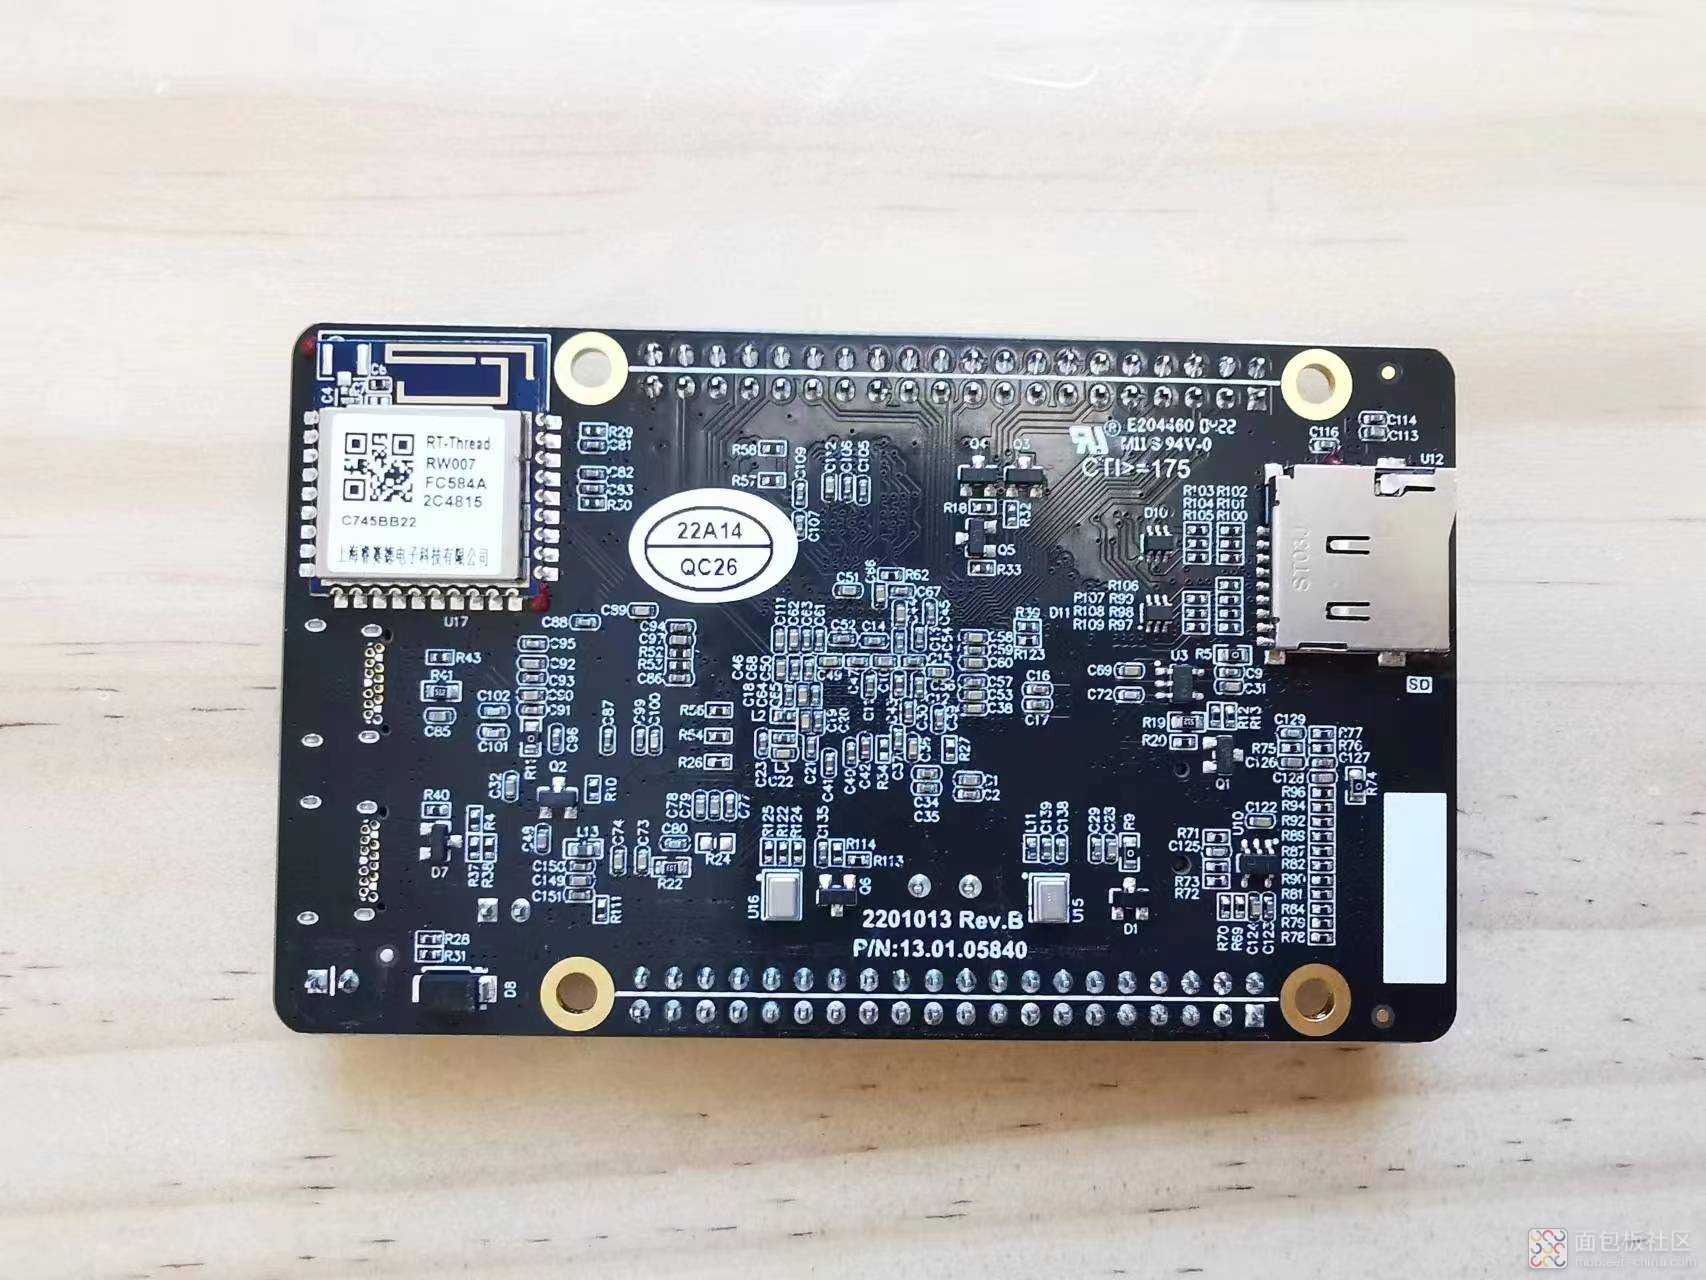
但Mini不减功能,接口丰富,而且是Type-C,良心企业!
经过一番了解,下载了官方提供的HPM_SDK,其中有关于Linux环境的说明,参考之后,一番尝试,搞定嘞macOS环境下的VSCode开发环境。
参考的文档为: hpm_sdk/README_zh.md at main · hpmicro/hpm_sdk (github.com)
具体的步骤如下:
1. 下载hpm_sdk
mkdir -p ~/hpm_workgit clone https://github.com/hpmicro/hpm_sdk.git cd hpm_sdk
复制代码2、设置GNURISCV_TOOLCHAIN_PATH
HPM板子的代码,要使用 riscv32-unknown-elf,可以找遍了网上,都没有找到 for macOS的。
从 riscv-collab/riscv-gnu-toolchain: GNU toolchain for RISC-V, including GCC (github.com) 下载了 riscv-gnu-toolchain 的源码,编译riscv32的,结果失败了。
后来,经过一番了解,原来,那要什么专门for riscv32的版本呀,编译riscv64的版本,只要启用了multilibs,就能够支持riscv32,也就是用riscv64-unknown-elf一样可以编译。
在macOS上,安装了brew的话,使用下面三行代码,轻松搞定
brew tap riscv-software-src/riscvbrew install riscv-tools brew link --overwrite riscv-gnu-toolchain
复制代码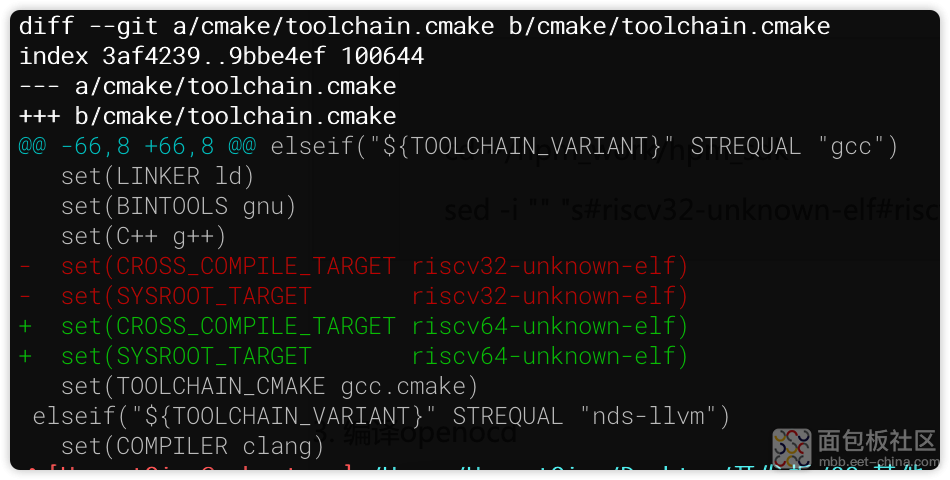
可以使用下面的命令,轻松搞定:
cd ~/hpm_work/hpm_sdksed -i "" "s#riscv32-unknown-elf#riscv64-unknown-elf#g" cmake/toolchain.cmake
复制代码3. 编译openocd
先楫使用的openocd是定制的,类似WCH,需要自己编译,步骤如下:
cd ~/hpm_workgit clone https://github.com/hpmicro/riscv-openocd.git cd riscv-openocd ./bootstrap ./configure --prefix=/usr/local/openocd-hpm --disable-werror --disable-internal-jimtcl --disable-internal-libjaylink --enable-ftdi --enable-cmsis-dap-v2 --enable-cmsis-dap CPPFLAGS=-I/usr/local/Cellar/jimtcl/0.81_1/include LDFLAGS=-L/usr/local/Cellar/jimtcl/0.81_1/lib make -j4 sudo make install
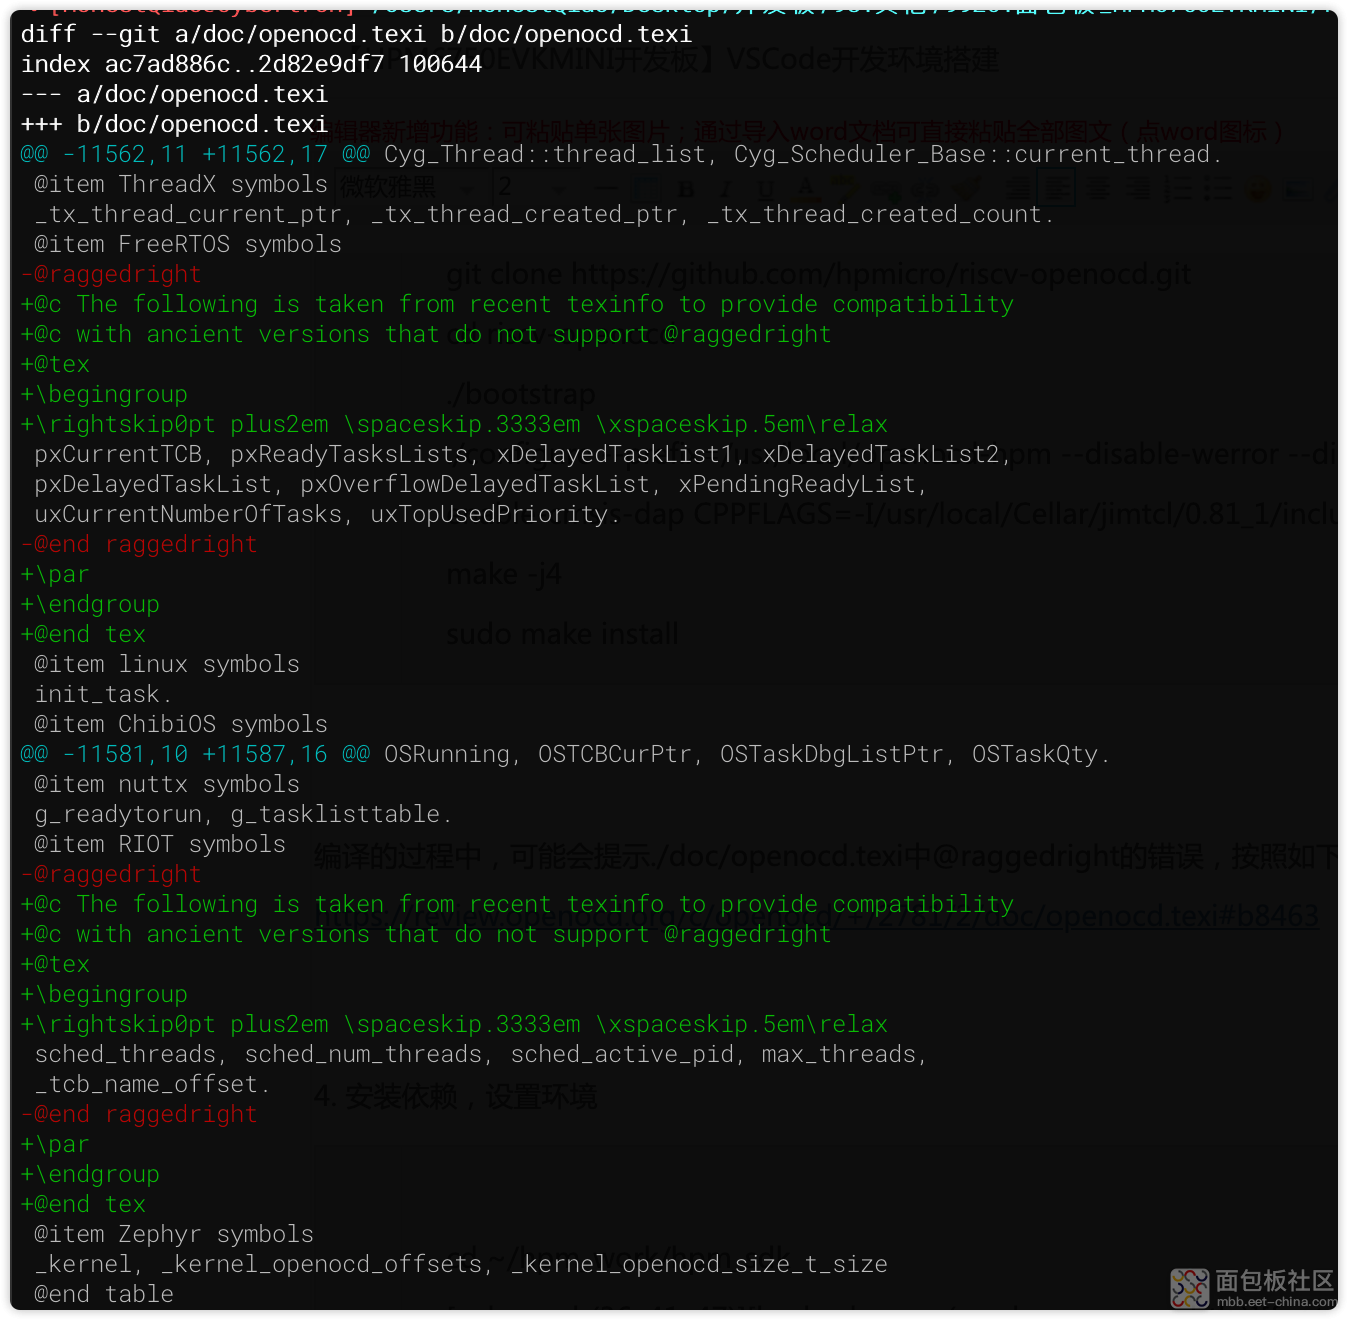
复制代码编译的过程中,可能会提示./doc/openocd.texi中@raggedright的错误,按照如下连接修改即可:
https://review.openocd.org/c/openocd/+/2781/2/doc/openocd.texi#b8463
4. 安装依赖,设置环境
cd ~/hpm_work/hpm_sdkpip3 install --user -r "$HPM_SDK_BASE/scripts/requirements.txt brew install ninja . ./env.sh export GNURISCV_TOOLCHAIN_PATH=/usr/local
复制代码5. 编译测试代码:
cd ~/hpm_work/hpm_sdk. ./env.sh export GNURISCV_TOOLCHAIN_PATH=/usr/local cd samples/hello_world mkdir build cd build cmake -GNinja -DBOARD=hpm6750evkmini -DCMAKE_BUILD_TYPE=flash_xip .. ninja
复制代码
上述cmake指令中的 CMAKE_BUILD_TYPE=flash_xip 很重要,设置后,编译的代码,可以试用openocd正常下载。
上述配置,是经过官方的大佬指点后,研究官方提供的windows环境的sdk_env后得到的。
6. 调试代码:
cd ~/hpm_work/hpm_sdkcd samples/hello_world export OPENOCD_SCRIPTS=${HPM_SDK_BASE}/boards/openocd export PATH=/usr/local/openocd-hpm/bin:$PATH openocd -f probes/ft2232.cfg -f soc/hpm6750-single-core.cfg -f boards/hpm6750evk.cfg
复制代码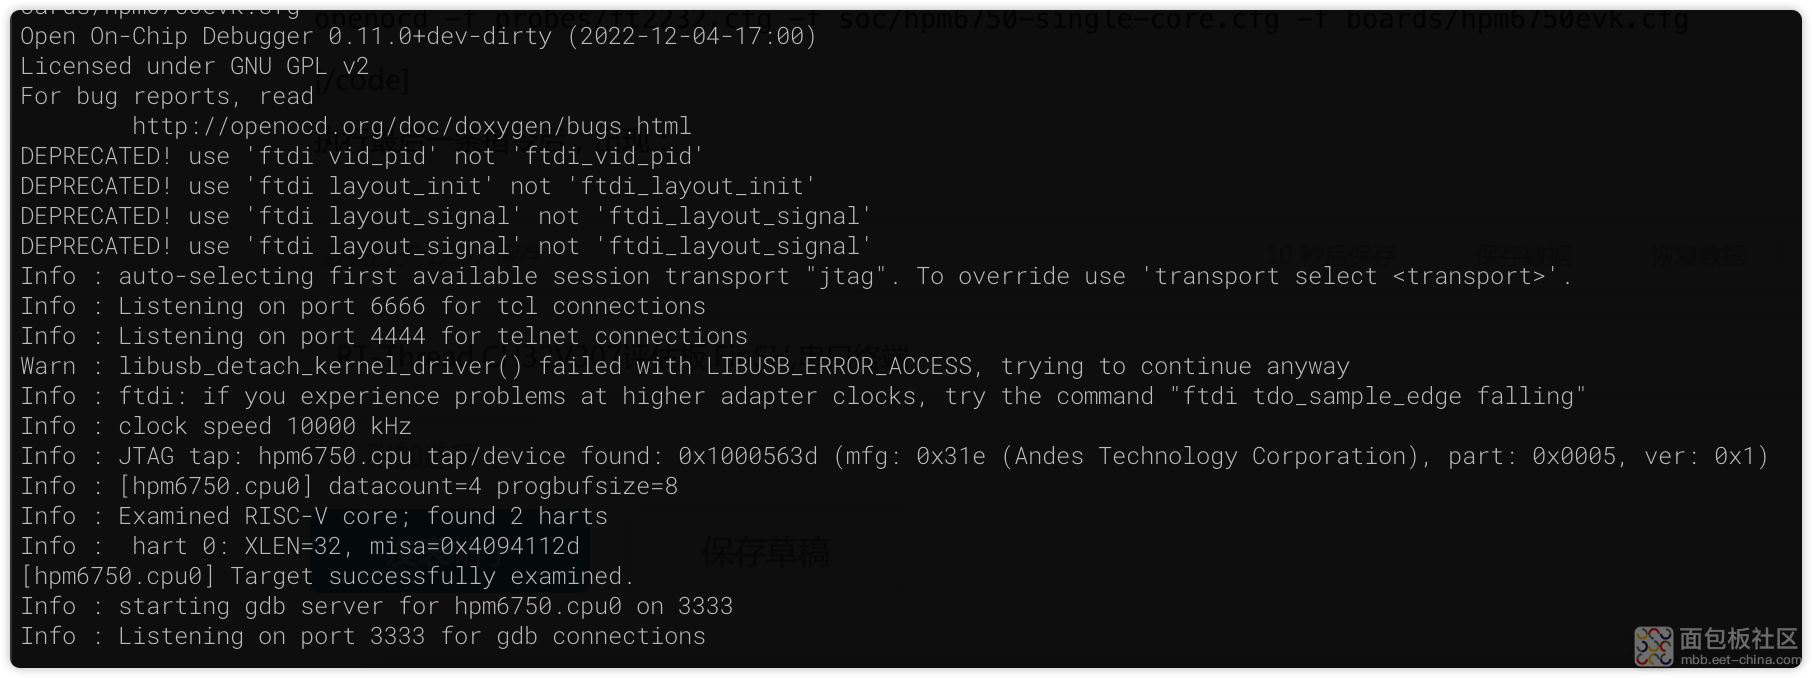
最后的一条是关键:Listening on port 3333 for gdb connections
如果启动失败,请参考 hpm_sdk/README_zh.md安装相关驱动解决。
然后再开一个shell窗口,执行下面的操作:
cd ~/hpm_word/hpm_sdk/samples/hello_world/. ./env.sh export GNURISCV_TOOLCHAIN_PATH=/usr/local export OPENOCD_SCRIPTS=${HPM_SDK_BASE}/boards/openocd export PATH=/usr/local/openocd-hpm/bin:$PATH riscv64-unknown-elf-gdb (gdb)
复制代码(gdb) file build/output/demo.elf(gdb) target remote localhost:3333 (gdb) load (gdb) b main (gdb) c (gdb) c
复制代码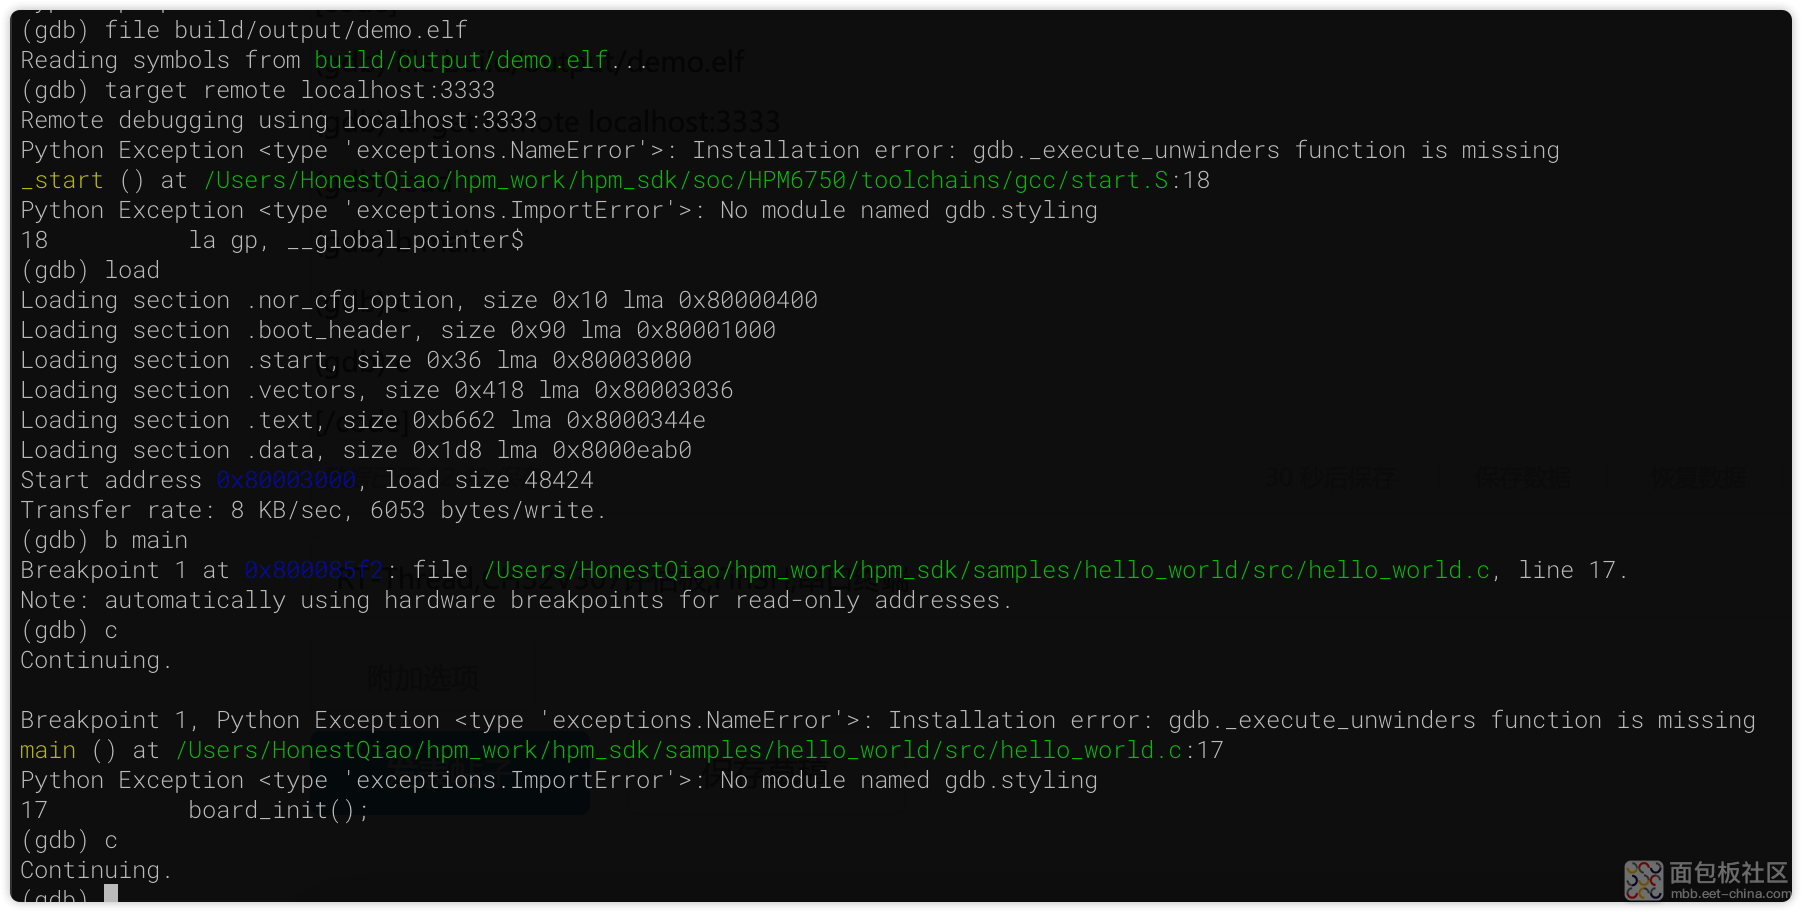
上述的b main表示在main处打断点,所以第一个c继续运行后,在main后的第一个实际代码board_init()处停止,再次输入c后,继续运行。
运行后,板子上的LED灯将会开始闪烁了。
7. 烧录固件:
使用opencod可以进行调试,同样也可以进行烧录固件。
要烧录,需要先关闭当前运行的opencod,然后使用如下的指令即可:
cd ~/hpm_word/hpm_sdk/samples/hello_world/. ./env.sh export GNURISCV_TOOLCHAIN_PATH=/usr/local export OPENOCD_SCRIPTS=${HPM_SDK_BASE}/boards/openocd export PATH=/usr/local/openocd-hpm/bin:$PATH openocd -f probes/ft2232.cfg -f soc/hpm6750-single-core.cfg -f boards/hpm6750evk.cfg -c "program "./build/output/demo.elf" verify reset exit"
复制代码
烧录完成,按一下板子上的rerst按键,板子里面的固件就会生效了。
完成以上步骤后,命令行的操作就完成了,可以进行vscode环境配置了。
8. vscode环境处理:
vscode环境中,关键就在于tasks.json和launch.json的配置,具体如下:
tasks.json:
{ // See https://go.microsoft.com/fwlink/?LinkId=733558 // for the documentation about the tasks.json format "version": "2.0.0", /*"options": { "cwd": "${workspaceFolder}/build" },*/ "options": { "env": { "GNURISCV_TOOLCHAIN_PATH": "/usr/local", "PATH":"/usr/local/openocd-hpm/bin:${env:PATH}" } }, "tasks": [ { "label": "_makebuildfolder", "type": "shell", "command": "mkdir -p ${workspaceFolder}/build", "problemMatcher": [], "group": "none" }, { "label": "env", "type": "shell", "command": "env", "args": [], "options": { "cwd": "${workspaceFolder}/build" } }, { "label": "cmake", "type": "shell", "command": "cmake", "args": [ "-GNinja", "-DBOARD=hpm6750evkmini", "-DCMAKE_BUILD_TYPE=flash_xip", ".." ], "options": { "cwd": "${workspaceFolder}/build" }, "problemMatcher": [] }, { "label": "clean", "type": "shell", "command": "ninja", "args": [ "-t", "clean" ], "options": { "cwd": "${workspaceFolder}/build" }, "problemMatcher": [] }, { "label": "reset", "type": "shell", "command": "rm", "args": [ "-rf", "./build" ], "options": { "cwd": "${workspaceFolder}" }, "problemMatcher": [] }, { "label": "make", "type": "shell", "command": "ninja", "args": [], "options": { "cwd": "${workspaceFolder}/build" }, "problemMatcher": [] }, { "label": "flash", "type": "shell", "command": "/usr/local/openocd-hpm/bin/openocd", "args": [ "-f","probes/ft2232.cfg", "-f","soc/hpm6750-single-core.cfg", "-f","boards/hpm6750evkmini.cfg", "-c","program "./build/output/demo.elf" verify reset exit" ], "options": { "cwd": "${workspaceFolder}" }, "problemMatcher": [] }, { "label": "openocd", "type": "shell", "isBackground": true, "command": "/usr/local/openocd-hpm/bin/openocd", "args": [ "-f","probes/ft2232.cfg", "-f","soc/hpm6750-single-core.cfg", "-f","boards/hpm6750evkmini.cfg" ], "options": { "cwd": "${workspaceFolder}" }, "problemMatcher": [] }, { "label": "Build", "dependsOrder": "sequence", "dependsOn": [ "_makebuildfolder", "env", "cmake", "make" ], "problemMatcher": [] } ] }
复制代码{ // Use IntelliSense to learn about possible attributes. // Hover to view descriptions of existing attributes. // For more information, visit: https://go.microsoft.com/fwlink/?linkid=830387 "version": "0.2.0", "configurations": [ { "name": "RISC-V Remote Debug@cppdbg", "cwd": "${workspaceFolder}", "type": "cppdbg", "request": "launch", "miDebuggerPath": "riscv64-unknown-elf-gdb", "targetArchitecture": "arm", "program": "./build/output/demo.elf", "preLaunchTask": "Build", "setupCommands": [ { "description": "Enable pretty-printing for gdb", "text": "-enable-pretty-printing", "ignoreFailures": true }, { "description": "装载文件", "text": "file ${workspaceFolder}/build/output/demo.elf", }, { "text": "target extended-remote localhost:3333" }, { "text": "monitor reset" }, { "text": "monitor halt" }, { "text": "load" } ], "launchCompleteCommand": "None", "externalConsole": true, }, ] }
复制代码tasks.json中的设置,就相当于是把命令行才操作,搬到了vscode来,使用vscode的菜单或者命令操作了:
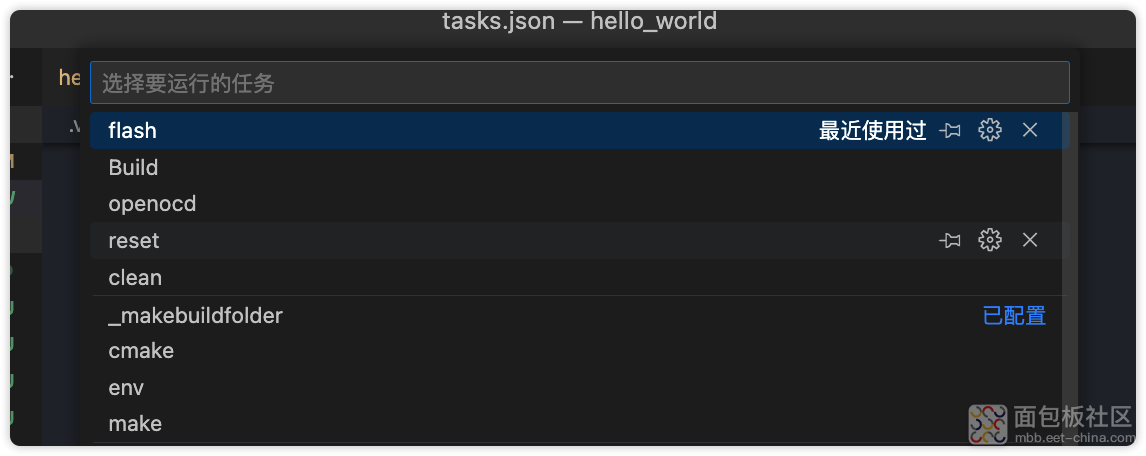
lanuch.json中的设置,是用于调试的,类似刚才我们执行的调试指令,不过加了monitor部分,用vscode可视化调试。
先从上述任务列表中,点击openocd运行连接;
然后,在代码中合适的位置打上断点,启动调试:
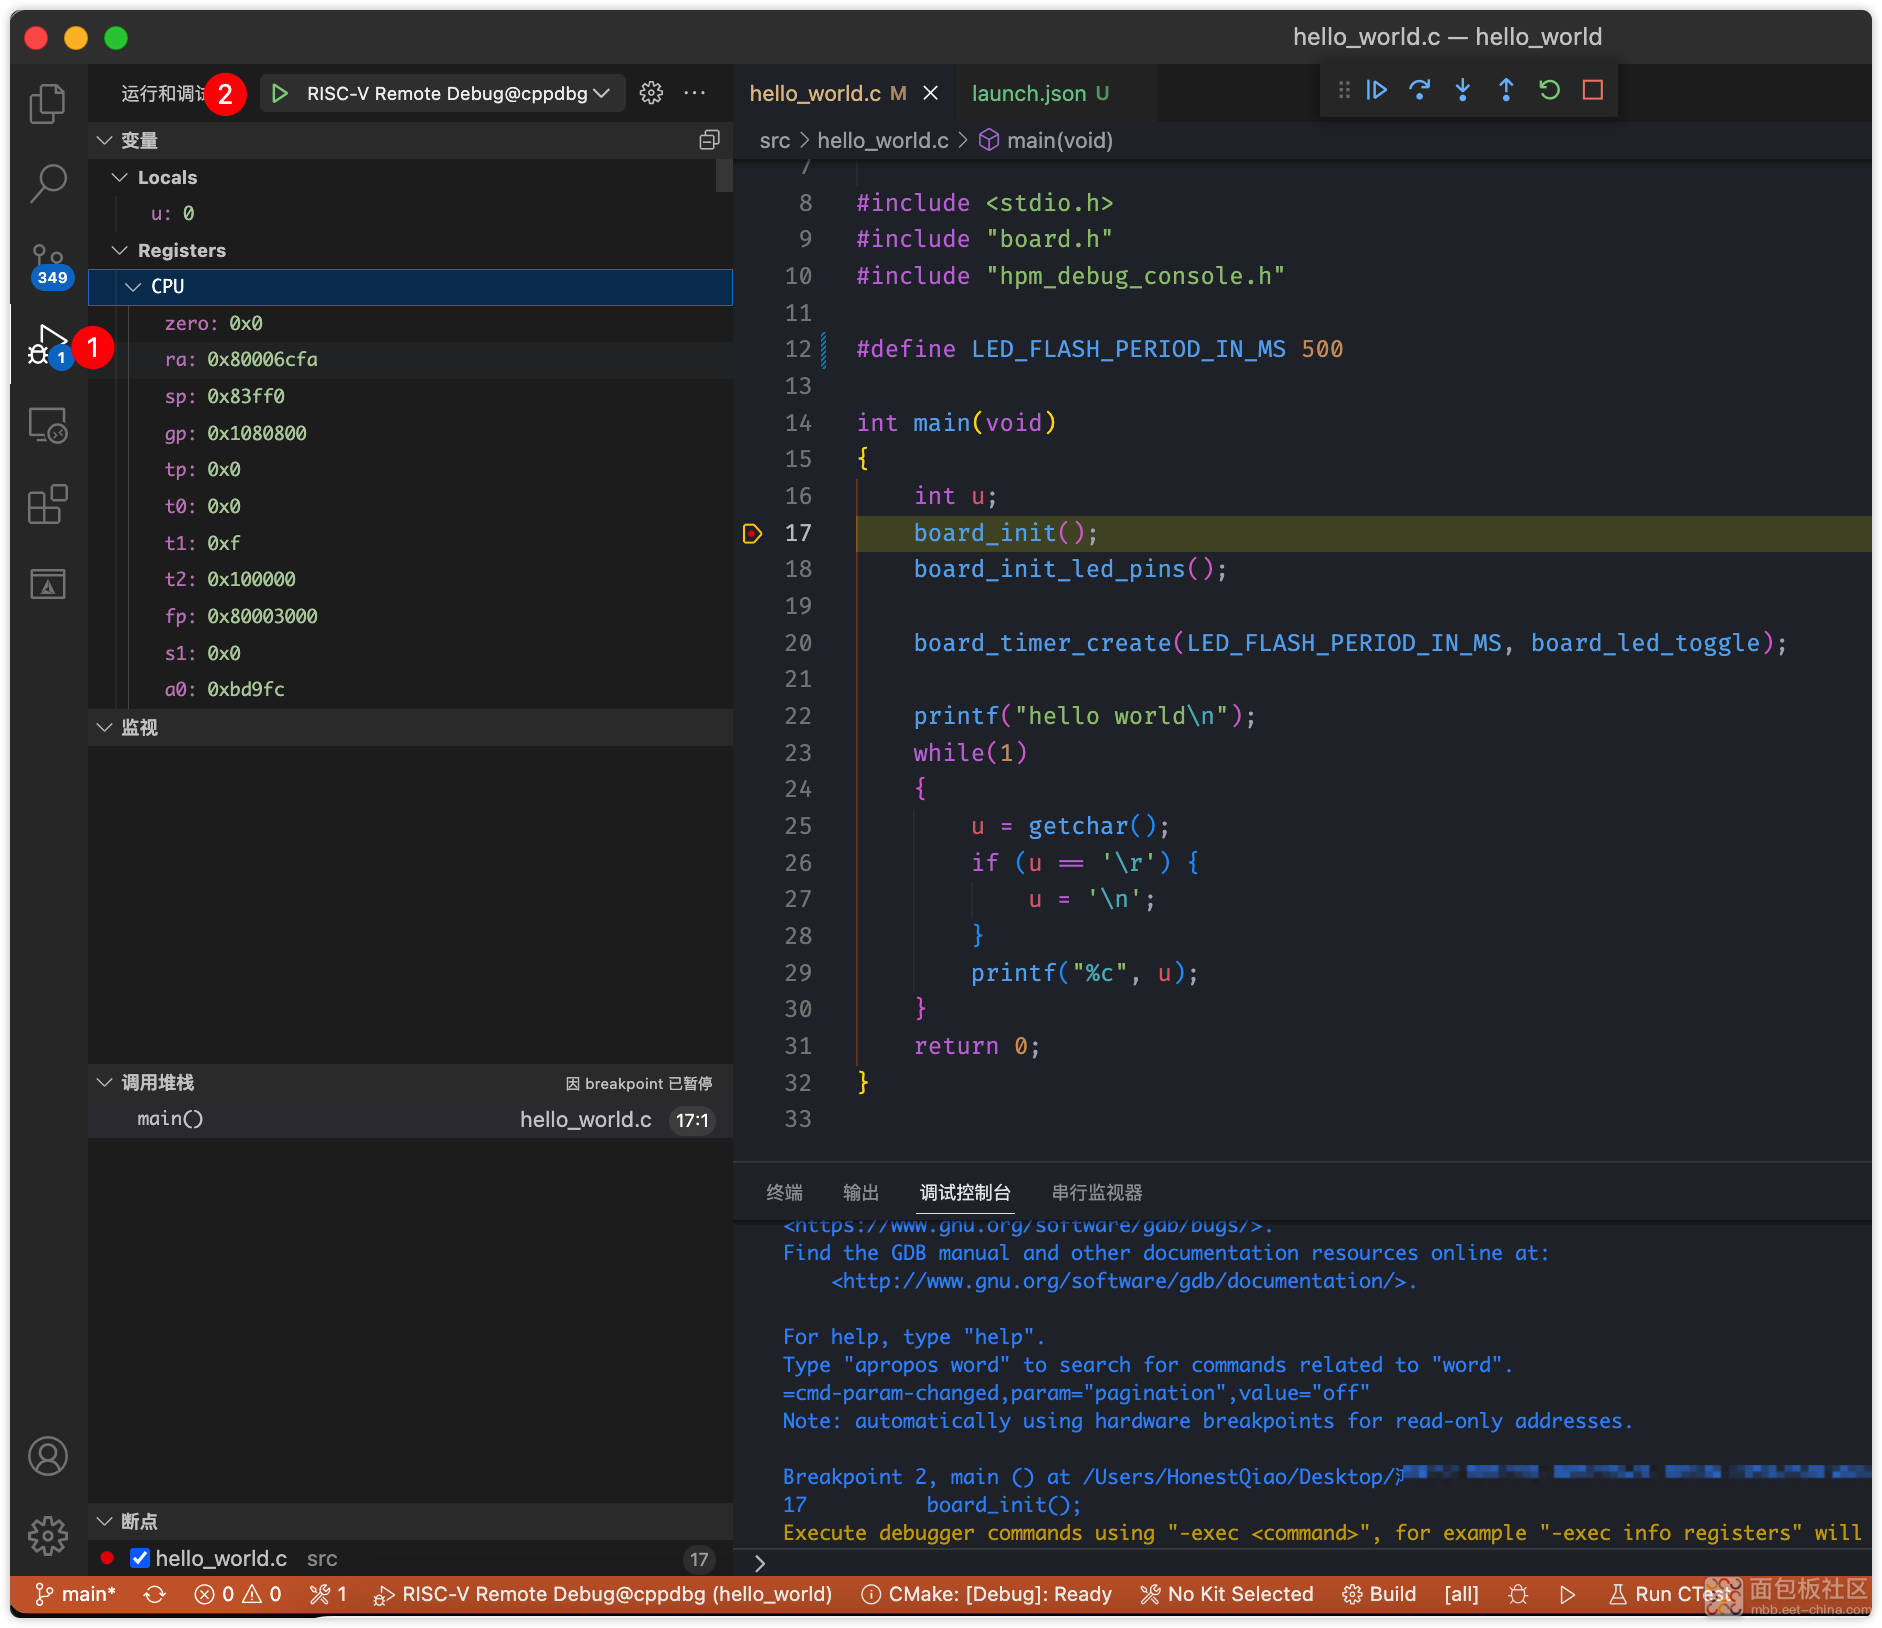
正常启动后,中能在我们预期的位置停下来,等待调试了。
9. 总结
搭建这个环境,还是经过了一波三折的,好在经过官方大佬指点,问题都解决了。
希望后续,能够将macOS环境的说明,也添加到官方指南上去。
下一步,就可以好好开始玩了。


 /4
/4 

