一,背景介绍:
自上次评测GD开发板之后就一直忙公司的事情,幸好主办方延期评测时间,这才能在假期潜心研究一下。众所周知今年的新型冠状病毒肆虐,正好拿这款开发板打发一下时间,本来想移植最近流行的LiitevGl图形系统,但是看评测团队里面已经有人移植过了,只好选个其他的东西玩玩,思来想去就移植一下咱中国自产自销的嵌入式实时操作系统RT-Thread,然后把两者结合起来,看看这个板子能否跑得动。
二、准备开发环境
- 首先用芯来的IDE建立一个工程,并且让成功跑起来。
- 官网下载LittevGL
- 先移植LittevGL,其实官网已经给出了很详细的移植步骤,按部就班的就可以一直完成了,但是可能有些初学者还是又很多地方比较迷惑,下面我就重点说一下需要注意的几个步骤。
- 官网下载RT-Thread
- 备用,等LittevGL移植成功之后在移植。
三、移植LittvGL(v6.1.1)
- 下载完成之后解压备用,选取<lvgl>文件夹里面的所有文件复制到工程目录下,在解压后的文件中找到如下文件复制到工程目录。

- 配置文件包含路径,即头文件和lvgl文件所在位置,基础配置步骤请参考我第一篇评测又详细说明。
- 剩余的移植步骤可以参考。
官方移植文档
移植评测文章
- 重点注意步骤,在<lv_port_indev.c>中获取触摸的函数如下。
static void touchpad_get_xy(lv_coord_t * x, lv_coord_t * y)复制代码- {
- /*Your code comes here*/
- *x = 240 - touch_coordinate_x_get(touch_ad_x);
- printf("x = %d \r\n", *x);
- *y = 320 - touch_coordinate_y_get(touch_ad_y);
- printf("y = %d \r\n", *y);
- }
在<lv_port_disp.c>中的显示函数如下。
static void disp_flush(lv_disp_drv_t * disp_drv, const lv_area_t * area, lv_color_t * color_p)复制代码- {
- /*The most simple case (but also the slowest) to put all pixels to the screen one-by-one*/
- int32_t x;
- int32_t y;
- for(y = area->y1; y <= area->y2; y++) {
- for(x = area->x1; x <= area->x2; x++) {
- /* Put a pixel to the display. For example: */
- /* put_px(x, y, *color_p)*/
- lcd_point_set(x,y,(color_p->full));
- color_p++;
- }
- }
- /* IMPORTANT!!!
- * Inform the graphics library that you are ready with the flushing*/
- lv_disp_flush_ready(disp_drv);
- }
在工程<main>函数中,添加如下初始化函数,然后编译运行整个工程就能跑起来了。
int lcdshow_init(){复制代码- exmc_lcd_init(); //初始化EXMC
- touch_panel_gpio_configure(); //初始化4线触摸
- rt_thread_mdelay(50);
- lcd_init();
- lv_init();
- lv_port_disp_init();
- lv_port_indev_init();
- return 0;
- }
四、移植RT-Thread(v3.1.3)
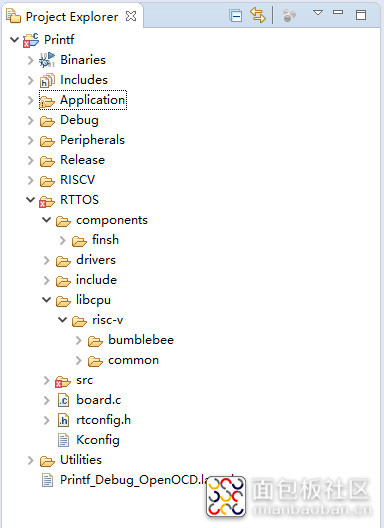
- 下载解压之后删除与RISCV无关的文件,将剩余的文件复制到工程目录,目录结构如下。

- 修改<start.S>文件。
/* argc = argv = 0 */复制代码- li a0, 0
- li a1, 0
- call
- entry
- tail exit
- 更具实际情况配置<rtconfig.h>文件,一定要配置合适堆栈大小,太小的话能编译通过但是程序无法运行。
#ifndef RT_CONFIG_H__复制代码- #define RT_CONFIG_H__
- /* Automatically generated file; DO NOT EDIT. */
- /* RootMenu */
- /* RT-Thread Kernel */
- /* Base Configuration */
- #define RT_NAME_MAX 8
- #define RT_ALIGN_SIZE 4
- #define RT_THREAD_PRIORITY_MAX 8
- #define RT_TICK_PER_SECOND 1000
- #define RT_USING_TIMER_SOFT
- #define RT_TIMER_THREAD_PRIO 4
- #define RT_TIMER_THREAD_STACK_SIZE 512
- #define RT_USING_COMPONENTS_INIT
- #define RT_USING_USER_MAIN
- #define RT_MAIN_THREAD_STACK_SIZE 1024
- /* Debug Configuration */
- #define RT_DEBUG
- /* InterThread Communication */
- #define RT_USING_SEMAPHORE
- /* Memory Management */
- #define RT_USING_MEMPOOL
- #define RT_USING_HEAP
- #define RT_USING_SMALL_MEM
- #define RT_USING_TINY_SIZE
- /* FinSH Shell */
- #define RT_USING_CONSOLE
- #define RT_CONSOLEBUF_SIZE 128
- #endif
- 注意事项,应为gcc编译有优化,所以RTTOS中的自动初始化函数编译完之后会被丢弃,所以一定要乖乖自己手动添加初始化函数,这个大坑让我迷茫了好久。
- 剩余的移植步骤可以参考。
官方移植文档
- 做完以上的功课整个RTTOS就算移植成功了,没错就是这么简单。
五、两者结合
- 两者结合也比较简单,先起两个线程,注意一定要设置合适的堆栈大小,不然程序能编译,但是不能运行。
/*复制代码- * lcdshow_thread.c
- *
- * Created on: 2020年1月31日
- * Author: master
- */
- #include "lcdshow_thread.h"
- #include "rtthread.h"
- #include "gd32vf103v_lcd_eval.h"
- #include "touch_panel.h"
- #include "lv_conf.h"
- #include "lv_port_disp.h"
- #include "lv_port_indev.h"
- static rt_thread_t lv_tick_tid = RT_NULL;
- static void lv_tick_thread_entry(){
- while(1){
- rt_thread_mdelay(5);
- lv_tick_inc(5);
- }
- }
- ALIGN(RT_ALIGN_SIZE)
- static rt_uint8_t lv_task_thread_stack[1024];
- static struct rt_thread lv_task_thread;
- static void lv_task_thread_entry(void *param){
- while(1){
- lv_task_handler();
- rt_thread_mdelay(5);
- }
- }
- int lcdshow_thread_run(void){
- /* dynamic thread*/
- lv_tick_tid = rt_thread_create("lv_tick",
- lv_tick_thread_entry,
- RT_NULL,
- THREAD_STACK_SIZE,
- THREAD_PRIORITY,
- THREAD_TIMESLICE);
- if(lv_tick_tid != RT_NULL){
- rt_thread_startup(lv_tick_tid);
- }
- /* static thread*/
- rt_thread_init(&lv_task_thread,
- "lv_task",
- lv_task_thread_entry,
- RT_NULL,
- lv_task_thread_stack,
- sizeof(lv_task_thread_stack),
- THREAD_PRIORITY-1,
- THREAD_TIMESLICE);
- rt_thread_startup(&lv_task_thread);
- return 0;
- }
- 在初始化函数中手动初始化LCD相关函数。
/**复制代码- * RT-Thread Components Initialization
- */
- void rt_components_init(void)
- {
- #if RT_DEBUG_INIT
- int result;
- const struct rt_init_desc *desc;
- rt_kprintf("do components initialization.\n");
- for (desc = &__rt_init_desc_rti_board_end; desc < &__rt_init_desc_rti_end; desc ++)
- {
- rt_kprintf("initialize %s", desc->fn_name);
- result = desc->fn();
- rt_kprintf(":%d done\n", result);
- }
- #else
- const init_fn_t *fn_ptr;
- for (fn_ptr = &__rt_init_rti_board_end; fn_ptr < &__rt_init_rti_end; fn_ptr ++)
- {
- (*fn_ptr)();
- }
- lcdshow_init();
- #endif
- }
- 在main线程中启动LittevGL线程。
extern int lcdshow_thread_run(void);复制代码- int main(void)
- {
- int i = 0;
- gd_eval_led_init(LED1);
- lcdshow_thread_run();
- while(1){
- gd_eval_led_on(LED1);
- rt_thread_mdelay(200);
- gd_eval_led_off(LED1);
- rt_thread_mdelay(200);
- }
- return 0;
- }
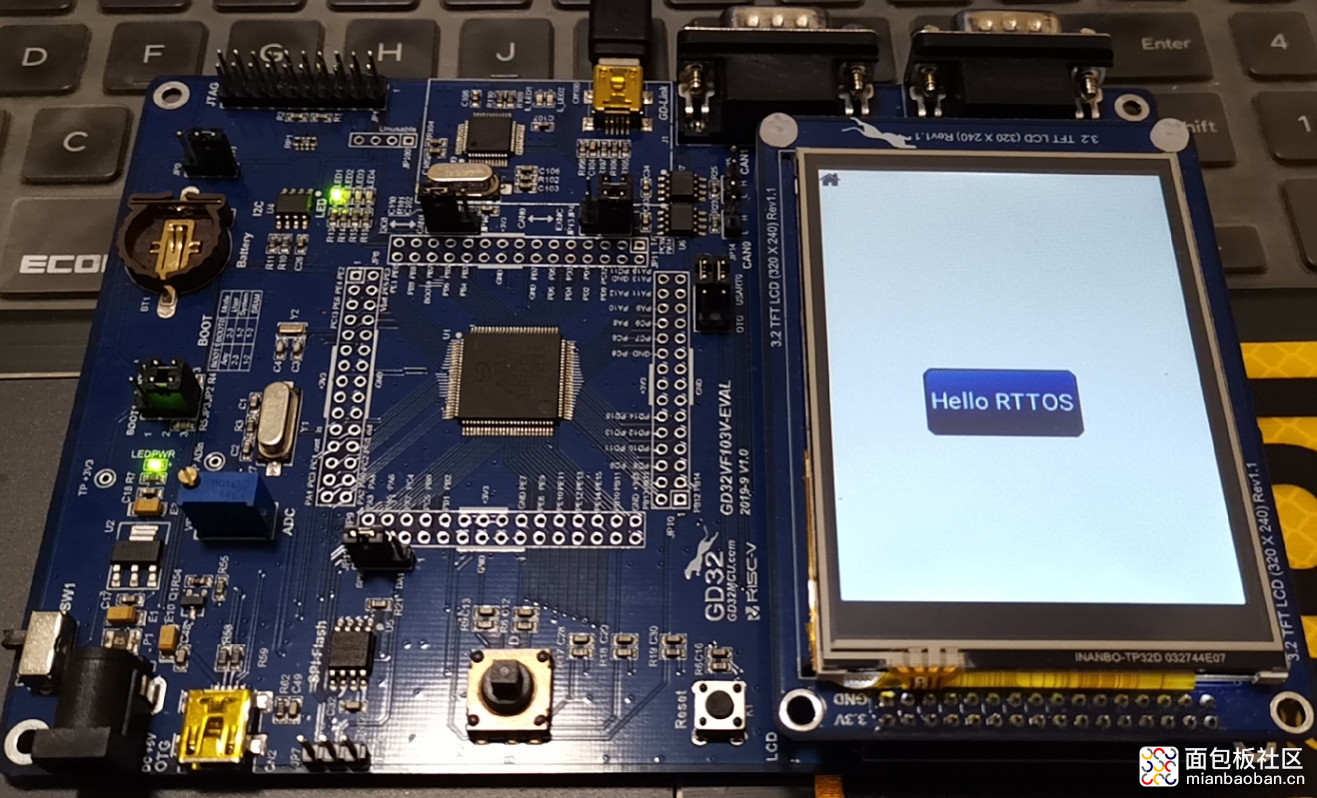
- 完成上述工作,两者就结合在一起了,一个运行在操作系统上的图形界面就完成了。
- 不过两者结合程序占用有点大,把优化开到-O2。Flashz占用126K,RAM占用31K。这样的占用率后续的应用程序也写不了多少。
- 重点提示,两者结合之后一定要给littevGL函数加互斥锁,因为它不是线程安全的。
- 移植这两个东西走了不少的弯路,跳了不少的坑,大多数都是因为gcc编译优化之后的坑。不优化的话程序体积太大。
- 官方给的调试器太慢了,还是Jlink给力。
- 芯来的IED不够友好,没有任何的代码提示,严重影响工作效率,感觉不太好用,可能是我用MDK的时间长了的错觉。
- 移植这两个大家伙下来占用的Flash巨大,这款芯片感觉有点吃不消,好在主频够高,外设够全,性价比够高,还是一款很值得推荐的芯片。
- 还有好多外设没有用到,后续有时间再带大家体验。


 /5
/5 


